Friday, June 14, 2013

The Real Wedding Photos Are Here!

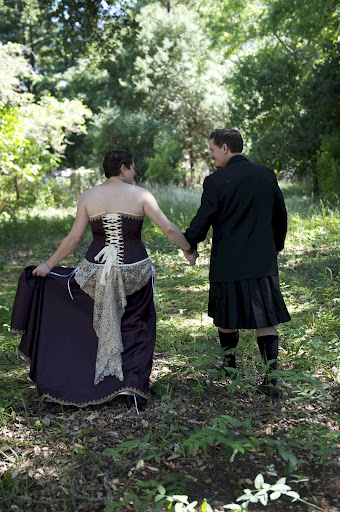
Not that my photos of Elaine's wedding weren't real, but they were just quick iPhone snaps. These are the professional ones taken with real cameras! All photos courtesy of Tom Chown Photography.


When I was back up in SF earlier this week for work, I dropped by Elaine's parents' house for lunch and her mom very kindly said that there wasn't anyone who didn't have something positive to say about her dress, so that made me very happy.


My one regret is that I didn't put in any kind of bustling mechanism for the train at the back...but Elaine managed to dance just fine despite my oversight!


Mr. Cation and I had a really nice dance too, to "The Luckiest," which was the song we had at our own wedding (three years ago next Wednesday!) during our unity precipitate ceremony.

And in a wide sea of eyes, I see one pair that I recognize, and I know...that I am...the luckiest.


In case you weren't following along with me in my wedding dress sewing journey, here are all the previous posts about the making of this dress:

Wedding Dress Progress Post #1
Wedding Dress Progress Post #2
Wedding Dress Progress Post #3
Not Really a Wedding Dress Progress Post
Wedding Dress Progress Post #4
Wedding Dress Progress Post #5
Wedding Dress Progress Post #6, plus my final thoughts on the making of it

Many thanks to all of you who believed in me (including, of course, Elaine and her family) and encouraged me along the way! Lastly, for those of you who don't believe me when I say how nervous I am about SHBs, I've finally got some evidence, captured on film an SD card:

There was a 3 month old at the wedding, and the photographer captured this expression of mine as I looked at the baby. Note the distress, trepidation, and reluctance to approach. I totally didn't even realize I was making this face; I seriously thought I was smiling. Yeah...


Wednesday, June 12, 2013

"[Woman] walks down the street in a [shirt] like that, and you know..."

...she's got to be a Browncoat.


Joss Whedon's Firefly is one of my favorite TV shows ever, if not the favorite. I'm in that guilty group who didn't watch it when it first aired on FOX, and only discovered it too late to show support and keep it from being canceled. Still, I'm forever grateful for the half a season and movie we did get (and also grateful to the nerdy students who told me to watch it). When I started sewing, I thought one day I might make myself a brown duster, or maybe one of Inara Serra's fabulous outfits, but when it comes down to it, the actual likelihood of that is pretty low. So rather than wait for the day that I get my cosplaying act together, I thought I'd declare my love by wearing my heart...well, over my heart.

“Take my love, take my land, take me where I cannot stand. I don’t care, I’m still free, you can’t take the sky from me. Take me out to the black, tell them I ain’t comin’ back. Burn the land and boil the sea, you can’t take the sky from me...” Best theme song ever, or best theme song ever?


I've been loving the galaxy print trend (although possibly it's over already, I wouldn't know) ever since I saw Sew Country Chick's dress for her daughter, and I remembered it again recently thanks to this fantastic sheet dress by Me and My Polar Bear. I knew that there were tutorials online for DIY-ing the look (since I wasn't lucky enough to own those awesome Tesco sheets!), so after some googling, I pulled out my freezer paper, bleach, and paintbrushes and gave it a go.


I used this image as the basis for my Serenity silhouette; it was easy to trace onto freezer paper by loading it up on my iPad and using it as a fake light-box. I cut out the shape, ironed it onto a black t-shirt that I had made, and then went to town with my spray bottle of 1:1 water/bleach solution (I inserted a plastic bag into the shirt first so that the bleach wouldn't bleed through to the back). By twisting the nozzle, I was able to vary the spray pattern to get fine mist (good for layering to cover large areas) or more concentrated streams (to make the "shooting star"-esque lines). All of this took less than ten minutes -- I was working fast and haphazard so that the bleach wouldn't make holes in my fabric! -- and then I rinsed the whole thing in cold water to stop the hypochlorite action. I then went back with a paint brush and made larger splotches in random places. Rinse again, and lastly, I used some acrylic paint to add yellow at the Serenity's butt-end, and white centers and blue-purple edges to the "nebulae." This final step took the longest, as I wanted to make sure that it actually looked believably space-like.

Here's what it looked like after the initial bleach spray, after I peeled off the freezer paper, but before I started adding paint and touching it up. I was a little nervous at this point, because this doesn't really look that cool yet. I didn't take any process pictures after this, unfortunately, because my hands were covered with paint. I always get really messy when I craft, and end up covered with paint or hot glue or sawdust, which makes documenting difficult.
I pressed the whole thing afterwards with a very hot iron to set the paint. I'll let you know how it holds up after washing!


Summary:
Fabric: Less than half a yard of black cotton knit with a pretty high spandex content, which I originally made into a t-shirt when I first started sewing three years ago. At the time, I had no idea how to finish curved edges, so the neckline is totally raw. I left it that way since there's no way I'm finding a matching fabric to bind it with.
Notions: None, but lots of craft supplies!
Hours: It probably took me an hour to make the shirt originally, then about three hours to print, cut, bleach, rinse, paint, and iron the design.
Will you make it again? Not this exact design, since I don't need more Serenity shirts, and definitely not this tee "pattern" since it's not exactly well done...I think I just sketched a shirt shape and started sewing when I made this, and the shameful secret is that I cut this so that it stretches the wrong way! I didn't know about directional cutting and 2-way stretch when I made this, so I'm lucky that it even fits, albeit quite tightly.
Other shameful secret: I also cut the scoop neck way too large/low when I made this (measure twice, cut once was NOT my motto!), so I never wore it. When I was trying to figure out if I had a black tee that I could use for this project, I realized I could just turn it around!  

First worn: For running errands today, but nobody recognized it...boo! :( One cashier at Trader Joe's asked about it, though, so I got to enthuse about how awesome a space western is, and at the end of my little ramble he said he'd check it out if he remembered later. Ehh, good enough.
Total cost: Since I used an old shirt, and these are all supplies I already had, $0! Yay for giving new life to an old garment!
Final thoughts: I love it? Do I really need any more final thoughts than that? How about the fact that when I wore the shirt for Mr. Cation, who also loves Firefly, he was totally floored to find out that I had made it myself! He thought it was a shirt that I had bought, not painted. I'd say that's a rousing success!

Worn with my most Kaylee-like olive green cargo pants from GAP, thrifted for $8 with the tags still on.

Silly anecdote: After I had finished the shirt, I hung it up inside out on a hanger to air out. I went to sleep and when I checked on it the next morning, I totally panicked because I thought all the paint/bleach had faded somehow and made my Serenity silhouette all blurry and indistinct! Then I realized that I was looking at the wrong side of the image, and my heart started again.

Here's what it looks like inside-out. Totally not recognizable as a space ship -- you see why I freaked out. 
Right side out: much more distinct! Phew. 


Last year I made a t-shirt to declare my Star Wars love, so this makes two sci-fi stories that happen in space that I've got me-made shirts for. I still want to make one for Battlestar Galactica and one for Sailor Moon (okay, that last one isn't sci-fi, but her transformation sequence looks kind of like it happens in space, and besides, all the Sailor Scouts are named for planets, and then there's that alternate galaxy, the Negaverse, and alien twins Alan and Ann...okay, I'll shut up now), and that'll nicely round out my media-that-happens-in-space me-made shirt collection!

So...have I convinced anyone else to give Firefly a try? Or at least DIY-ing a galaxy print fabric?

Monday, June 10, 2013

June Stashbusting: DIY Gold Clutch


June's stashbusting theme is containment, i.e. "sewing things to put other things in." While I could do something sensible, like make a reusable grocery bag, let's be honest -- Mr. Cation has gotten so many free bags from business school job fairs, we're probably set for life (and don't even talk to me about pens, notepads, and water bottles with random company names on them!). I'm a two-purse kind of girl (one nice professional one, and one casual messenger bag), so I don't need any more purses. I do, however, need a new clutch for dress-up events, when my giant teacher purse (the professional-looking one) doesn't cut it. My current clutch was a free gift from a Black Friday sale in college, so I think it's about time I replaced it!


While I was in Italy, I stopped by a Euro Village, which I guess is the equivalent of a dollar store. I picked up a bunch of sewing notions for a euro each, as well as this gold placemat for two euros. It was so nice and weighty, I figured it would make for a good clutch. "Oho, but that means you're not stashbusting!" you say accusingly...well, I used stash fabric for the lining! I got this home-dec sample in London on our first anniversary trip, and it was the perfect size and color scheme for this simple clutch.

Step 1: To make the lining, cut out a piece of sturdy fabric a little bigger than your placemat. Fold over and press the edges (and sew mitered corners if you want super neat corners!) to make a rectangle with finished edges. Pin or clip the lining to your placemat and sew all the way around the edge, leaving a little gap in the middle of one short side so that you can insert an elastic later. 
I used clips instead of pins because the punctures show on my vinyl placemat. I wasn't sewing too neatly and veered off at one point and had to unpick; fortunately, the shininess of the placemat distracts from the needle holes!
Step 2: Play around with how big of a pocket/flap you want on your clutch. Fold up the side that does NOT have the gap in stitching; this will be the size of your pocket. The flap with the gap will be the "cover" of the pocket. I settled for not-quite-thirds for my folds. Once you've decided, measure your placemat to determine the center, then make a tiny mark so that you know where to sew your button. Sew on the button. (If I had been making this clutch two years ago, it wouldn't have occurred to me to sew the button before sewing up the sides...and then I would've cursed my lack of foresight, since it's much easier to sew on the button at this point, while it's still flat!) 
Step 3: Find the gap that you left in the "top" flap, insert a hair elastic, and topstitch over it a few times with tiny stitches to secure. (I sewed most of the clutch with a stitch length of 4, to better match the existing topstitching on the placemat, but switched to a stitch length of 2 for the elastic part.)
Make sure that the inserted elastic is big enough to go over the button. 
Stitching done on both the button and elastic! I chose this black button with a gold rim to break up all of the gold. 
Step 4: Sew up the side seams, backstitching at the top of the pocket for extra security. 
Done!

Summary:
Fabric: 12"x18" gold vinyl placemat, similar size 100% cotton canvas. This project is perfect for showcasing a cool fabric that you only have a bit of! Of course, if you were going to make it from a non-placemat, you might need to add in some stiff interfacing to keep your clutch from being too floppy.
Notions: 1 hair elastic leftover from when my hair was still long enough to require such things, 1 shank button from the stash
Hours: 1.5...a nice quick project!
Will you make it again? Considering how few purses I use, probably not for myself, although I might make more for friends if I come across cool placemats.
Total cost: I don't remember how much the home dec fabric was, but the whole project was definitely less than $5. Not as good as free, but at least I didn't have to wake up at 5 AM and fight a bunch of other people at Express before the limited supply ran out! 
Final thoughts: It's funny, in high school and college, all my accessories were silver/stainless steel and cooler toned, but recently I realized that gold/brass and warmer tones suit my coloring better; this clutch reflects this discovery (and all the light in the room). Also, I like that this clutch is actually big enough to put things in! Which, as you know, was the whole point of June's theme.

Experimenting with how much I can fit: my iPhone, my even smaller clutch with my credit cards and ID and cash, and a little makeup thing that I use about twice a year. I bought it when I got engaged four years ago, and I still haven't used it up...
I decided that a picture of makeup in my clutch wasn't a fair representation of what I was likely to actually carry in it...so I replaced it with one of my favorite short story collections instead. Perfect for all of those times that Mr. Cation is groomsmanning/MCing at weddings (because he always gets asked! He's like a professional groomsman and MC at this point) and I'm bored. 
Proof that it still closes nicely even with a book inside!

Saturday, June 8, 2013

Winner, Winner

...chicken dinner and a question for you all:

1) Winner: Congratulations to Aleah of No Time to Sew for winning May's knit stashbusting challenge! She says she's not good at improv while sewing, but if this darling dress is what results from sewing on the fly, well, I say she needs to do more of it! Pop me an email, so we can send you a little something!

2) Winner: Beth of SunnyGal Studios gets to take a crack at tracing that umm, rather intense pattern sheet from Modellina Facile! Let me know what your address is so I can send you your prize and you can get to tracing...because goodness knows, following those lines is going to take long enough.

3) Chicken dinner: It's been a while since I put up any Walnut photos, so have a quick iPhone snap of the closest thing I could get to a chicken dinner.

He had burrowed himself under the covers of the guest bed for his morning nap, and looked totally shocked when I flipped back the covers, put a stuffed chicken leg plushie next to him, and quickly took a picture. 


3) Question: Have you ever put a knit lining into a woven dress? I want to make a sheath dress from the gold lace I have leftover from making Elaine's wedding dress, but obviously the lace is see-through. I've got a cream-colored jersey that would make a nice underlay, but I'm not sure if mixing stretch/non-stretch is a big sewing no-no. Thoughts, sewasauruses?

Friday, June 7, 2013

Sewing and My Personal Sense of Style

Have you seen my guest post over at Seamstress Erin's blog as part of her series on Sewing and Style? She's been doing this fabulous set of interviews with sewing bloggers about how these two things intersect, featuring such sewlebrities as Handmade by Carolyn (one of the first sewing blogs I discovered), American Duchess (one of my favorite costuming blogs), and Meg the Grand (one of my first sewing blogger friends!).

I was so flattered when Erin asked, because, well...if you had told middle school me that one day I would be asked to write about my sense of style, I would have laughed in your face. Actually, no, painfully shy middle school me would have shrunk back behind my book and thought malicious thoughts about punching you because it was probably a joke, like when horrible people nominate the unpopular kid for homecoming queen as a big prank. See, for most of my life, style was a mystery, a je ne sais quoi that cool people effortlessly had, and which I cluelessly grasped at, only to fail miserably. See exhibits #1 and 2:

Middle school me: giant glasses, high-waisted pants (but not in the cool retro sort of way), awful print-mixing and ugly sweaters.  Oh dear. 


Yeah. I was forever being teased at school about my free t-shirts from various academic competitions and mom jeans sent from Hong Kong by my aunt and grandma, not to mention the fact that I wore huge glasses and had no idea what to do with my hair. I know it was the late eighties/early nineties, and everyone was dressing questionably, but even my dressing questionably skills were, um, questionable. When I hit high school and college and finally got to dictate how I spent my clothing budget, my goal was to dress as unobtrusively as possible, which meant buying whatever mass-produced item was hottest at GAP and Old Navy. By the time I started teaching, I had more confidence and a slightly better sense of myself and who I was, so I began branching out into colors and quirky science t-shirts, but even then, my wardrobe was heavily dictated by what was available at the mall and in my price range. So how did I make the leap over to dressing like a cool geek (as opposed to a dorky geek)? Go check it out!

This is cool geek, right? 

Wednesday, June 5, 2013

A Look Through Italian Sewing Magazines

While I was in Rome, I quickly realized that I wasn't going to be able to bring home any gorgeous Italian wool suiting or silk chiffon because of the prohibitively high prices. For someone who thinks that anything more than $3/yd (or $3/thrifted sheet, which translates to less than a dollar a yard!) is pricey...well, let's just say I'm lucky I didn't keel over right then and there in Fratelli Bassetti Tessuti! I really wanted some sewing-related souvenirs, though, and somehow, elastic and zippers don't cut it. They're so...boring. Thankfully, Assorted Notions' blog post about fabric shopping in Rome clued me in on the treasures waiting for me in those ubiquitous green newsstands -- sewing patterns in magazines! I picked up four different magazines while I was there, from different stands:


Let's take a look through them more carefully, shall we? First, Burda Giovane & Easy, meant for the younger set and presumably with easier patterns:

There are a lot of gathered elastic waists, simple shapes, and trendy design elements.
There are other articles about make-up, style, and crafting, like this one with directions for making an envelope clutch.
Pattern sheets in the middle, printed on tissue paper. I like that they take a basic shape and build on it for different looks, kind of like the Feminine Wardrobe book. I really like the first set of patterns.
I want to give 3D a try, as I need a nice basic button-up shirt. 
The instructions include how to take measurements, layout, and basic construction. 
There are some nice line drawings illustrating the steps, which is good because I don't read Italian. 

Then there's the actual Burda Style magazine, which goes along with the site that I used to post on, except that I got tired of reloading my pictures for every make (when you have to load them on the blog, Flickr, PR.com, and BurdaStyle, it gets to be a lot of extra time spent summarizing and linking and loading).

It starts with a helpful article about how the patterns in the magazine are similar to runway trends.  
I love that all the technical drawings are gathered onto one page! 
Patterns like this don't scare me anymore, after my experience with Japanese sewing books. However, I have no idea whether these come with seam allowances or not. Anyone know? 
There was this cutesy section featuring matching mother-daughter outfits. 
Just watch me have SHBs that are all male...my SHB and I won't be able to wear matching star-print skirts!
Little accompanying article about what household objects one could use for stamping fabric. 
Oh hey, random article with recipes for sandwiches! Is it just me, or do other people think that 1) it's weird that there's food in a sewing/style magazine...it feels unsanitary somehow, even though I know that there's no way to get printed crumbs and oil stains onto patterns that are stapled in the middle of the magazine, and 2) who the heck needs a recipe for a sandwich? A pot roast, I understand, but don't you just assemble things on a sandwich? 


I had never heard of La Mia Boutique until reading Assorted Notions' post, so I was quite intrigued.

There's a whole bunch of Grace Kelly-inspired dresses and coats, including the lovely gray outfit on the cover.  
I love the pleats on this dress. Also, Grace Kelly does not do bold colors? All of these are pastels and silvery grays.
Technical drawings. I'm quite keen on trying #8!
I got really confused when I saw the bottom of this page of drawings, until I read further in the magazine...
...and realized that there are patterns for a men's tuxedo?!
And *whew*, if I have a male SHB I can still dress him. 


And lastly, Modellina Facile, which was also new to me. Going by what I know of Italian, this translates to Easy Tiny Models? Since the suffix -ina means a smaller version of the thing?

A whole set of patterns for going to the beach/pool! It's too bad the fabric they chose is so busy...it obscures the cute style lines of the swimsuit.
I really like the look of that blazer.  
The directions don't have illustrations like the easy/teen magazine does. Still, if you either had a similar pattern in your stash, or you were really good and winging it, you could probably figure it out. 
The whole collection, unfortunately displayed on models, instead of technical drawings. That is, it's unfortunate that there isn't a page of all the technical drawings, and not that the modeling itself is unfortunate.

Okay, now here's the fun part -- one of you gets to fake-visit Italy with me by winning your own copy of the last magazine, Modellina Facile! Just specify in your comment that you'd like to enter the giveaway, and tell me what's the most you've ever spent (per yard or per meter) for fabric...let's see how  close we get to that ridiculously-priced cotton-viscose blend in my last post! Also, if you live in Italy, you probably shouldn't enter this giveaway :)

In the spirit of full disclosure, this is what the pattern sheet looks like for the Modellina Facile magazine. Happy tracing!

I'll choose a winner on Friday night. Speaking of things that end on Friday night, have you voted on your favorite knit stashbusting project yet? Go check out the link party; there are some pretty spectacular makes!