Showing posts with label Vintage Top Pattern. Show all posts

Monday, June 9, 2014

Me Made May Wrap Up

I'm back from my East Coast travels! I spent the last week recovering and spending lots of quality cuddle time with Walnut and Mr. Cation (and my bed). Thanks to the constant demands of making sure no students wandered off, I managed to come back without having added to my stash at all. The downside of this, of course, is that I also didn't get to bring back any fabric souvenirs, and I didn't get a chance to meet up with any of the fabulous ladies out in NYC or Philly (I'm sure there are fabulous ladies in Washington DC, too, but I don't personally know any). I also managed to only scrape by with three more me-made days, thanks to the vagaries of the weather and the limitations of what I packed. I appreciated all of your helpful tips about layering, but in the end I decided not to stress about wearing me-made every day.

Days 26, 27, and 29: Refashioned Old Navy dress, new floral top, and coral stripe dress. Hello, growing baby bump!

Final count at the end of the month: 24 out of 31 days, and no repeats!

What I learned from MMM'14:
- Apparently I didn't really stretch myself during this challenge, because that's actually about the same percentage of days I wear me-made items during the rest of the year. Oops.
- Wearing me-made is really easy when one has a lot of knits. Stretchy fabrics are more comfortable and can accommodate my belly more easily than wovens.
- At the same time, I really miss my woven dresses :(
- Most of my favorite me-mades have been either self-drafted or made from free patterns. There's no need to buy a bunch of patterns to have a wearable wardrobe...and yet I keep acquiring more!
- Maybe I should delve into more serious underwear-making? That would give me an automatic easy me-made item every day, and I need some new pairs anyway...
- I wear A LOT of cardigans, and a fair number of leggings. It's time to work on filling those two gaps in my me-made wardrobe! I don't foresee learning how to knit anytime soon, though, and finding appropriate fabrics for cardigans and leggings is going to be a challenge if I'm stashbusting, too. I have a few sweater knits and cardigan patterns in my stash that I can use, but a serious lack of legging material and/or patterns.
- I need to make more skinny jeans/trousers too. I'm going to give myself a pass on this for now, though, since I don't know what shape I'm going to end up.
- I like belts. I don't think I'll take up belt-making though.


I never blogged that second to last tunic-y floral top (although I did post about my seam allowance cutting mishap and fix on Instagram), so I'll do a quick blurb about it now, if only just for my own records. It's the same pattern as the chemise from my hobbit costume, the vintage Simplicity 7842 peasant blouse. This time I used view 2, without any sleeve gathering or crazy ruffles, and it worked beautifully with my rayon jersey for a breezy, cool top.  Since it's so loose and swingy, I figured that it would be a versatile top -- I can theoretically wear it unbelted, belted at the empire waist during pregnancy, or at the natural waist post-pregnancy. I had originally made it long enough to be worn with leggings as a tunic top, but unfortunately it shrank in the wash and will have to just be a regular top. I usually don't pre-wash my knits since they rarely shrink, but the amount of rayon in this fabric made it the exception. Oops. And I passed my textiles class with flying colors, too!

I was trying to take better pictures of this top when I wore it yesterday, but that didn't really work out so well.
But hey, at least I blogged it before I forgot about the making of it!

Summary:
Fabric: 1.5 yards of very soft, drapey, thin rayon jersey. I originally bought it at Fabrix two years ago with the intention of making it into a dolman sleeve top, but never got around to it.
Notions: A piece of 1/4" elastic salvaged from a RTW top that died, and a tiny scrap of fusible interfacing to fix my snipping error!
Hours: Less than two...no seam finishing, no sleeve-setting, so fast! I did hem it, though, as lately I've been a little ashamed of the unhemmed edges on my earlier knit makes. Nothing fancy, just flipped it over and straight stitched (I know! Gasp! But I don't like how the zig-zag stitch looks and it's not like this hem needs to stretch!).
Will you make it again? Maybe? I can't really predict my need for peasant tunics in the future.
Total cost: $4.50
Final thoughts: If I pair it with flared jeans, it looks really hippie? That's probably the most I've thought about this otherwise unremarkable top. It's serviceable but not my favorite garment. But not everything I make can be (or needs to be) THE BEST THING EVER, so I'm totally fine with that!

Sunday, May 18, 2014

How Long Can I Get Away With This?

I'm still spending some of my time in that major Egyptian river regarding my slowly changing body, but it's been really helpful reading all of your encouraging comments about viewing such changes positively. I'll be honest, I'm scared of never being able to wear my geeky dresses or fun costumes again, especially after spending hours of my life getting them to fit right. Is that superficial or what? Then again, my style has really become part of my identity, and even more so as a science teacher. Have you seen this article about gaining status by wearing non-conformist clothing? I feel like that's what I do in my Ms. Frizzle-esque teacher persona, enough so that students actually mentioned it in their year-end evaluations. A loss of that part of me (even if it's just an outward part! inwardly I'm still just as much of a dork as ever), coupled with trying to decide if I should return to school after the standard three months of maternity leave (lose my career identity to motherhood too??), and I've had lots of thinking and processing to do lately.

In the midst of all of that, I've still had to get dressed every day. I quickly discovered that the downside to having sewn tops that perfectly fit my small bust meant that about half of my me-made tops immediately became unwearable (unless I was purposely going for the bursting-out-of-my-blouse look). I had to have an emergency sewing weekend where I just churned out several quick tops that worked, and would continue to work as my body changes. Thankfully, loose, slouchy, or swingy tops are in right now, and of course I've no shortage of stash fabric!

Day 9 of Me Made May.

Anyway, almost exactly two years ago I made a version of Simplicity 8986; that top ended up being donated even after fixing the facing issue, just because the boxiness + polyester wasn't worth dealing with. I pulled it out again to make View D, which despite its very 90s envelope art is perfect for a no-fuss, kimono sleeve, trendily shapeless top. I wanted to add some visual interest, though, so I modified the pattern to include a contrast panel in front. Joining the bias-cut woven rayon to the stretchy knit rayon resulted in some weird drapiness at the seams, and the knit neckband got wonky at the join, but frankly I've seen a lot worse in RTW tops and I'm just glad to have a wearable top. It got a lot of positive comments when I wore it to school, and as we all know, teenagers have no qualms about telling you exactly what they think, so I think I'm good. Also, I discovered after having made it that it's pretty much just like this top-rated Modcloth tee, so that's nice.

It's really just a giant tee shirt with a trapezoid in the middle!

Summary:
Fabric: 2/3 yard of white mystery knit (feels like rayon with a healthy amount of lycra, since it's got decent recovery) and a remnant from this dress, both from the stash.
Notions: Just thread.
Hours: Less than two, from cut to finish. I love how knits require no seam finishing (I did pink and topstitch the rayon portions to control fraying), and kimono sleeves require no setting in, and I can do knit neckbands in my sleep now. How's that for instant gratification?


Will you make it again? I don't have anymore rayon scraps large enough to do this exact look, but I do like the idea of mixing prints with solids in simple tops!
Total cost: Less than a dollar, since the knit was original purchased in bulk from Michael Levine Loft, and the rayon was a remnant.
Final thoughts: I'm pleasantly surprised that mint is still in two years later because I love this top, despite its being not at all quirky. I think it's because I like to be able to prove that despite wearing odd-ish me-made clothing most of the time, I am still capable of identifying what's in fashion. It has no mental baggage attached since it was so easy to make, and it's gratifyingly attractive to wear while being loose enough to accommodate quite a bit more potential belly.

Seriously, how is this fabric still trendy even though I bought it two years ago specifically because it was trendy then?
And yet it is. Not that I'm complaining. 

I'm going to try to hold out as long as I can before conceding to actual, "official" maternity tops. I've got at least a few more non-maternity garments that I've made recently and been wearing...I hope they'll last for at least another couple of months!

Tuesday, September 11, 2012

Steampunk-Flavored Vest


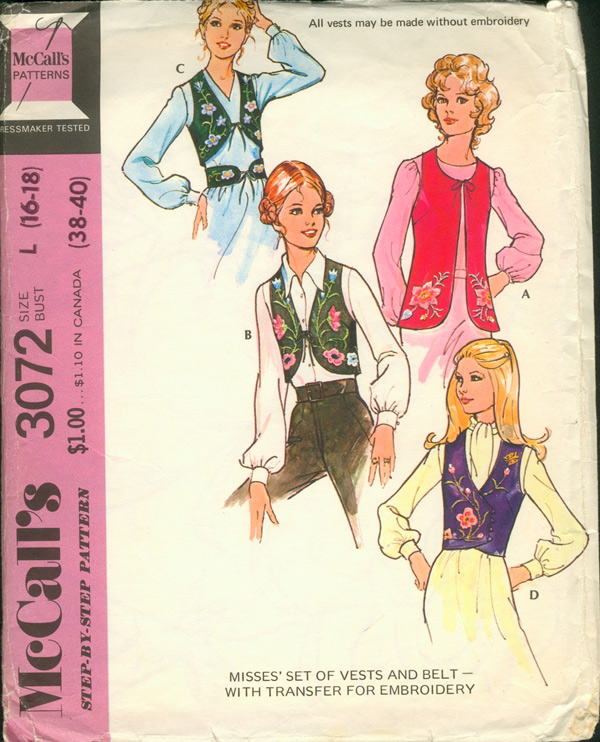
I guess I couldn't count on my streak of practicality lasting; after making something like five normal tops, I couldn't resist jumping back into costumes for a bit. After getting back to TCOCC, I surveyed the state of my sewing room (bad) and decided that I needed to get rid of some of the stash. I still had about a third of a curtain left after making my steampunk skirt, and I had thrifted a 70's vest pattern (McCall's 3072), so obviously the right thing to do was make a vest to go with my whole ensemble.

Vintage Pattern Wiki's copy is a large, mine was a
medium (bust 34-36). I used View D.
This pattern was not the best place to start for making a very fitted vest. It's already meant to be a loose-ish vest, and my copy was too big to boot. I ended up cutting my lining first and using that as a muslin, then transferring all my changes and cutting out the shell and sewing them together. In the end, it was only a matter of taking in the side seams by about an inch and a half (meaning there were six extra inches of ease!) under the arm, tapering to about 3/4" at the waist, bringing in the center back seam by about an inch at the top to get rid of the gaping, and taking in about 3/4" at the back shoulder, tapering in to 1/2" at the neck.  To make things extra fun, I also cut the back on the bias so as to get the chevron effect. I really like how it turned out, though, so it was worth the effort of pinning and fussy cutting. I also decided to go with regular buttonholes instead of the corded loops that the pattern called for, mostly because I couldn't be bothered to make corded loops.


See, it's a real working pocket!
This vest also marks my dubious entrée into the world of tailoring, and gosh what a botched debut it was! Kind of like Kaylee and her layer cake dress, only I didn't even have an extensive knowledge of machines to enchant the old men with. So yeah, I have a lot of practice ahead of me before I can make a beautiful welt pocket like Poppykettle. Maybe it would help if I were an engineer. Or, you know, I could just be more meticulous in my marking and stuff. At any rate, I'm still pleased as punch that I've got a place to put my pocketwatch now! I'm also exceedingly pleased with my (useless) epaulets and the buttons I used; they echo the buttons I used on my steampunked Nerf gun.
Seriously, that welt pocket is so ugly. That's why I made the buttons waaaay larger, so you can be entranced by the prism...

I think it's official...I am in love with chevrons!
Summary:
Fabric: Less than a yard of 60" wide 70/30 viscose-poly blend curtain fabric for the shell, 100% cotton lawn for the lining
Notions: Three large buttons, two smaller buttons for the epaulets, a snap to keep the vest from gaping
Techniques: Double welt pocket
Hours used: Eight, what with the muslin-ing and welt pocket and all
Will you make this again? I don't think so, unless I decide I need another fitted vest in a slightly more wearable fabric?
Total cost: about $2 for the buttons and lining; the curtain fabric was free
Final thoughts: I'm pretty happy with the vest, and willing to overlook the ugly pocket welts and the slightly pointy darts, mostly because it's just a costume piece. I do think it really helps tie the whole costume together, and should I decide to go to a winter event, the vest will help with the warmth thing. As it is, it was pretty ridiculously warm to wear, even just briefly for pictures in our air-conditioned apartment. Oh, and when I asked my husband what he thought, he (wisely) asked first, "What look are you going for?" When I said it was for my steampunk outfit, then he said it was just fine and worked well for that purpose. I mean, did he think I was going to wear a vest with a pocketwatch out in public for real life?! Actually, knowing me, that's not entirely out of the question.

Next costume piece to finish: something hobbit-y for Second Breakfast on September 21st...anyone in the LA area want to join me next Saturday to celebrate Bilbo's and Frodo's birthday?