Showing posts with label Geekery. Show all posts

Tuesday, March 30, 2021

Eowyn, Shieldmaiden of Rohan

If there were awards for "The Movie (Series) That Spawned the Most Cosplayers/Costumers," I'm pretty sure that Peter Jackson's Lord of the Rings trilogy would be a strong contender. Goodness knows, it was instrumental in getting me started on my own costume-making journey! I remember when we first heard that FotR was coming out, I made "elven" capes for my best friend and another friend to wear to the movie. Because I was a poor college student who had no idea what I was doing, I bought a couple yards each of two different colors of the wispiest acetate lining fabric, then sewed two half-circle capes with unfinished, fraying seams, the rippliest, most uneven hem in the world, and I was so proud. 

But these capes made it to NZ, to the actual filming location
of the Nazgul riding past the hobbits hiding under tree roots!

In the years since then, I've made myself a number of Middle Earth-related costumes: a green Eowyn dress (from sheets), a hobbit maiden (from sheets), a Galadriel dress (not from sheets), an Eye of Sauron/Barad-dur headdress (from a balloon), a Party King Thranduil costume (that Lee Pace then tweeted!), a Smaug fancy dress outfit, and a Denethor + Pippin look with my daughter, and that's not even counting all the costumes for other people or Middle Earth crafts I've done. But the unifying theme for all of these costumes was a lack of screen-accuracy. Don't get me wrong, most of them were certainly recognizable as their characters (except maybe Smaug), but my modus operandi is very suited to community theater costuming: get the idea across as cheaply as possible, and assume that the audience will be standing several feet back. Also, using recycled/thrifted/secondhand materials means that finding screen accurate fabrics is nigh impossible. 

But since this is the Year of the Ring, I wanted to make one of my dream cosplays, Eowyn's camp dress, as close to screen-accurate as possible, while still keeping to my not-new-fabrics pledge as much as I reasonably could. 

From the invaluable Costumer's Guide.

I started with the inner layer, her cream-colored "chemise." I reused the bodice of a toile I made for my pirate coat as my base, since the unbleached muslin worked color-wise. For the neckline that would show above the brown bodice, I used a cream-colored jacquard with swirls that I had leftover from a millinery class. I then treated that fashion fabric layer like a facing but flipped it to the outside instead of the inside, effectively finishing the neckline edge, then zigzagged the raw edge down since it won't be visible. Rather than sewing the tiny tuck lines, I opted to keep things simple and just sewed parallel lines in gold thread. I think it works fine visually while saving myself the annoyance of trying to actually make such tiny tucks and keep them even.

It fits better on me than Cecily.

How many shortcuts can you spot in this picture? ;)


The sleeves were essentially really long bell sleeves with a slit cut up the center to the elbow (see this diagram, except my slit went up higher and the overall triangle shape had a wider base) that I narrow hemmed by machine. I made them out of cream-colored crinkle cotton that I inherited from a friend's stash. For the braided ties, I ended up purchasing new trim from Jo-Ann Fabrics, but they only had bright white so I had to coffee-dye them. I accidentally left them in the coffee too long, so they're darker than I would like, but oh well. The cream-colored underskirt is a half-circle skirt made from, surprise surprise, a thrifted cream-colored sheet. The opening for this whole underlayer closes with hooks and thread loops down the front. 


Here you can see how dark the braid turned out, as well as how nicely lettucey the crinkle cotton hem is. 

For Eowyn's brown bodice and corselet, I used a thrifted dark brown cotton sateen sheet from my stash (basically if I'm at the thrift store getting kids' clothes and I see a solid colored cotton sateen sheet in good condition, I'll buy it for costuming purposes) as the fashion fabric. The bodice from Simplicity 4940 (now sadly OOP) was a good starting point, although I had to draft my own cap sleeves. For the bodice neckline and corselet trim, I toyed with the idea of custom embroidery, but ended up going the easier route of machine-sewing a line of decorative stitching and then hand-sewing gold braid to dark brown bias tape, which I then used to finish the edges of said garments. The cap sleeves had the same decorative machine stitch + gold braid combo and were self-lined, then the armhole was finished with bias tape. 

Dark brown bodice, made with Simplicity 4940. 


Close up of the trim. 

Inside: I lined it with more sheeting and used black bias tape to finish the armhole.
You can also see my hand stitches at the neckline securing the braid.  


The corselet was drafted according to the instructions on Koshkathecat's absolutely invaluable costuming page; I first used those instructions for my Bellatrix corselet and mentally bookmarked it for the day when I would actually make Eowyn, and now I have! I cut one layer from cotton canvas and boned it with zip ties, then cut two more layers: from the dark brown sateen, and from quilt batting remnants. I quilted these last two layers together to get the distinctive diamond pattern, then basted all of it together and finished it with the trim pieces. I was so glad to have borrowed a tabletop grommeter from AJ of Confused Kitty Sewing, which made the whole last step so much easier than hammering everything in by hand! I did have to purchase brown rattail cord for the lacing as well. 

I'm so pleased with how the quilting came out! 

Secret secrets revealed to you: I had to add a little bias tape patch at the top of the back opening so as to wedge in a tiny piece of (ziptie) boning since my original piece wasn't long enough, and I'd already sewed on all the trim. 

All the pieces together!

The (slightly lighter) brown outer skirt was again made from a thrifted sheet, in a half-circle using my TNT pattern, Simplicity 5006. Seriously, I use that skirt pattern for EVERYTHING, from Mulan to Ursula to Weaver Girl to theater costumes. Then it was just a matter of scouting an appropriate location; Coyote Hills Regional Park, with its eponymous hills and giant mounds of rocks, was absolutely perfect. My photographer, @captured.by.shirelle, did an absolutely fantastic job of capturing the whole mood and look of Eowyn, White Lady of Rohan, "fairest lady of a house of queens...standing straight and proud, shapely as a lily...as if wrought by elf-wrights out of steel."


Summary 

Pattern: Simplicity 4940 for the outer bodice, Simplicity 5006 for the skirts, self-drafted for the sleeves, chemise bodice, and corselet

Fabric: Two twin-sized cotton sateen sheets for the skirts, half of another one for the outer bodice and corselet. Also 2 yards of 60" crinkle cotton for the sleeves, and half a yard of muslin for the chemise bodice, remnants of rayon jacquard for the neckline of the chemise, and remnants of cotton quilt batting for the corselet.

Notions:  Seven yards of gold braid, four yards of white braid, five yards of brown rattail, three packs of dark brown bias tape, a handful of brass grommets, a separating zipper, and several hooks.

Techniques: Uhh...self-quilted fabric using a walking foot? Does that count as a technique?

Hours: Well, I started working on this last December, then took a break to finish up Weaver Girl, so all in all I'd say it was two months of my kind of work hours, which is to say an hour here or there after kids are asleep, if I don't have other work to do for school. There was also so much hand-sewing of trim that I did in five minute snatches while kids were playing-but-not-arguing-yet, so it's really hard to say. I want to say at least 35 hours based on rough estimates of how much time similar pieces took pre-kids. 

Total cost: $65, but that includes $20 worth of gold pens for the flag, and then all the new trim I had to buy was pretty costly even with coupons. The main fabrics, though, cost less than $10. 

Final thoughts: I've always loved strong female warrior characters, from Mulan to Alanna of Trebond to Aerin Firehair, so it was pretty much a given that I was going to love Eowyn the first time I came across her. It's just a nice bonus that her costumes in the movie were brilliant. Eowyn is also extra meaningful to me because of where I was in life when I first read LOTR. Growing up, it was always drilled into me that going into STEM was the only acceptable career path, and my passion for art and making things was not something to be celebrated or pursued seriously. When I got to college, for the first time I was away from home and somewhat free to make my own choices; I switched from a biology major to an art major just as The Two Towers came out, and I was struck by her fear of being caged, her desire to make her own path, one that was different from what was expected of her, and ultimately her seizing the opportunity for glory in battle as Dernhelm. I saw her act of secret rebellion as akin my decision to choose my own major, but unlike Eowyn I did not kill a foul dwimmerlaik. Instead, I saw that a huge public research university was probably not the best place to get an art degree if I wanted to actually learn skills (and not just do weird avant-garde pieces), so I switched back to biology. I did, however, decide to be a science teacher instead of a researcher, which ultimately meant that I had the opportunity to get my theater costuming feet wet via high school drama productions. Later, once I became a more seasoned teacher and didn't have to spend every waking hour thinking about lesson prep or grading, I was able to make time for actual sewing, drafting, and costuming classes at a local community college. In a not dissimilar arc, Eowyn was able to make peace with her role and place in society and chose to be a healer. Both of us found a compromise in our lives that eventually brought peace and joy, not a feeling of being caged. All this to say, making and wearing this Eowyn costume was a dream come true, and a fitting conclusion(ish beginning to a new story). 


Oh! And the flag of Rohan! That was a ridiculous process of experimentation that I documented on my IG highlight, should you care to see all the wibbling I did about making it (and the rest of Eowyn). Tl;dr if you don't want to watch the story: I did an Elmer's glue resist in the outline of the Rohirric horse on a pillowcase, then painted it with watered down acrylic paint and used various gold paint pens to outline the horse. I used vintage bias tape to secure the flag to a spear (made from foam, duct tape, and a wooden dowel) leftover from a drama production. I hadn't even really planned to make it, but when I was planning for the photo shoot I realized that I didn't have a sword and I really need some kind of prop to hold or else I don't know what to do with my hands...I'm so glad it turned out as well as it did!


Thursday, January 9, 2020

A Very Star Wars Halloween

Raising Small Human Beings is oftentimes an exercise in simultaneous frustration and amusement, and the selection of Halloween costumes is a prime example. When SHB#1 was three, he was obsessed with zebras, so he wanted to be a zebra for Halloween. That was fairly easy to make, and the fleece zebra suit I made for him got plenty of wear afterwards for pretend play. The next year, he was into construction vehicles and dinosaurs, so he alternated between wanting to be a pteranodon, a stegosaurus, or a "construction stegosaurus." I managed to convince him that a stegosaurus would have a hard time fitting a construction vest over the plates on its back, and together we settled on his being a "construction zebra" since the zebra suit still fit. I had to laugh when I saw his class picture: so many store-bought superheroes and princesses, and a lone zebra wearing a neon vest.

Here's a picture of the zebra costume, with a red cape so that he could be Superhero Zebra (4yos are nothing if not literal) for his third comic con. His stuffed zebra is also wearing a tiny red cape so that they can match! I was dressed as Dark!Rey. 

This past year, he was into the Octonauts for a good deal of it, so he went back and forth between wanting to be Tunip or Kwazii. I was despairing about finding teal or orange pants at the thrift store when he suddenly, in the last month before Halloween, got super into Star Wars, and decided he actually wanted to be Darth Vader. SHB#2 wants to do everything big brother does, so she immediately declared that she, too, would be Darth Vader (despite my best efforts to convince her that she would make an adorable Ewok). SHB#1 then decreed that we should be a Star Wars family, so I had to be Rey and Mr. Cation had to be Luke Skywalker. I can't lie; since Star Wars was one of my first fandoms I was super proud of the kids' geeky decision and secretly thrilled to have an excuse to make all these cool costumes!

Both kids already had black pants, and finding black turtlenecks at the thrift store was easy, so then it was just a matter of figuring out how to make Darth Vader's iconic chest plate, belt and cape. I thought about trying to applique all the pieces onto the turtlenecks, but that sounded like waaaaay too much work, plus I wanted them to be able wear the tops for regular, non-costume things. In the end, I decided to cut all the little buttons and "lights" out of tape and put them on black felt that I had leftover from a school costuming project. Gray duct tape worked for most of the details, and for the red and green bits I just used Sharpie to color over masking tape. After I showed the completed chest box to SHB#2, though, she immediately tried to take off all the "stickers," and I realized I would need to find a way to make them more durable to survive kid handling. I bought some iron-on vinyl and put that over the chest box and belt pieces and it worked perfectly; the tape seemed to really meld into the felt and it was easy to stitch it onto some scraps of black fabric and ribbon in order to allow it to all be tied on. The capes were just half circles cut from stash black jersey knit and sewn on with some elastic to gather the top and allow for easy slipping on over the kids' large heads.


Finished costume, a little worse for wear after being stuffed into a backpack, but still holding up fine! 


On Halloween, with their matching lightsabers. SHB#2 absolutely refused to wear a DV mask. 


Since SHB#1 hadn't specified which version of Luke he wanted Mr. Cation to be, I went with the easiest to put together, the ANH Tatooine Luke. I borrowed a gi top from a friend, and then it was just a matter of wearing his own khaki-colored linen pants and a dark brown leather belt with the buckle turned to the back. I also wrapped some strips of brown linen around his calves to mimic Luke's puttees.

Rey was the last costume to come together, even though I've been working on her the longest. I was originally planning on making her Resistance outfit to Rebel Legion standards, but stalled when I realized how difficult it was going to be to thrift the right fabrics. I'm committed to making my costuming greener where I can, and if that means not being screen accurate, then so be it. Costumes already get so few wears, I'd rather not add to their environmental burden by buying new fabrics for each one. Anyway, a year ago I thrifted some long brown pants; I cut off the bottoms and used those to make the kneepads. The shirt is made from a tea-dyed large white polo shirt, and the belt and wrist cuff were purchased from a seller in the Rey FB group. I found a very 80s grey wool herringbone coat at the thrift store for $10 that I initially thought might work for Rebel Legion approval, but upon closer examination, I realized that it was actually black and white herringbone, which together looked gray from far away. At this point I was too disappointed to continue work on Rey, so I stuffed everything into a garbage bag for a year.

From (a galaxy) far far away, it reads as gray, but up close it's pretty obviously black and white ;__;


A year in a naughty bag gave me time to get over the sting of disappointment, and when I pulled the coat back out, I felt okay about making the vest to complete our family costume. Thankfully, I still had the pattern pieces that I'd drafted and the mockup vest, so after what felt like miles of seam ripping to take apart the coat, I managed to get the pattern pieces to mostly fit.

From my Instastory. See the welt pocket I had to work around on those top pieces?

I ended up using a bunch of the scraps to practice the closed blanket stitch that's used on the edges of Rey's vest.
Why I chose to put in the time for that tedious that detail for a non-RL-approvable vest is beyond me. 


I did have to fudge a little by sewing some buttonholes closed, but it worked out in the end. I lined the inside of the vest with gray cotton flannel, which, with the interfacing that was already fused to the wool, made the vest stiff and heavy enough. I did reinforce the center front edges of the collar with some ironed and stretched horsehair braid, a technique I learned from my evening gown class with Lynda Maynard. After that, it was just a matter of adding the hand-sewn closed blanket stitch to all the edges. That took forever, and I only finished it just before we had to leave for trick or treating!

See that buttonhole I had to sew up right next to the side seam? Also I probably should've done something about the bulk at the shoulder from all the layers of wool+flannel+batting+turned seam allowances, but at that point I no longer cared. 

Look at all that time I spent carefully doing all that ladder-stitching by hand!
Gray flannel lining and wool held together by closed blanket stitches, and also all the whipstitched edges on the shirt.
So. Much. Hand. Sewing.

And here we all are! 


During trick or treating, it was so fun to hear people react to SHB#1's costume -- "Aww, a tiny Darth Vader!" -- and then to hear the even more excited reaction when they saw SHB#2 come up to the doorway right afterward -- "OMG AN EVEN TINIER DARTH VADER!!!" -- because obviously the smaller something is, the cuter, right? Only a couple people realized I was Rey, and not just somebody with somewhat odd clothing choices, but Halloween is really about the kid costumes. I would like to finish making my knock-off Po-Zu Rey boots at some point in the future, but in the meantime I'm just glad I finished this vest so that I could remove at least one UFO from my costume list and make my son happy at the same time.

Then again, maybe his happy face is due to the fact that he just ate a piece of his trick or treating loot. 

Friday, November 8, 2019

A Glamorous Loki-Inspired Evening Gown


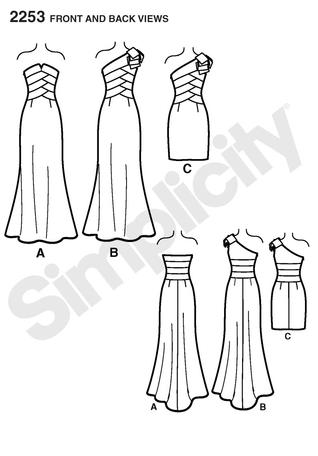
I never thought that having a second child would result in my finally making all my dream cosplays, but something about having another drain on my energy/time made me think "oh f*** it, things are never going to ease up so I might as well just do it now." Since I've had BBG, I've done my Asian-inspired Wonder Woman, victorious Mulan, and many other dream cosplays, and Glam Loki is another one! Loki is my favorite MCU character, both for his sartorial style and his snark+angst. (what can I say, I love me a well-dressed antihero...see also: Thranduil, Ballister Blackheart, BBC Sherlock, and Prince Zuko). I did an Asian-inspired version of Loki for the Thor: Dark World movie many years ago, but wanted to do another one with more of a nod to the overlapping torso pieces on his original Thor costume. I bought Simplicity 2253 many years ago with an eye toward making a glamorous genderbent version of Loki, but just never had a reason or enough courage to tackle the 30+ pieces that I would have to cut out...until this year.

I made view A.

I've been taking fashion design classes at Canada College for oh, six years now, and one of my favorite professors is Lynda Maynard: she's hilarious and so knowledgable and I just like her teaching style. I've taken all her classes (French moulage, pants drafting and construction, bustier, and copying RTW) and was kind of bummed when I had finished them all, so I was super excited when it was announced that she would teach Evening Gown Construction over the summer. I was a little less excited when I found out that we would be making a strapless gown, as my only foray into strapless gowns was not my favorite. I kind of had this idea in my head that only certain body types could pull them off, and mine was not the right kind; spoiler alert: I was wrong. Thank goodness for education and expanding ones' knowledge, right?

I have not yet, however, expanded my knowledge when it comes to doing hair for cosplays. 

Besides learning lots of tips and tricks for working with tricky fabric (velvet! chiffon! sequins! things cut on the bias!), I also learned that the key to making strapless gowns work (i.e. stay up without lots of periodic tugging) is having a well-fitted corselet underneath. A corselet differs from a corset in that the former is meant to be a close-fitting garment that conforms to the curves/shape of the wearer, but is not meant to change one's measurements or silhouette. A corset, on the other hand, is a garment that is specifically worn to change the measurements or silhouette of the wearer (think wearing an S-bend corset to get the fashionable Edwardian silhouette, or any number of literary heroines tightening their corset laces to fit into their gowns). Having worn both, I can say that they can both be comfortable if fitted and made correctly, but they definitely serve different purposes and the latter is certainly more restrictive (but not in a painful way, unlike all those corset myths about women removing ribs and fainting all over the place!). In a lot of ways, the corselet is similar to the bustier; the only real difference is that a bustier is meant to be a standalone garment, so it has an additional fashion fabric and lining layer.

Front view of the corselet on Cecily, who is close to my measurements but not quite the same. 

Back view.

Side view. 

My corselet was made from unbleached muslin, but any tightly-woven, thin, stable natural-fiber fabric can be used; other recommendations were cotton batiste or bobbinet. Essentially I made the lining pattern of my dress twice, then stitched the two layers together, sandwiching the steel boning in between. I also added a grosgrain waist stay and decorative lace and the whole thing closed with lingerie-style hook-and-eye tape.

Did it bother me slightly that the hook and eye tape was bright white and the muslin was unbleached ivory? Yes, yes it did. 

You can see the boning placement (and my humongous seam allowances) really well in this backlit picture. 

The finished corselet is then hand tacked at the top only to the neckline of the evening gown. Because the corselet is fitted perfectly to one's body and lengthened by an inch to combat the inevitable settling over time, it serves to hold up the weight of the entire garment and no awkward tugging up of the gown is required! I know this is true because I wore this gown for a whole day at Silicon Valley Comic Con and did not once fear a costume malfunction.

Don't judge my hand stitching please. 


Once I made the corselet, I had to cut out all the pieces of fashion fabric for the gown. It was both more tedious than I thought it would be (all those pieces, but x2 or x3, because I underlined the black twill with silk organza, and some of the pieces had an additional lace or gold taffeta or green velveteen layer!) and easier (the actual construction is easier than it looks; no weird pivoting around angles because of the order in which it's sewn). The back closure is a hand-picked zipper which disappeared beautifully into the green panné velvet of the skirt and the black and gold lace of the bodice.

Tiny prick stitches!

I did run into a problem that turned into a happy accident when it came to piping the front upside-down V. Since I was trying to avoid buying anything new if at all possible, I used some gold lamé bias tape that I had leftover from a previous project. After I sewed it in, it looked too flat, so I had the (I thought) brilliant idea of plumping it up with some white pipe cleaners I had. Unfortunately, since I was inserting the pipe cleaner after sewing, I poked a hole through the fragile lamé, right at the center front! I tried to stitch it down with some gold thread to keep it from getting worse, but it just made the issue more obvious because there was a giant lump of messy handstitching. On the day my gown was due, I had an epiphany and realized that I could cover it up with the gold necklace I'd originally bought to wear with this gown. I found it at a thrift store and thought it perfectly echoed the little curved gold piece of Loki's first outfit, so instead of wearing it, I detached it from the chain and sewed it to my gown. The concave back fits perfectly over the ugly bit on my gown and I honestly like the look better than my original plan.

Look at the shameful bunch of hnnnghhh in the middle! You can see here that I already started trying to cover it up by hand-stitching a little piece of of green material over the mess.

Glorious. Like it was meant to be there. 


Once I finished the gown, I decided the skirt portion needed something more in order to bling up all the green, so I added gold chain "draperies" to the hips. I'm toying with the idea of making some kind of necklace that has similar gold chains draping over the shoulders to visually break up the expanse of neck and shoulder skin. When I wore it at SVCC, it felt like it was missing something and maybe that would help visually tie it all together? Or maybe it'll just look too busy?

I measured out two sets of four chains in increasing 2" increments, then attached them all to jump rings that I sewed to the center front point. 

On the back, I attached them where the lace panels end. 


To go with the dress, which was only subtly Loki-ish, I decided I needed to make his signature humongous horned headpiece. Googling and Pinteresting (I know the former is a real verb now, but the latter definitely isn't) turned up Red Shoes and Wine's Burlesque Loki, so I followed her brilliant lead and used a sawed-up floral heart to make the horns. After carving and sanding it down, I used wood filler to coat it all, sanded that down too, and painted it with a base layer of brown acrylic craft paint, several layers of gold, and finally a matte polyurethane coat to seal it. I cut out the rest of the headpiece from craft foam and painted it the same way, then hot-glued it all to a flexible headband. To make sure that the horns wouldn't detach themselves suddenly, I used two tiny nails to poke through the craft foam and into the styrofoam. The flexibility of the headband meant that I could bend it around my forehead enough to get it to stay, as long as it wasn't too windy, I didn't look too far down, or turn too suddenly. Since Loki would definitely have some blinging huge rings, I purchased the largest green and gold beads (I don't know if there's a better word for them; they're flat and have the holes situated such that they would be perfect on a bracelet or choker) I could find and strung them on black elastic cord to make matching rings. I borrowed some gold cuffs from my sister, and of course, I had to break out my Chitauri scepter from my Asian-Loki in order to complete the whole look. Thankfully, the batteries were still working and all I had to do was touch up some paint.

Accessories! The gold at the bottom is a purse that I ended up not using. 
The staff looks pretty good still, even after hanging out in a closet for several years!

Summary:
Fabric: Muslin for the corselet; black twill (Han Solo vest remnant), black silk organza (secondhand from the Canada College free shelf), black and gold lace (remnant from Dark Garden, purchased during a trunk sale), gold poly-taffeta (inherited stash), and green poly-velveteen (inherited stash) for the bodice; stretch green panné velvet (leftover from McGonagall) for the skirt
Notions: Cream-colored lace hem tape and bias tape (inherited stash), pink grosgrain ribbon (FIDM store), spiral steel boning (leftover from Elaine's wedding dress) and hook-and-eye tape for the corselet; gold chain, zipper, and nylon horsehair braid for the dress
Hours: So. Many. I made a test muslin of the corselet as well as the dress, then there was the actual construction of the whole thing. Basically it was my main project for the eight weeks of class. I'd estimate upwards of 50 hours.

My muslin fitting of the pattern. 

How accurate is it? Seeing as how it's my own imagining of the character, it's extremely accurate, hah! But in all seriousness (as serious as one can be about a cosplay outfit), despite the upside down overlapping torso pieces (the original outfit is Vs; mine are flipped the other way because that's what the pattern was), the color scheme was enough that when I wore the gown (sans headpiece and staff) for the class final showcase, people asked if I was meant to be Loki. And of course, with all the props, it was pretty obvious at SVCC, and it was gratifying to see people's eyes light up when they recognized my cosplay.
Total cost: $92 for the cost of the class, $64 in bridge tolls and parking permits for the eight sessions, about $20 worth of muslin, $10 for various notions, $6 for a floral heart, $3 for a headband, $4 for the beads for the rings, and all the rest was from stash. Did all my driving back and forth by myself negate the sustainability efforts of trying to avoid buying new fabric? Sigh, probably.

I am trying really hard to be more green in my costuming efforts and going with stash or secondhand materials whenever possible, even when it's tempting to buy something shiny and new (all those sequined fabrics and laces and burnout velvets -- Jo-Ann's has really upped their game, yo!). The unfortunate reality of living in the East Bay, though, is that all the classes I really want to take are going to require a drive somewhere, so yeah...it's not easy being green. My consolation is that I would've taken the class anyway, and at least I made a conscious effort not to unnecessarily purchase new fabrics.


At any rate, attempts at sustainability aside, I am really pleased overall with how this came together, and that I was finally able to use that pattern for its intended purpose. I loved how grand I felt swishing around at SVCC in it; it was worth the burden of wearing heels all day just for the added three inches of glorious purpose!

I found a Professor McGonagall (in a cloak of much nicer velvet than mine) so of course I had to take a picture with her:


Friday, August 9, 2019

I Left With A Quilt, I Came Back With A Quilt (Or Four)

So ummm, last time I blogged, I was very pregnant and had just finished a quilt for SHB#2...two years later I have birthed the SHB#2, made a whole bunch of random things (plushies! a tiny hut on chicken legs! art! more than 250 nativity figurines!) and a few costumes. Due to said SHB#2, who is less inclined to play by herself than SHB#1, I've opted to do save my me-time for making things instead of blogging, relying on Instagram to quickly document most of my finished projects. I do miss the more detailed, longer form of blog entries though, and always meant to get back into it. Now that the new school year is starting and I have cosplays to finish before SVCC next weekend, this is the perfect time to procrastinate with a blog entry, y/y?

Since my sewing area is accessible to the kids, and I don't really need more clothes (more on that later), I haven't done much sewing until recently, when SHB#2 got old enough to (kind of) understand that she needs to leave Mommy's things alone. And even then, I was so brain-dead most of the time, I couldn't handle complicated things like fitting or figuring out new patterns, so I've defaulted to making quilts, which are not easy per se, but at least once I have the pieces laid out, it's more or less mindless sewing of straight(ish) lines.

I made this from florals that I inherited from the school drama teacher's mother-in-law's stash. All straight lines, and can you tell that I really didn't think too hard about the placement of my blocks?

I mean, look at how haphazard all the piecing on the backing is!


After the stashbusting quilt, I made a few quilts for important babies in my life:

Very simple, vaguely sportsball field-esque look. 

A dear friend's baby had a difficult start in life, spending time in the NICU and then working hard to recover for the first year of his life, but now he is a healthy, thriving boy who outweighs my own little girl, despite being almost a year younger! Maybe one day he will play sportsball for one of his parents' alma maters, you know, because the quilt I made him is so inspiring...j/k.

The back was fleece (no batting inside, since San Diego weather doesn't require a lot of warmth).
 I'm glad the school colors don't clash. 


Another dear friend had her third daughter, and I wanted that little girl to have something special of her own that wasn't a hand-me-down from her older sisters, so I made a Harry Potter and Star Wars mashup quilt so that she would have both of her parents' fandoms to wrap her in love. And then because those are also two of my big fandoms, I made an almost identical one for SHB#2. Like her big brother, Chewbacca is her first favorite SW character (SHB#1 has since moved on to Darth Vader, mostly because his lightsaber is red), so she enjoys pointing him out.

This was a challenge to design (even though it's all just rectangles) because so many SW fabrics are so dark, and HP fabrics are so bright, so to put them together in one quilt and have it look somewhat cohesive was tricky. I'm inordinately pleased with what I came up with!

This is the back of the one I kept. The one I gifted had a border of Hogwarts house crests instead of the spaceship blueprints shown here. All of these licensed character fabrics are from Joann's. 


And lastly, one of my college friends struggled with infertility for many, many years, so when she found out she was expecting, I knew I had to make something for her baby. She and her husband are huge LOTR nerds (they previously attended my LOTR birthday party and her husband won the trivia contest), so I wanted to incorporate that somehow into a quilt that also illustrated their story. While googling LOTR-themed quilts, I came across this amazing art quilt, but I knew I wouldn't be able to replicate something like that, nor would it really be baby-friendly. More googling of landscape quilts yielded this one, which seemed much more doable with its pieced strips (yay straight lines!). I decided to try to combine these two ideas to make my own take on an "Into the West" quilt; the more I thought about it the more I was set on it as the perfect representation of their journey. They had walked through the wasteland of Mordor in their quest for a biological child, and now after all that exhaustion, they were finally getting to sail into the west, into the rest and peace and hope of the Undying Lands. Not that having a newborn baby is at all as restful as I imagine Valinor to be, but you get the idea.


I had purchased a sizable lot of quilting cottons in various colors a year ago from somebody else's destash (some of the pieces were used to make up the rainbow blocks in the HP/SW quilts), and I tried to use those as much as possible in this quilt. I figure elves and hobbits would be all about being green and not purchasing new fabrics, right? The only new fabrics I had to buy were some browns for the cliffs and the backing fabric. Anyway, I started by laying out my fabrics in a semblance of the final image, then I got to all the tedious cutting and sewing of sky and water strips.

I initially wanted to have hobbit boles at the bottom, hence all the green bits. After doing some measuring, though, I realized it would end up being too long of a quilt for its width. 


Figuring out the cliffs and greenery was more fun and challenging. I wasn't sure how to attach them, so after more googling I treated them as appliques, folding the edges under and hand-stitching them down. The little boat was done the same way, but I interfaced the pieces since they were so tiny and fiddly to work with.


I chose a neutral gray, vine-y backing fabric; I wanted a fabric with some kind of busy pattern to disguise my inevitable quilting errors, and vines seemed appropriate for the elvish theme of the front. For the binding I went with a plain solid navy blue since I figured the edges would get dirty fastest and I didn't want to take away from the design. The quilting was all sort of haphazardly done; I didn't mark any of my lines beforehand and just sort of sewed with a vague plan in mind. I think it turned out pretty well, all things considered. One day I'll take a quilting class and figure out how to do things the real way instead of just winging everything...


This quilt took a month's worth of nighttimes and naptimes, but since AP exams were over it was mostly a relaxing way to wind down after a hard school year. We were even able to make it down to San Diego as an entire family to deliver it in person at their baby shower; it was gratifying getting to watch them unwrap it. This is why I'll probably only ever make quilts for people I love a lot -- I don't think most people would be willing to pay for the hours and hours it takes to make one, but this is the best way I know how to show how much I care. I may not be a baby person, but I'll be a sewing-for-your-baby person as long as it's my idea and not an outrageous request that belongs on @canyousewthisforme!

These last two pictures taken by the mom-to-be's sister.