Showing posts with label Thoughts. Show all posts

Monday, February 1, 2021

Foundations Revealed Contest 2021: The Inspiration

I've been lurking on Foundations Revealed/Your Wardrobe Unlock'd for years, since way before I had a sewing machine. I remember being a bone-tired, overworked teacher, looking through all the helpful articles and inspirational costumes that were posted, and thinking wow, someday I want to be able to make and wear beautiful things like that. Even after I taught myself to sew and discovered historical costuming and cosplay, I always felt like the FR/YWU yearly competition was beyond my skill level. And then when I finally felt like I could maybe enter, I had kids, a side gig doing theater costuming, and had started taking classes at Canada College, which meant I had no time to think about making something to enter. This past year, with older, more self-sufficient kids, no theater costuming work because no theater productions, and more experience in designing my own costumes, I finally felt like I could maybe do this. 


The theme this year, "Once Upon A Time...,"designing an outfit for a character from literature, was the push I needed to enter. Reading and imagining fantastic costumes for literary characters was so important to me as a child, and here was the perfect excuse to indulge myself and actually bring to life one of my imagined designs! So many classics of children's lit have evocative descriptions of outfits; how could I choose one? I have a soft spot in my heart for the Little House series, as LIW's little details probably played a huge part in my love for historical dress (come on, who doesn't remember Aunt Docia's dress with the buttons that look just like juicy blackberries, or the lovely triangular fichu that Laura's friend gives her as a wedding present? Or is that just me?). And of course Tolkien is a quintessential fantasy inspiration (I've always wanted to do Goldberry or Luthien), and if you're into villains like I am, there's always Jadis or the Lady of the Green Kirtle from the Chronicles of Narnia. Then there's my middle school comfort read, The Song of the Lioness, featuring the first canonically "Asian" character I ever encountered in a fantasy book, Thayet jian Wilima, whom I already cosplayed when I met author Tamora Pierce at a con. 


But ultimately what helped me decide was looking at the Pinterest board posted by the competition organizers: almost all of the inspirational literature they included comes from the Western literary tradition. The West does not have a monopoly on great literature, and considering the relative age of some ancient Chinese poetry, it could be considered even more historical. I understand, of course, that FR is based in England and run by Europeans, but in 2021 I would hope that there would at least be a bit more diversity in their mood board. To that end, I decided to design a costume for a character from Chinese mythology, the Weaver Girl. Because how fitting is it that I choose a heroine characterized by her association with textile creation, for a fabric-based competition? It's also perfect for this year, as we all hold off on seeing our loved ones and learn to wait for a (hopefully) joyous reunion.

The legend of the Cowherd and Weaver Girl is all about waiting for a year to see a loved one. As we come up on ten months of purposeful distancing to keep our community safe, this story seems especially apt. Image source, which also tells one version of the story.

As I wrote in my inspiration description for my entry, "The Cowherd and the Weaver Girl is an ancient Chinese story/poem of a celestial maiden who fell in love with a mortal man. The Queen of Heaven forbade their union and used her silver hairpin to carve a rift between heaven and earth: the Milky Way. Once a year, on Chinese Valentine's Day, magpies form a bridge to allow the lovers to meet again. I've always loved this version of the (literally) star-crossed lovers and wanted to capture the beautiful poignancy of the Weaver Girl, Zhinü, waiting to be reunited with her husband. The image of a flock of kind-hearted magpies bridging the Milky Way is so evocative of the importance of community support. I kept the color palette limited to mostly black and white in homage to the yin-yang concept as a reflection of duality and balance in both the patience and the passion of waiting, especially in this pandemic year as we wait to hug our loved ones again. The silver and iridescent accents echo the sparkle of the stars, and the feathers are magpie mementos that Zhinü might have saved and woven into her outfit for the next year's meeting. The shorter overskirt, trailing gown, and gauzy fabrics are modernized versions of style elements typical in Chinese paintings of celestial maidens; the traditionally styled hair accessories and the qipao-esque collar and bolero shape bring to mind both historical and more recent Chinese fashion, emphasizing the timelessness of the story."

To give you an idea of what celestial maidens like Zhinü usually look like in traditional Chinese art:

Lots of wispy fabric drifting about! Image source.

So I definitely wanted to incorporate light, flowy, ethereal fabrics, and I wanted to have lots of starry sparkle, and I wanted magpies. I toyed with the idea of having a magpie leaving a trail of feathers across the dress, but it didn't feel right. One of my best friend's husband, who is a photographer, posted his photo of the Milky Way and the design inspiration just clicked: I would do a Milky-Way-esque sprinkling of beads on a bed of velvety black "night sky," and the magpies would be "holding" this bridge between their beaks. While I didn't want to make a historic Chinese hanfu, I did want some nods to Chinese fashion elements in my costume, so I decided on a little bolero with a qipao-style mandarin collar and lines that echoed the double-sided round-ba front that's seen on some qipao, especially ones worn by famous Chinese politician and fashion icon, Madam Soong Mei-ling, aka Madam Chiang Kai-shek. The qipao, while seen in many Westerner's eyes as a classic Chinese style, is actually a fairly recent fashion, relatively speaking (it originated in the 1920s, which is practically modern in light of China's thousands of years of history...I wrote a whole paper about this for my History of Fashion class), so I wanted to incorporate some more traditional historic elements in the costume. I went with a mid-length overskirt to mimic the look of a qiyao ruqun (齐腰襦裙) and full sleeves, similar to the look seen here:
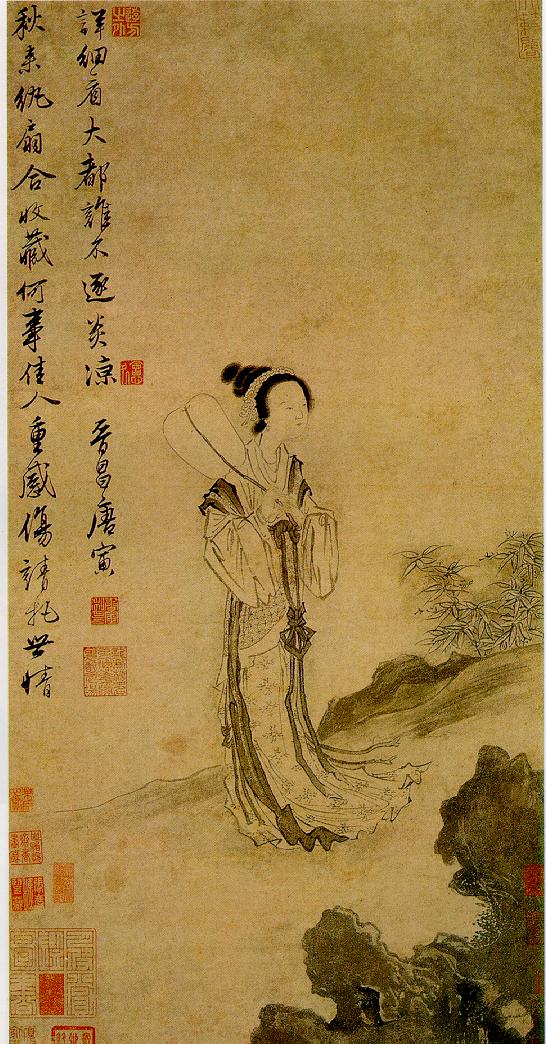
Impractically full sleeves, and a shorter overskirt that even has a vague hi-lo thing going on!
Image source.

While historic Chinese clothing did not include corsets per se, there are periods where very wide belts/sashes kind of give a vague underbust corset look. I was also inspired by the feather-looking bits that can be seen sticking out of the front tabard in statues like this Tang dynasty female figurine: 

I decided to add fabric feathers to the bottom of my corset as a nod to this design.

Another aspect I wanted to incorporate was an actual feather cloak; in some versions of the story, the Weaver Girl leaves her magical feather cloak while bathing on earth and the Cowherd discovers the magical garment which allows her to fly back to heaven. I wanted to keep that aspect while not using any actual feathers, and also not totally obscuring the lacing on the back of the corset, thus netting to echo the gauzy underskirt fabric, repeated in the sleeves, and the fabric feathers were cut from the scraps leftover from making the corset and overskirt. 

Here was my initial sketch. Pretty sketchy.

And here's what I actually made! Professional photos coming...

The final touch on this costume was the hair styling. To be honest, I was the most concerned about how this would turn out, because I absolutely suck at doing my own hair. If I had an Achilles heel in cosplaying, hair would be it. I can style other people's hair just fine, but the combination of not being able to see the back of my head, plus my fine, thin, wispy hair that doesn't want to stay, means that I'm limited in what I can do. Thankfully, AJ of Confused Kitty Sewing was able to direct me to some helpful hanfu hair styling tutorials, or else I would probably have just done a mom-bun and called it a day! Even though I wasn't able to replicate any exact style, I learned how to loop my hair up and use a hairpiece to approximate the historical look. I did two practice runs of hairstyles and even then my final style was entirely different from the tests because I'm also incapable of replicating anything twice. Thankfully, my milk jug hair clips and hair stick helped to disguise a lot of that. Yup, that's right, milk jugs! I know people melt down milk jugs to reuse the plastic, and I've used candles to singe and curl poly-organza flowers before, so from there it was a short leap to using my heat gun to lightly melt and reshape flower shapes cut from old plastic gallon jugs. I love being able to repurpose trash, so this was seriously thrilling to me. The best thing about making flowers is they're meant to be organically irregular, so it works well with this method of crafting. I finished them off with bead and wire stamens/pistils and hot glued them to clips and chopsticks to approximate the look of traditional hanfu-style hair accessories. I was very, very pleased with how they turned out and they way they help visually communicate an ancient Chinese aesthetic. 

The chains and beads dangling down give +2 to perception of Chinese-ness rolls. 


In some versions of the story, the Milky-Way-creating-antagonist is the Queen of Heaven, while some say that it's Zhinü's father, the Jade Emperor, who is angry that his daughter neglects her duty of weaving brocade robes for him because of her romance with the cowherd. I feel more strongly about the latter version, since one thing I've been working through emotionally this past year is my dad's insistence on my not pursuing the arts throughout my childhood/teen years. Even though he was instrumental in teaching me creative reuse and giving me a general DIY attitude, he was very clear that he expected me to go into some kind of STEM career. While I do love teaching science and am good at it, it's still hard not to play the coulda-shoulda-woulda game and wonder what my life would be like had I not waited until my thirties to really lean into costuming. The pandemic and resulting sheltering in place has meant that I had more time for introspection; I've been having a lot of angst about how best to use my talents, feeling less-than because of my lack of perceived success according to traditional Chinese standards, and wishing that I had had more freedom to really tap into my creative side. Feeling the tension between wanting to respect my parents' wishes but also forge my own path, along with the image of waiting to see a loved one in this pandemic year, really makes Zhinü's story hit home for me. 

Entering this contest with such an intensely personal creation has been a surprisingly emotionally fraught, but ultimately healing and therapeutic process. I used to never do things unless I was assured of success, as I'm pretty risk-averse (#notagryffindoratall #selfpreservingslytherinthroughandthrough), but preparing for this competition has been a good exercise in simultaneously doing a thing anyway (even when there's no assurance of winning, which has led to lots of great conversations with SHB#1) and also believing that I'm good enough to go for it. I like how the entry form makes you check a box agreeing to the competition conditions and also certify that "I confirm that I am a creative badass, and will never again doubt myself or my talent and capability." So here goes!

Monday, December 30, 2019

A Dangerous Coat

I used to think the 1910s and 1920s had the worst fashions, but the VPLL 1912 Project, Downton Abbey, the new Great Gatsby movie, the Fantastic Beasts movie, and Phryne Fisher have all conspired to totally change my mind about that. I now love love love these eras, so much so that when at a loss for what to do for my Cañada College fashion department classes, I've just sort of defaulted to the 1920s. I drew drop-waisted dresses for my fashion illustration classes, made a summery cloche for my millinery class, and for this past semester I've worked on making a 1920s-ish coat for my tailoring class.

This tweed+fur coat of Phryne's was my inspiration.

When McCall's started releasing updated vintage patterns as part of their Archive Collection, I immediately snatched up a copy of M7259, a (sadly now out of print) caped coat pattern, and filed it away for "someday when I have a good reason/the time and skills." Since I can only take classes at night, and tailoring was the only class I hadn't taken yet for this past fall's evening classes, that gave me the reason, and presumably I would learn the skills and make the time. Admittedly, it's not a very difficult coat to make (it's even rated as "easy" on the pattern); a shapeless boxy coat doesn't require a lot of fitting, there's no notched collar or vents anywhere, and not even a welt pocket! But I knew I would have a busy semester already, what with parenting in general, Halloween and cons, and costuming. Did I feel a little embarrassed about the simplicity (even though it's a McCall's pattern...haha sorrynotsorry) of my pattern choice when I saw my classmates making five or more muslins, making all sorts of alterations, drafting new collars and sleeves, and putting in eight welt pockets? Maybe a little. Was I grateful I kept it uncomplicated when, after finishing up the drama production I had a little over a week to put together all my coat pieces and do all the fussy hand-stitching? You bet! Besides, I know I would never wear a blazer, and I already have two perfectly serviceable RTW coats that I love, so I might as well get going on my dream of having a Phryne-esque wardrobe.

The pattern: I was definitely swayed by the brilliant red sample. 


My little compilation of scraps to give me
an idea of how things might look together.
First step was selecting fabric: I knew I only had a couple of pieces of yardage with the right length, drape, and fiber content (our professor preferred natural materials, especially wool because of its "pressability"), so it was basically between a dark green wool blend suiting material or a gray wool tweed suiting with little colored specks in it. We decided that the gray tweed would hide more sins, what with this being my first serious coat, and I did have a little more of it so as to allow me to make the cape as well.

Next step was to do a pinned-together paper mock-up, which to me seemed a little pointless, but I can see how it would be a cheaper, faster way to get a sense of major size or fit issues without the effort of making a real muslin. As it was, I only had a very minor swayback adjustment to make, but then I do realize that I am extremely fortunate that I usually fit Big-4 patterns with very few adjustments (usually only swayback, narrow back, and small bust adjustments). Then we made actual fabric mock-ups with cotton muslin, and again, not much to report here, other than that I decided to shorten the cape significantly so as to keep it from being visually overwhelming.

Without and with the cape, with dark threads marking the grainline on the sleeves and the center front line. 

I sewed my mock-up with the side seam pockets that the pattern called for, but decided later that I didn't like them; they made things hang weirdly, I didn't like the bulk of the pocket bag, and they were too far back to feel natural when I put my hands in them. I decided that I needed to make pockets on the front of the coat, but at that point I had a minor crisis about what kind of pockets to make, and proceeded to flood my IG with way too many stories debating various pocket types and placements and their historical accuracy vs. general aesthetic vs. ease of use. Since I was also in the thick of drama costuming, the pocket issue gave me an excuse to not work on my coat for a month. I did assemble the cape (but not hem it), but three weeks before the coat due date, and I had really only a bunch of fashion fabric pieces (that I had at least interfaced with soft fusible knit interfacing; since my fabric was so thin and loosely woven, it really needed some extra support) and lining pieces.

This was what I was primarily deciding between: a shield-shaped patch pocket, or a swoopy-looking patch pocket that would be sewn into the side seam. Although the swoop won by a small margin on IG, I realized that I really preferred the look (and historical accuracy) of the shield and went with that option. If you want to see all my ridiculous wibbling about the pockets (and other construction bits), you can check out my 1920s coat highlights on my IG here.

The antepenultimate week (and also the week leading up to the show, so lots of last minute decisions, fittings, and runs to various stores for accessories and such), I sewed together the facing, lining, and lining patch pockets. The lining patch pockets were hand-stitched so that I wouldn't have topstitching thread showing, per this extant 1920s coat (I did briefly consider smocking the tops of my pockets, but then dismissed that idea as that of a person with more time than I had), which looked lovely but took a long time.

Here's what the facing + lining looked like hanging on Cecily. You can also see the only dart in the entire thing where the shawl collar is. Ignore the stack of toddler clothes storage boxes in the background...


The penultimate week (and also the week after the show, i.e. all the tasks of costume striking to be completed by me, the one-person costume shop), I sewed together the fashion fabric fronts and back, and sewed the sleeves (but didn't set them in) and brought them in to class to have them hung by my professor (I put on the coat and she pinned them in place in the position that caused the least drag lines. Since many of us work on computers, we have forward sloping shoulders and lining up the shoulder seam notch and underarm/side seams may not actually be the best position for a lot of people; my sleeves needed to be rotated forward about 3/8"). I basted the sleeves in by hand in class, then brought them home to set in by machine. I also had decided on shield-shaped patch pockets as being the best compromise between historical accuracy (while there are some examples of welt pockets on coats of the era, the vast majority of them had large patch pockets...or no pockets at all, but that was a non-option for me), general aesthetic (a heckin' large square, while historical accurate, looked a little too boring to me, so I went with a slightly more interesting shield shape), and ease of use (I placed them low enough that it wouldn't be awkward to put my hands in them, even if the perfectly vertical placement is a little less ergonomic than a slanted one). Like the lining, these patch pockets were hand-stitched invisibly, and thanks to the busyness of the fabric, they don't break up the lines of the front as much as I was afraid they might.

That last week, I set the sleeves in, put in all the tailor-y bits (homemade shoulder pads, sleeve heads) attached the outer shell to the facing/lining, and then went about the tedious business of evening out my hems and catch-stitching everything down. For the hem of the cape, I catch-stitched the fashion fabric and the lining separately, then used French tacks to secure the two together at the side seams and center back. I had previously attempted to attach the lining entirely, but couldn't get it to sit right with a jump hem on the bias portions, so I opted to let it hang separately.

You can see the shape of the cape here, as well as the snaps that hold it onto the coat. 

For the coat, it took a couple of tries (and lots of staring at the coat on Cecily as a pinned, glared critically, repinned, glared again, etc.) before I got everything to hang right without pulling, but eventually I got it all sewn down (again, by hand) with a jump hem and everything! Oh, and I also tacked the lining to the coat at the neck seam allowance and the side seams so that the lining wouldn't billow out separately from the outer shell of the coat. I finished all the hemming with two days to spare, but the next day was full of frustration as I attempted to sew in the fabric-covered snaps and large button in exactly the right places and without any weird pulling anywhere. The morning the coat was due, I plopped SHB#2 in front of Sesame Street so that I could sew on all the snaps that attached the cape to the coat, and then I was finally done!

Without the cape, with nicely-blending-in pockets. 

Hello, 1920s-esque ulster coat!


Summary
Pattern: McCall's 7259, part of the archive pattern collection, circa 1927
Fabric: A little over 3.5 yards of a 60" wide, dark gray, tweed wool suiting with little flecks of ivory, burgundy, black, cornflower blue, and mauve; I originally purchased this from an antique furniture store in Berkeley seven years ago when I found a tiny little shelf in the back of the store that had some random yardage. The lady said she had got it for herself to make something fabulous, but had come to realize she likely never would, and she just wanted it to go to a good home. I paid all of $30 for it, which I now realize was an absolute steal for fabric of this quality. The 2ish yards of 55" wide lining fabric was mostly this dark burgundy floral damask polyester satin, which is on the thick side for a lining, but that just makes it feel extra luxurious. This was from my best friend Elaine's partner's stash, that they passed on to me when they moved (out of Arizona, ultimately back to the Bay Area!), so when I look at the lining I'm reminded of their generosity. It wasn't quite large enough for me to be able to cut all the lining pieces, even with the shortened cape, so I supplemented with some black Bemberg rayon for the sleeves since they wouldn't be seen.
Notions: 3 yards of 20" wide fusi-knit interfacing, which I used on every pattern piece except for the lining pieces and the back piece. I didn't have enough to do the large back piece (and actually had to piece together bits for the side edges of the front, and didn't want to wait to order more, so I just used black silk organza to underline the back piece. The organza was a fortuitous find from the free shelf in the back of the sewing classroom, and I still have yards left! I also purchased six 3/8" metal snaps for the cape attachment, a 1.5" covered button kit for the coat closure, and used a set of 1" metal snaps (covered with fashion fabric) from my stash for the inner closure. The facings on both the cape and coat are piped with black silk dupioni left over from my bustier project, and the hem of the cape lining is finished with burgundy-colored lace hem tape from an inherited stash.

I love that the inside is so secretly beautiful, even if nobody will ever see it!

Will you make it again? Unlikely, since I don't really need another coat like this. I do want to make another Phryne-inspired 1920s coat though, maybe a lighter duster in linen?
Total cost: $30 for the wool, lining was free, about $15 for the interfacing, and $5 worth of snaps/buttons = about $50! Of course, throw in the cost of the class tuition + toll + parking...and all the hours spent...
First worn: Just in class to show off and for pictures, but I'd like to wear it to go see the Phryne Fisher movie when it comes out next year!
Final thoughts: I'm really glad that I was able to make this coat almost primarily from stash/secondhand fabric, thereby keeping to my unofficial pledge to not purchase new in order to stay as green as possible in all my sewing endeavors. Things like interfacing or the exact size of snap are hard to come by secondhand, so I'm making an allowance for those things, though. I'm in love with the (detachable!) drama that the cape provides, and the instant Sherlock-y vibes of a caped coat. I have a little bit of wool leftover; maybe I should make another deerstalker? Actually, I would rather try to make it into a 1920s hat to match, so maybe if I find a suitable pattern one day. Without the cape, the coat is a little boring, but that's fine, because I decided to splurge a little and buy myself a fabulously fluffy, white faux-fur collar from Amazon that I can throw over the shawl collar of this coat to up the Phryne-ness of it!

This was taken by the fashion department's blogger. 


I'm really pleased with the whole tailoring class experience: I got a lovely coat out of it (even if I later realized that I had made myself yet another grey wool coat (aforementioned RTW coats in my wardrobe are also grey wool, so I guess I have a definite coat type...), and while mine didn't have more technically challenging bits like bound buttonholes, welt pockets, or a notched collar, at least I got to practice those skills when I made my samples, and best of all, I got a scheduled sewing time every week (and I even got to throw in the bonus of regular conversation with another adult, since my costuming friend @simply_mi was also in the class!). Even though the lead up to class is always stressful (get dinner ready! make sure the house is somewhat in order! spend some time with SHB#1 when he comes home from school! make sure my bags are all packed with all the sewing things I need!), in the end it's really nice to know that I'm guaranteed at least three hours every week to do something just for me.

Sometimes I feel guilty for taking so much time for myself every week -- it's not just the sewing class itself, but the commute there and back, the time it takes me to do my assignments for the class, and the time it takes to go out and acquire the materials I need to do my assignments -- but just recently I fell down the rabbit hole of Bernadette Banner's historical sewing videos, and she mentioned Cathy Hay's Worth peacock gown reconstruction project, which then led me to this very helpful video where she talks about how not to feel guilty about sewing when you have a family. She quotes Iyanla Vanzant: "My cup runneth over: what runneth over is for you, but what's in the cup is for me." At first, it seemed like just another variant of the "put on your own oxygen mask first" mantra that I blogged about before, but upon further rumination I realized the problem with that: oxygen masks are vital to life, so it makes sense to take care of your own basic needs first. But sewing costumes, or just giving in to my drive to make things: that's not *really* a basic need, is it?

I don't know if it's the child-of-immigrants, sacrifice-everything-for-your-family, just-work-harder rhetoric that was drummed into my head growing up, or leftovers of my childhood church's very conservative, Puritan-esque suspicion of anything that seems like too much fun, but it's very, very difficult to let go of the feeling of guilt that I should be spending all my free time doing something less frivolous. Like I said, I already have two fine coats, and there's always something more productive I could be doing with my time: research on developing children's emotional intelligence, integrating NGSS into my science teaching, or figuring out how to reduce waste in our family. I go ahead and pursue my hobbies anyway, because I'm a selfish Slytherin like that, it's just that I carry along a lot of guilt with it that prevents me from fully enjoying it. I'm not sure where to draw the line, since I know it's obviously not an either/or issue. Taking time for myself is healthy, but parenthood does inherently involve some sacrifice, and there must be a balance somewhere...and what if I just have a really, really big cup and "need" lots of replenishing time before I give the runoff to anyone else? See how I'm hesitant to even call time to create a need, I mean it's not one of those things that form the foundation of Maslow's bogus hierarchy of needs now, is it? If any other sewing moms out there have any brilliant insights, I would appreciate them!

Anyway, all this to say, it's so hard to know how to break out of societal constraints and expectations for women and undo the years of programming. A man cave is, if not expected, definitely not frowned upon for a stereotypically male breadwinner to be able to relax, get away from responsibilities, and putter around. How that translates in my mind for a non-breadwinner is trickier until I remember that I'm trying not to devalue traditional "women's work" like childcare and sewing, and I want to set an example for my kids of self-care and not self-martyrdom. So I suppose it's kind of perfect that my coat has four nice large pockets, perfect for carrying leaflets to spread sedition? Or, you know, fairness, kindness, and equality. Ladies, I guess I did take the advice of Irish poet Sharon Owens, and sewed myself a dangerous coat made of pockets and sedition (go read her fabulous poem if you aren't already familiar with it).

Pockets! (Photo courtesy of my professor, Ronda Chaney.)

[Apologies for the mostly terrible photos in this post. Most of the construction photos were taken at night, since that's when I sew, and I kept thinking I would take better finished garment photos in an atmospheric location, but let's be honest, that's probably not happening anytime soon and I'd rather get this blogged before I forget all about how I made it! Also, more about my lab garment, a 1920s-ish evening gown, in the next blog post!]

Thursday, July 27, 2017

Projects for SHB#2

I made a whole host of things for SHB#1, most of which are still perfectly useable for SHB#2, so I didn't make a whole lot during this pregnancy. Also chasing a toddler kind of precludes having the time to sew and paint very much! But one thing I definitely wanted to do was to make SHB#2 a quilt; I wanted each child to have their own tangible piece of evidence that I was thinking about, dreaming about, and hoping lovely things for their lives. Since SHB#1's quilt was ocean animal themed, I decided that SHB#2's should be land animal themed, with a bit of a feline bent, because obviously cats are great. This decision was also helped by a dear friend bringing back a pink cat quilting cotton from Japan. Although I'm not a huge fan of pink, I decided to go ahead with a pink/red color scheme for this quilt, if only to set it apart from SHB#1's teal blue quilt. I managed to find fabrics with a lot of yellows and oranges as well, though, so it's not overwhelmingly pink in a froofy pastel princess way.


Back when I made SHB#1's quilt, I kind of just chose every single ocean animal quilting cotton I could find, and that's about all the thought that went into it. Maybe because SHB#2 is a girl, and I've been thinking a lot about the world she's coming into, and what my own experiences were like growing up as a quirky, nerdy girl who didn't come into her own until a quarter of a decade into life, but my fabric choices and sewing experience with this quilt were much more thought out and meditative.


I realize that a lot of this is going to sound overdramatic (and a lot like the made-up symbolism for my art class essays), but this is really what I was thinking about while sewing. I thought about back in the Laura Ingalls Wilder pioneer days when women would make quilts by hand with meaningful fabrics, and I tried to think of the whole process as sewing my love for this baby girl into a blanket that she could wrap herself up in. The pink cat fabric that started it all was from a long-time friend who helped me feel welcome and at ease when I felt particularly awkward in a new social situation, and despite living in different cities now, she remains someone I can look to to offer wise questions and compassionate understanding when I struggle with marriage, motherhood, and life. I want SHB#2 to have those kinds of uplifting friends in her life. The other small rectangles have different animals on them; I feel strongly that how we treat animals, who don't have a voice and represent the stewardship role that humans have, is indicative of our hearts. I want SHB#2 to have that kind of care and sense of responsibility for all the vulnerable and oppressed. The lion fabric in the middle features male lions with crowns, but I want SHB#2 to know that just because she is a female living in a male-dominated world, does not mean she can't rise up and still accomplish what she wants. The ombre-ish dot progression goes in both directions at the top and the bottom of the quilt; I hope that as she matures that she still maintains a childlike (but not childish) sense of wonder and openness and imagination. I hope that she has the courage to go in the opposite direction of those around her when necessary, and that she can see people and issues on a spectrum instead of as black and white, that things aren't always either-or, which is something that I struggle with personally. And lastly, the dotted backing fabric and striped binding fabric are echoes of her brother's quilt; I pray that instead of being jealous or rivals, they will enjoy a close relationship and love and support each other.

I thought it was fitting that as the little sister, she have little dots to his big polka dots. 

"I just trying it, Mom." Of course he would like her quilt more than his own.  


And then because I was on a quilt-making kick, and because the Warriors had just won the champeenship (Homestar Runner, anyone?) again and I still had leftover Warriors fabric, I figured that I might as well make a little blanket to match SHB#1's SF Giants one. That way, both kids will have a fleece blankie to commemorate the Bay Area sports team that won some big thing the year they were born!

I made it with remnants, hence the irregular logo distribution. At least all the squares made for easy quilting!


Bonus Warriors-related craft: I know this post's title says that this is supposed to be about projects for SHB#2, but here's a clock I made for Mr. Cation.


When Mr. Cation and I first started dating, I remember being really concerned about how much he liked sports (which is funny because now that I've met more husbands of friends, I realize he's not even that hardcore...he doesn't get depressed when his favorite sports team loses, nor does he spend a lot of time/money to watch/attend games). Sports and I have a terrible relationship, mostly stemming from the elementary school trauma of always being picked last for teams. But anyway, I was so worried about it that I actually talked to my wise older mentor teacher (who was also an awesome life mentor) about whether our relationship could even work. She advised me that he was a good guy who was worth holding on to despite our different interests, and pointed out that there would be different opportunities for me to show my support of his "fandom" with my crafts. She was so right of course, on both points, and while I'm still incapable of dribbling a basketball, I have enjoyed making these sport-themed projects for our children and for him. I'm so glad that our marriage has given me the chance to somewhat redeem my awful childhood PE experiences; I'm especially glad that with him as a dad, SHB#1 and #2 will have a better grounding in sports than I will, and hopefully won't have to suffer as I did!

This is pretty much what all sports sounds like to me. 

Wednesday, July 5, 2017

Ease-in to Motherhood

Thanks for inviting me to be part of the conversation on sewing and motherhood, Erin!

Before SHB, I used to get slightly annoyed whenever one of the sewing bloggers on my feed reader would announce her pregnancy, because I knew that she would either 1) post much less frequently, or even disappear entirely, and/or 2) start sewing irrelevant-to-me items, either baby things or maternity/nursing garments. Oh pre-motherhood Cation, what a selfish, clueless sewing blogger you were! The minute you had SHB, you basically became all those things, even going so far as co-hosting a sewalong centered around sewing for small human beings! I can't remember the last time I sewed a non-costume garment for myself (although to be perfectly honest, I was such a prolific sewer before pregnancy that I really didn't need to keep sewing to keep myself clothed), and the last thirty things I've sewn have all been plushies for SHB. So yeah. But let's talk in more detail about how motherhood has changed my sewing.

As I'm sure is the case for many of you, sewing is a vital creative activity that keeps my brain active and my heart happy. In my early sewing years, I relished finding ways to use the crazy fabrics I was finding at thrift stores in the form of bedsheets, and making fit-and-flare dresses out of them became part of my identity: I was a quirky green Ms. Frizzle wannabe who wore her fandoms on her sleeve (literally), I knew what looked good on my body and had the time and means to dress it how I wanted. After the fashion-related insecurity and teasing of my pre-teen years, it was such a relief and release to be me and, as I got older, the more I realized I only needed and cared to please myself. Sewing was the vehicle to self-love for me, not only with my body but with my mind and talents.

And then I found out I was having SHB. Suddenly I wasn't a selfish seamstress anymore, and while I did still sew for myself, I had so much fun making cute things for my coming baby, too! Having a baby meant rediscovering my love for sewing non-garment items, as well as discovering new forms of sewing expression, such as quilting. I was excited and felt like new worlds were being opened to me.

Then I actually had SHB, and it was miserable. He was bad at sleeping (I wore him in the Ergo and bounced on a trampoline to get him to nap for the first six months of his life), I was tired beyond belief (hello, 9 PM bedtime in anticipation of waking up five times every night!), and when I had a moment to myself (rare, as we didn't have any regular babysitters and I nursed SHB until he was two), I was so brain-dead I couldn't make my mind work enough to go through the mental exercise of sewing. I started just sleeping or wasting time on Pinterest when I had free time, but was still confused about my ongoing grumpiness until I realized that I wasn't creating, and I missed and needed it. Talking to other creative moms (mostly sewing bloggers I met through here!) helped me realize that what I needed more than sleep was to Make Things Again. I don't remember who said it, but basically what I needed to do was at least one irreversible thing every day. So many of my life tasks were reversible (baby needs to eat again! dishes need to be washed again! toys need to be picked up again! papers need to be graded again!) that I felt like I was in the Red Queen's race, running and running just to stay in the same place (or actually fall behind, TBH).

Once I realized things needed to change, I made a plan to Get My Life Back. For me, this meant sleep-training SHB. I realize that that's a controversial decision in a lot of parenting circles (and I had my fair share of nights crying while he cried because I was afraid that I was damaging him forever by not going to him), but it was the best thing I could have done for us. It took several months (like I said, terrible sleeper), but once SHB was out of our bed and out of our room, I finally had the space (physically and mentally) to create again. Even if all I was making was simple items for him, it was enough to see concrete evidence that I had Done Something With My Day. Around the same time, I was hosting the SHB Sewalong with Mikhaela and Clio and just having other sewing moms to commiserate with helped me see the importance of community. As my social psych prof used to say in college, misery loves miserable company, and while we weren't necessarily miserable, I felt so much better knowing that I wasn't the only one trying to figure out how to manage a needy, demanding being while still being one's own person with hobbies and a changing body that needed to be clothed.

SHB finally started sleeping through the night at around a year, and since his 7:30-8 PM bedtime is fairly early, I get the whole rest of the evening to be an adult. Sometimes that's sewing, sometimes that's just catching up on adulting tasks, but it's glorious to know that my nights are my own again (especially since I'm a night owl...midnight bedtime means I get a few hours to myself). I'd say that around the 18 month mark was when I felt like I really had a handle on this whole motherhood-while-not-just-only-being-a-mother-I'm-my-own-person-too business, and it's only gotten better as SHB becomes more independent and verbal. Now, at almost three, SHB has enough of an attention span and his own interests that I can even sew during the day sometimes; of course, that's only if the items are for him...


While I've mostly reclaimed my creative time, I'm still working on how to reclaim my style. All those fun sheet dresses I made (mostly) still fit before I got pregnant again, but they're really not practical as a parent of a toddler. I'm satisfied with living out my geekiness in cosplay instead of everyday life; I don't think quirky clothing is as central to my identity as creating is. I believe strongly enough in slow fashion to not sew when I don't technically need to, so I think this is one of the areas where I'm content to wait and see. I'll wait until I'm done nursing for good to see where my body settles, and then decide what kind of style suits me then.


***

Now that those I'm-so-tired-I-hate-my-life-why-did-I-decide-to-have-a-kid moments are a (somewhat) distant memory, I sometimes wonder why I'm subjecting myself to the horror of having another small human being; I think knowing that the newborn months are short will help me make it through to the toddler years, which I find much more enjoyable. I have more mom friends now, both online and IRL, which will hopefully make a difference when I'm in the worst of the sleep deprivation and demands of two small human beings. I'm hoping that since I'm more experienced now, both as a mom and as a person, I'll recognize sooner the importance of having my own time to create, and make an effort to make room for it. My self-care mantra in this past year has consisted of trying to remind myself of the truth of the airplane oxygen mask -- take care of yourself first so that you can take care of your child -- instead of succumbing to the lie that I'm being selfish by not giving of myself constantly. We'll see how it goes in a few weeks when SHB#2 arrives!


THIS.

Tuesday, September 1, 2015

Take That, Jeb Bush!

It's not Asian Pacific American Heritage Month until May, but indulge me here and allow me to get on my soapbox for a spell.

Right before we moved away from TCOCC, I was on a roll with Historical Sew Fortnightly challenges. I was only working part time, I lived near the LA Fabric District and FIDM and its inspirational garments, and I had plenty of creative energy. I was actually in the middle of making my rich lady pirate ensemble (completed the coat, waistcoat, and shirt, still need to make pants and a cravat) when we moved, but then I started working full time again and then we were house-hunting and then I got pregnant and then I had SHB...and now here I am two years later, finally getting back into things. The HSF has turned into the Historical Sew Monthly, which is definitely an easier time frame, and I've been stewing this idea in my mind for almost a year -- plenty of time to do research and more research and then some thinking and wait, better do a little more research just in case!

What made me decide to finally take the plunge and get to sewing? Well, I'd already been thinking about sinking my teeth into a non-knit project, but then Jeb Bush went and lit a fire under my tail with his comments about "anchor babies" and Asian-Americans. While I have been fortunate to grow up in San Francisco and attend public schools with large APA populations (unlike many APAs, I have never had to be "the Asian kid"), I have definitely experienced my share of othering statements like "No, where are you really from?" and "Wow, your English is so good!" I've sat through more stories of that-one-time-I-went-to-an-Asian-country-you-look-Asian-so-you-probably-want-to-hear-about-it than I care to remember, and when it's time to play the what-celebrity-do-you-look-like-most game, most people would probably just default to Lucy Liu because she's the only really well-known Asian-American actress (although there was also Anna May Wong in the 1930s!).

Just yesterday Mr. Cation and I tried to think if there were any Asian-American superheroes (and not just the one-dimensional Asian Sexy Dragon Lady/Ninja/Bruce Lee Type tropes), and all we came up with were B-list heroes like Jubilee, Wind Dragon, and Dana Tan (who is not even a superhero, just a superhero's girlfriend). Granted, we're only semi-into superheroes, but that's still pretty sad. While I love that there are more APAs in diverse fields now (instead of the stereotypical STEM fields, we've got Margaret Cho, Elaine Chao, and Jeremy Lin!), there aren't many APAs who are just cool. Okay, I guess Jeremy Lin is cool if you're a teenage boy, but I mean cool like "full of thrilling heroics," not "I can put a ball through a hoop."

Source

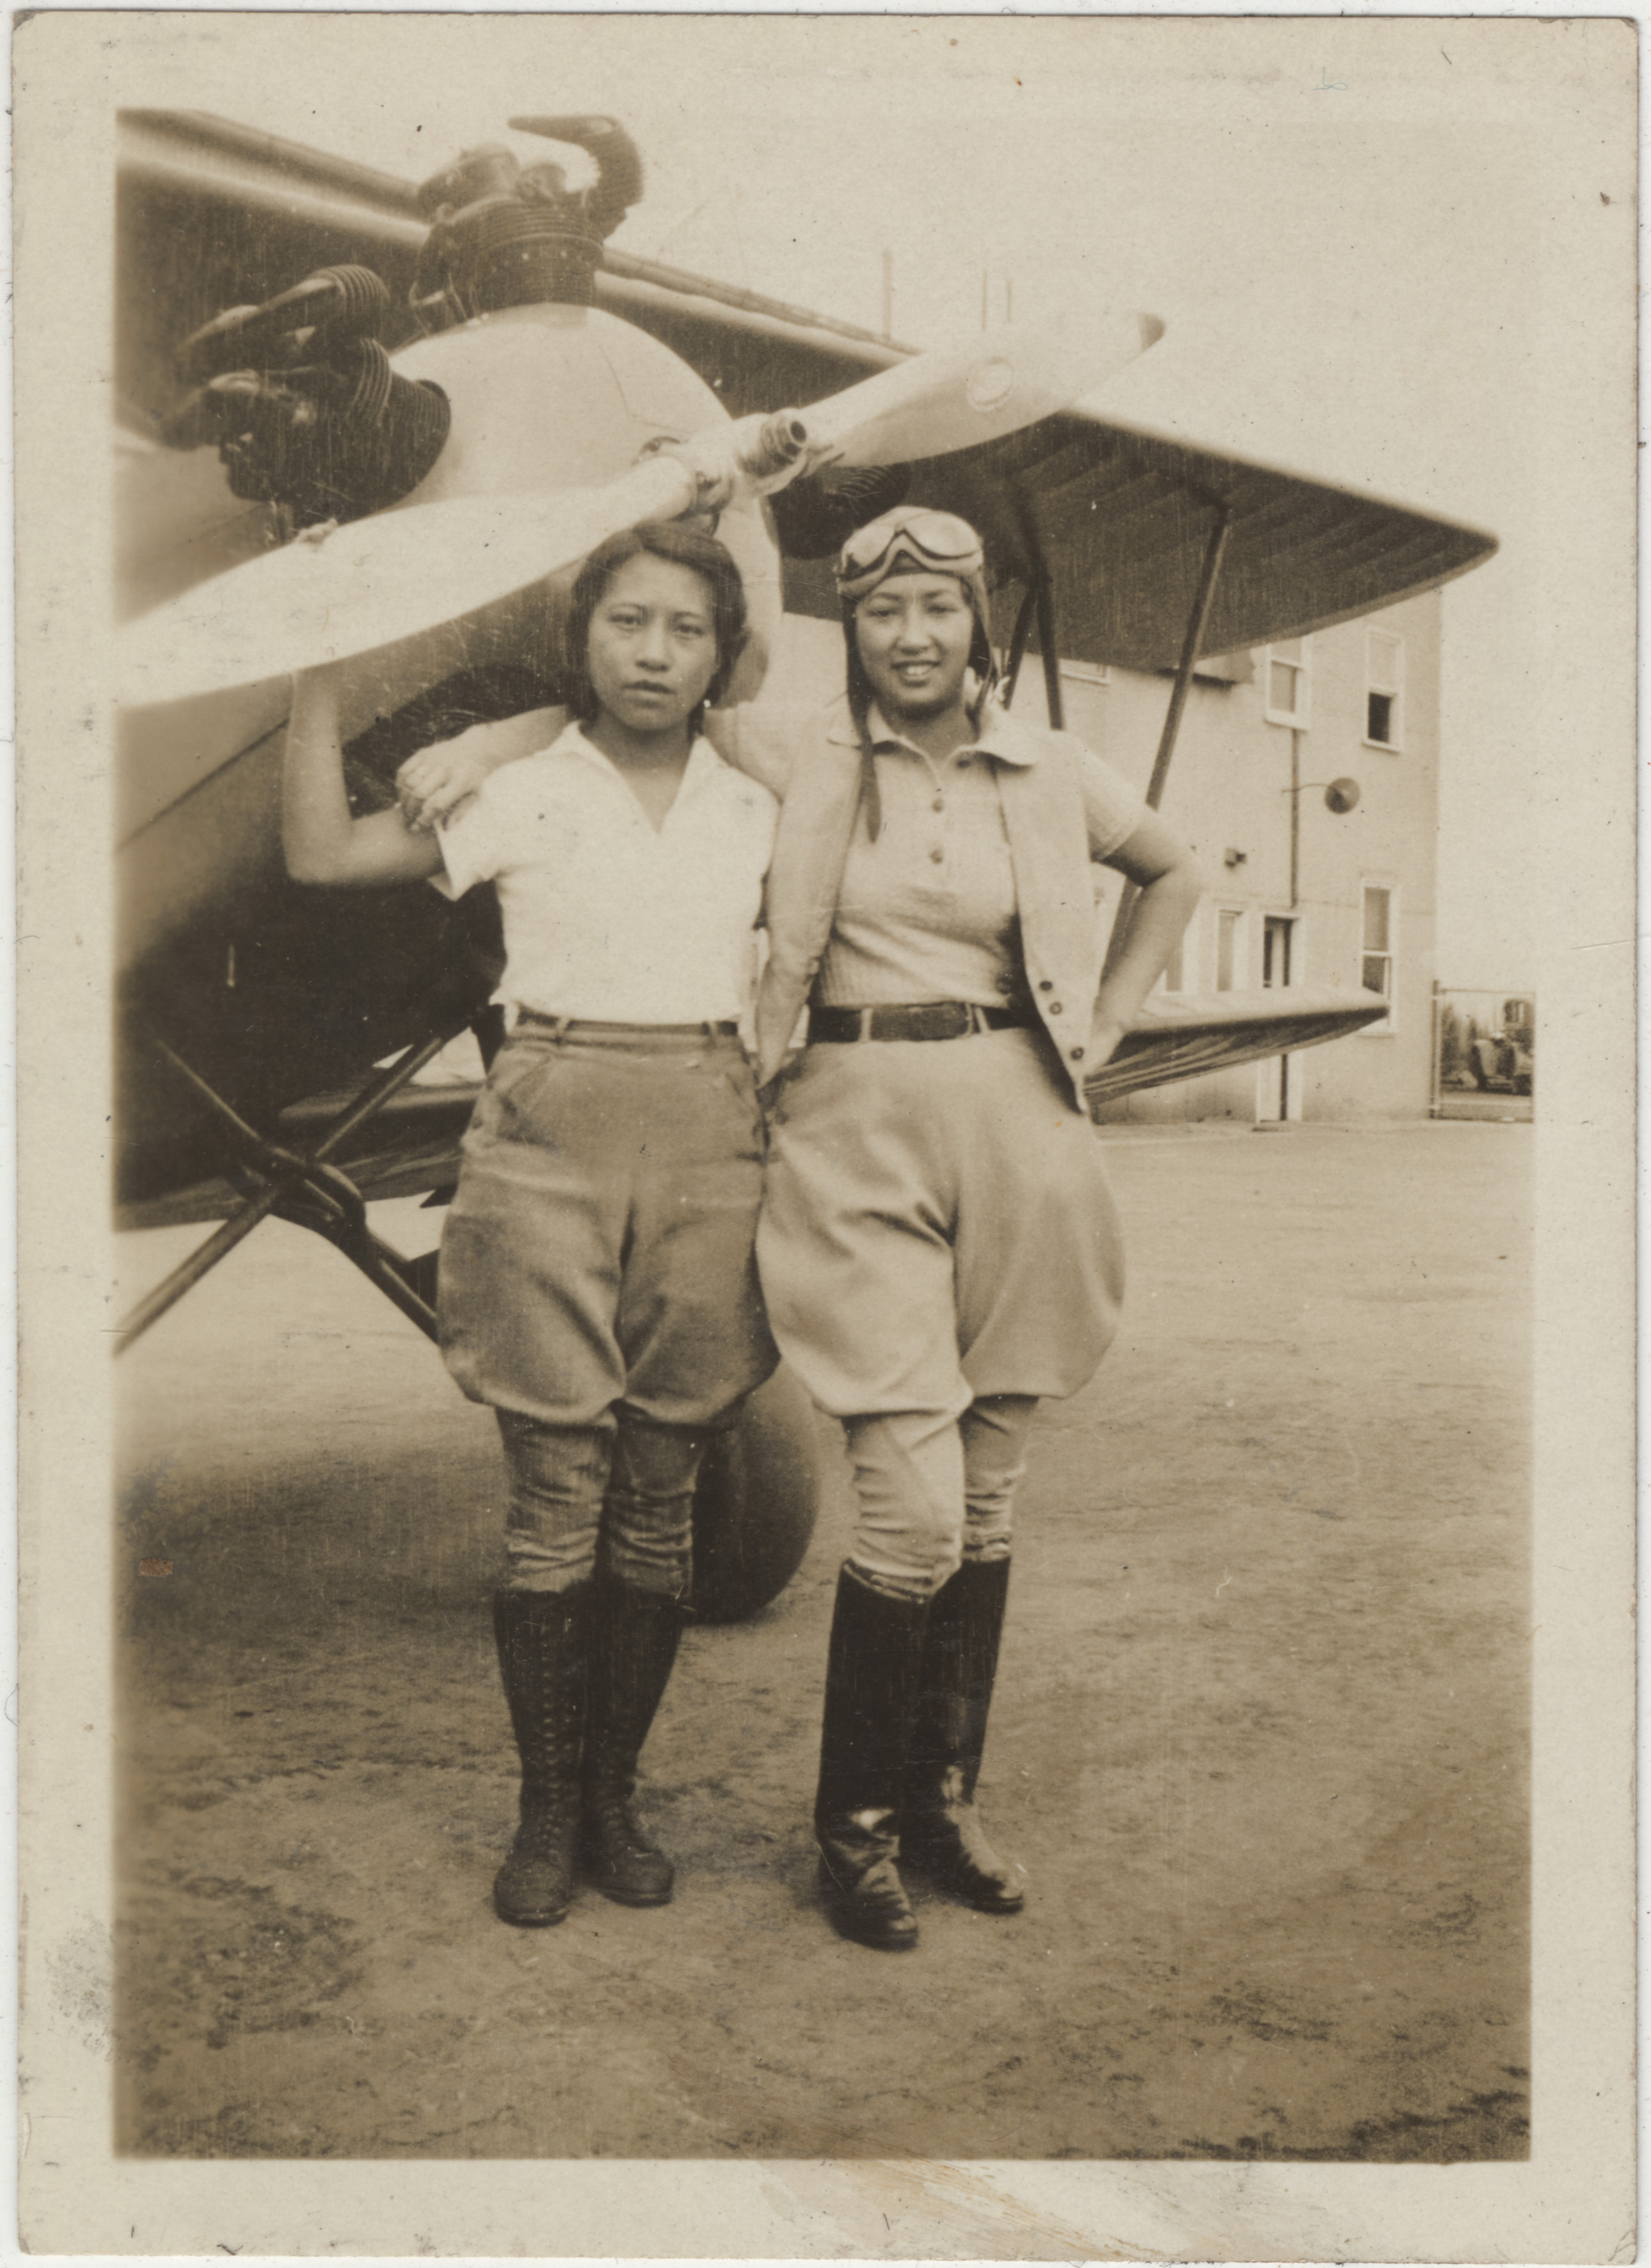
So when I came across the mention of Hazel Ying Lee in this random HuffPo article about famous Chinese-Americans, I was intrigued. An APA aviatrix? Who served as a WASP in WWII?! How have I never heard of her before? Especially when she has the same name as my mom! Okay, that doesn't make us related or anything, but I'm still going to claim her and others who served our country (heeeeey look, this other aviatrix has the same name as my aunt!) as part of my Chinese-American heritage.  All this to say, I made some old-timey aviatrix jodhpurs.


And now, without the belt and boots so that you can see the waist and lacings better. In bare feet, I felt like some kind of weird hobbit-pilot. 
A close-up of the waist. I'm really pleased at how neatly it all came together!

This might be the nicest facing job I've ever done. 

And a look at the lacing on the outseam. 

The inside. I didn't finish my seam allowances, but that was somewhat common at the time so I feel okay about it. 

I looked at many, many extant garments from the 1920s-1940s, and since I've never felt tied to strict historical accuracy, I boiled it all down to just a few must-haves to really get the idea across: military color (either tan, brown, olive, or dark green), side openings with buttons, buttons or laces at the outside of the knee, and that patched-on reinforcement on the inside of the leg. I didn't have a pattern and didn't want to just use this cheater method, so I went uber-historical and drafted my own pattern following these original 1912 instructions, with additional help from this 1908 drafting book for clarification. That's a couple decades earlier than my aimed-for 1930s look, but I was hoping that maybe jodhpurs were one of those garments that hadn't changed too much. Here's what my original draft looked like:

Yes, I do my drafts on the back of wrapping paper.
It's cheap and large, and it's already got those handy 1" grids printed on the back! 

And after multiple fittings and modifications, here's what my final pattern looked like:

Except without the darts. 
A comparison of the original center back seam and my new center back seam. 


I ended up eliminating the darts and taking the difference out at the center front and back seams instead, because the darts just looked poofy and hideous on the stiff twill I used, and many extant garments (including Hazel Ying Lee's) don't feature any darts at all. Even so, the final garment is pretty unflattering to my modern eye. And if you're thinking that the above pictures looked fine, that's because you didn't see the back and side view...

Um. What. Can we say hello, excess fabric?

It's like I've got room below my butt for an extra butt. 

I realize that it's supposed to be baggier and roomier than modern pants, but looking at how some 1940s jodhpurs fit, I'm inclined to think that they did get at least a little sleeker between the two world wars. I desperately want to take out some of the extra fabric at the inseam, but it's faux flat-felled and there's that huge applique over it, so I'm just going to say this is a wearable muslin. Besides, if I keep it this way I can use it as the base for a wartime Lady Edith costume. I did end up purchasing this Folkwear costume pattern, based on a 1920s outfit from the Met, so maybe I'll give the slightly-more-modern jodhpurs a try in the future. Despite the unflattering bagginess, I'm actually pretty pleased with myself for actually making these. My brain definitely got a workout, what with the research and drafting and alterations! And of course, I couldn't resist pulling out my circa 2001 leather jacket for an even sillier non-HA aviatrix look.

Old-timey filter!
Anachronistic jacket and boots ftw! 

Summary:
The Challenge: Heirlooms and Heritage
Fabric: 2 yards of 54" wide poly-cotton forest green twill, fairly stiff and inclined to resist pressing, inherited from a friend's stash
Pattern: self-drafted, following original 1912 instructions, with modifications
Year: 1912, fudged into 1930s
Notions: Eight black 7/8" plastic buttons, 1" wide black petersham ribbon for the binding, black ribbon for the lacing
How historically accurate is it? I'm going to put it at 60%, since it's a real historical pattern, but from slightly earlier, and not strictly historical materials. I got as close as I could while sticking to stash, as I'm going for the look, since I'm trying not to spend money on this. Real jodhpurs from the 1930s seem to be mostly linen or wool, although there are a couple of cotton ones and this one is even a forest green twill! Four buttons for the waist seems to be standard, as is no yoke + facing + belt loops, but the button facings tend to be invisibly attached. The petersham binding should be replaced with twill tape, and the ribbon with actual lacing cord, per this very helpful examination of an extant pair.
Hours to complete: 12, but that's not including the research.
First worn: Just for pictures, and probably not for a long time, if ever. This was more a brain exercise project than anything, but maybe if they have a history day of sorts at school I could give it an outing? Although I'd have to make an aviator cap to go with it.
Total cost: $4 for the buttons, everything else was free from other people's stashes.
Netflix queue: Suitably enough, I watched Ken Burns' epic documentary The West while sewing this, which I heartily recommend not only for the sheer amount of information, but also because it touched on a little known part of Chinese-American history, the Chinese Exclusion Act. I know it can't compare to the long list of crimes committed against Native Americans, nor is it as awful as being enslaved for hundreds of years, but it's definitely one of those things that doesn't get covered enough in US History.
Final thoughts: While I didn't use any heirlooms, and these jodhpurs are only loosely part of my heritage, I think it's still fitting for this challenge. It inspired me to do a lot of research on a less well-known part of history and gave me a sense of pride in my APA identity. While I don't know that these costume jodhpurs will be passed on as an heirloom, I certainly hope that I can pass on that sense of pride in being Asian-American to SHB. I don't want him to grow up in a world that is suspicious of him because he might be an Other who's somehow "taking advantage" of the birthright citizenship amendment. Okay, I'm done politicizing!

And then I had a patriotism fail: I was trying to do one of those saluting poses like you see in the pin-up girl pictures from WWII, but I couldn't figure out why it looked so wrong. After some Googling, I realized I had actually done a "I'm shading my eyes while looking for someone" pose instead of a salute. *facepalm*

Tuesday, August 4, 2015

"Vivir con miedo, es como vivir a medias!"


Strictly Ballroom was my favorite movie when I was a senior in high school. My best friends and I were crazy about ballroom dancing and boys, so what's not to love about a cheesy movie featuring an ugly duckling who turns into a swan and gets to ballroom dance with the boy of her dreams? It's like Baz Luhrmann was trying to craft a movie specifically to appeal to us! Anyway, the key line from the film is when Fran goads Scott into dancing with her by telling him "A life lived in fear is a life half-lived!" What does that have to do with sewing? No, I'm not making ballroom dresses.

Two years ago, Mr. Cation gave me a serger for his birthday because he is a wonderful hobbit man. At first I was excited about serging All The Things, but then I got scared because of all the stories about how tricky it is to thread sergers and figure out tension and hey THERE'S A KNIFE THAT MOVES and what if I accidentally cut off my finger? So I kept making excuses for not figuring it out, like how we were moving into a new apartment so I didn't want to unpack it yet...and then the school year started and then I got pregnant and was tired all the time and then I had SHB and was really tired all the time, and before you know it, two years passed and the serger was still sitting in its nice box, and I was still scared. Finally I decided that enough was enough; it was silly to have a perfectly good serging sitting in a box just because I was afraid of messing it up. After all, a life lived in fear is a life half-lived and all. If studying the manual and reading the numerous blog posts sounded too overwhelming, I would just sign up for a class to teach me everything I need to know. Thankfully, my sewing school of choice, Cañada College, has a Basic Serging class!


Three long nights later, I had a notebook full of samples and I was no longer scared of my serger. I proceeded to do a whole bunch of sewing with both knits and fray-prone fabrics in order to make up for the previous two years. Looking at all my nicely enclosed seam allowances, I felt so silly for putting off figuring out my serger for so long. All the knit garments that could've been better finished! Oh well, at least I finally learned how to use it. And then all the power went to my head and I created a monster.


One of the garments I made during the last month was a raglan sleeve sweatshirt, which has been in regular rotation so often that I toyed with the idea of making another, identical one. I decided that was too silly, though, so I thought about what my wardrobe needed and figured a sweatshirt dress/tunic to go with leggings in the wintertime would fit the bill. I didn't want to make a plain one, though, so I started poking through my Pinterest boards for some embellishment inspiration. And as is typical for me, I got inspired by kids' clothes, namely this little girl's cat dress. Um, what was I saying earlier about identical sweatshirts being silly? I'm pretty sure this is sillier! But then I found this cat dress and this suggestion of a cat dress, for adults! I don't know, is there a point when one is too old to wear cat clothing? I'm over thirty and have a small human being who depends on me for sustenance, and I'm somewhat responsible for shaping young minds and all that jazz, should I really be wearing something so juvenile? Yes, I've worn lots of other cat clothing, but it was generally slightly more adult-looking.

This is not adult at all. Unless maybe I were a Japanese adult? They seem to revel in kawaii at all ages. 

Then I thought about the serger and how I spent two years living in fear (okay, more like two years living with intermittent guilt every time I either 1) made a knit garment, or 2) looked at the box in my closet), and decided screw it, if I want to dance my own steps...er, wear ridiculous cat clothing, I'm just going to do it, no matter what the Australian Dance Federation and president Barry Fife have to say about it!


Summary:
Pattern: McCall's 6992, modified to make it tunic-length
Fabric: Mystery sweatshirt knit (feels mostly cottony) from Elaine's husband's stash, passed on to me when they moved to Baltimore
Notions: Steam-A-Seam Lite for the appliqué pieces
Hours: Two so far, but I'm thinking I should probably go back and hand-sew around the facial features just to make sure they last through washing. I've had remarkably good luck in the past with Steam-A-Seam-ed appliqué pieces holding up, but I don't want to risk it with possibly my favorite use of it ever!
Total cost: Free, thanks to the use of someone else's stash.
Final thoughts: I feel like my cat garments just get crazier and crazier, and the more silly they are the happier I am about them. This is good, I'll get it all out of my system now, before SHB is old enough to be embarrassed by his mom's goofy outfits!