Showing posts with label Film Costumes. Show all posts

Tuesday, March 30, 2021

Eowyn, Shieldmaiden of Rohan

If there were awards for "The Movie (Series) That Spawned the Most Cosplayers/Costumers," I'm pretty sure that Peter Jackson's Lord of the Rings trilogy would be a strong contender. Goodness knows, it was instrumental in getting me started on my own costume-making journey! I remember when we first heard that FotR was coming out, I made "elven" capes for my best friend and another friend to wear to the movie. Because I was a poor college student who had no idea what I was doing, I bought a couple yards each of two different colors of the wispiest acetate lining fabric, then sewed two half-circle capes with unfinished, fraying seams, the rippliest, most uneven hem in the world, and I was so proud. 

But these capes made it to NZ, to the actual filming location
of the Nazgul riding past the hobbits hiding under tree roots!

In the years since then, I've made myself a number of Middle Earth-related costumes: a green Eowyn dress (from sheets), a hobbit maiden (from sheets), a Galadriel dress (not from sheets), an Eye of Sauron/Barad-dur headdress (from a balloon), a Party King Thranduil costume (that Lee Pace then tweeted!), a Smaug fancy dress outfit, and a Denethor + Pippin look with my daughter, and that's not even counting all the costumes for other people or Middle Earth crafts I've done. But the unifying theme for all of these costumes was a lack of screen-accuracy. Don't get me wrong, most of them were certainly recognizable as their characters (except maybe Smaug), but my modus operandi is very suited to community theater costuming: get the idea across as cheaply as possible, and assume that the audience will be standing several feet back. Also, using recycled/thrifted/secondhand materials means that finding screen accurate fabrics is nigh impossible. 

But since this is the Year of the Ring, I wanted to make one of my dream cosplays, Eowyn's camp dress, as close to screen-accurate as possible, while still keeping to my not-new-fabrics pledge as much as I reasonably could. 

From the invaluable Costumer's Guide.

I started with the inner layer, her cream-colored "chemise." I reused the bodice of a toile I made for my pirate coat as my base, since the unbleached muslin worked color-wise. For the neckline that would show above the brown bodice, I used a cream-colored jacquard with swirls that I had leftover from a millinery class. I then treated that fashion fabric layer like a facing but flipped it to the outside instead of the inside, effectively finishing the neckline edge, then zigzagged the raw edge down since it won't be visible. Rather than sewing the tiny tuck lines, I opted to keep things simple and just sewed parallel lines in gold thread. I think it works fine visually while saving myself the annoyance of trying to actually make such tiny tucks and keep them even.

It fits better on me than Cecily.

How many shortcuts can you spot in this picture? ;)


The sleeves were essentially really long bell sleeves with a slit cut up the center to the elbow (see this diagram, except my slit went up higher and the overall triangle shape had a wider base) that I narrow hemmed by machine. I made them out of cream-colored crinkle cotton that I inherited from a friend's stash. For the braided ties, I ended up purchasing new trim from Jo-Ann Fabrics, but they only had bright white so I had to coffee-dye them. I accidentally left them in the coffee too long, so they're darker than I would like, but oh well. The cream-colored underskirt is a half-circle skirt made from, surprise surprise, a thrifted cream-colored sheet. The opening for this whole underlayer closes with hooks and thread loops down the front. 


Here you can see how dark the braid turned out, as well as how nicely lettucey the crinkle cotton hem is. 

For Eowyn's brown bodice and corselet, I used a thrifted dark brown cotton sateen sheet from my stash (basically if I'm at the thrift store getting kids' clothes and I see a solid colored cotton sateen sheet in good condition, I'll buy it for costuming purposes) as the fashion fabric. The bodice from Simplicity 4940 (now sadly OOP) was a good starting point, although I had to draft my own cap sleeves. For the bodice neckline and corselet trim, I toyed with the idea of custom embroidery, but ended up going the easier route of machine-sewing a line of decorative stitching and then hand-sewing gold braid to dark brown bias tape, which I then used to finish the edges of said garments. The cap sleeves had the same decorative machine stitch + gold braid combo and were self-lined, then the armhole was finished with bias tape. 

Dark brown bodice, made with Simplicity 4940. 


Close up of the trim. 

Inside: I lined it with more sheeting and used black bias tape to finish the armhole.
You can also see my hand stitches at the neckline securing the braid.  


The corselet was drafted according to the instructions on Koshkathecat's absolutely invaluable costuming page; I first used those instructions for my Bellatrix corselet and mentally bookmarked it for the day when I would actually make Eowyn, and now I have! I cut one layer from cotton canvas and boned it with zip ties, then cut two more layers: from the dark brown sateen, and from quilt batting remnants. I quilted these last two layers together to get the distinctive diamond pattern, then basted all of it together and finished it with the trim pieces. I was so glad to have borrowed a tabletop grommeter from AJ of Confused Kitty Sewing, which made the whole last step so much easier than hammering everything in by hand! I did have to purchase brown rattail cord for the lacing as well. 

I'm so pleased with how the quilting came out! 

Secret secrets revealed to you: I had to add a little bias tape patch at the top of the back opening so as to wedge in a tiny piece of (ziptie) boning since my original piece wasn't long enough, and I'd already sewed on all the trim. 

All the pieces together!

The (slightly lighter) brown outer skirt was again made from a thrifted sheet, in a half-circle using my TNT pattern, Simplicity 5006. Seriously, I use that skirt pattern for EVERYTHING, from Mulan to Ursula to Weaver Girl to theater costumes. Then it was just a matter of scouting an appropriate location; Coyote Hills Regional Park, with its eponymous hills and giant mounds of rocks, was absolutely perfect. My photographer, @captured.by.shirelle, did an absolutely fantastic job of capturing the whole mood and look of Eowyn, White Lady of Rohan, "fairest lady of a house of queens...standing straight and proud, shapely as a lily...as if wrought by elf-wrights out of steel."


Summary 

Pattern: Simplicity 4940 for the outer bodice, Simplicity 5006 for the skirts, self-drafted for the sleeves, chemise bodice, and corselet

Fabric: Two twin-sized cotton sateen sheets for the skirts, half of another one for the outer bodice and corselet. Also 2 yards of 60" crinkle cotton for the sleeves, and half a yard of muslin for the chemise bodice, remnants of rayon jacquard for the neckline of the chemise, and remnants of cotton quilt batting for the corselet.

Notions:  Seven yards of gold braid, four yards of white braid, five yards of brown rattail, three packs of dark brown bias tape, a handful of brass grommets, a separating zipper, and several hooks.

Techniques: Uhh...self-quilted fabric using a walking foot? Does that count as a technique?

Hours: Well, I started working on this last December, then took a break to finish up Weaver Girl, so all in all I'd say it was two months of my kind of work hours, which is to say an hour here or there after kids are asleep, if I don't have other work to do for school. There was also so much hand-sewing of trim that I did in five minute snatches while kids were playing-but-not-arguing-yet, so it's really hard to say. I want to say at least 35 hours based on rough estimates of how much time similar pieces took pre-kids. 

Total cost: $65, but that includes $20 worth of gold pens for the flag, and then all the new trim I had to buy was pretty costly even with coupons. The main fabrics, though, cost less than $10. 

Final thoughts: I've always loved strong female warrior characters, from Mulan to Alanna of Trebond to Aerin Firehair, so it was pretty much a given that I was going to love Eowyn the first time I came across her. It's just a nice bonus that her costumes in the movie were brilliant. Eowyn is also extra meaningful to me because of where I was in life when I first read LOTR. Growing up, it was always drilled into me that going into STEM was the only acceptable career path, and my passion for art and making things was not something to be celebrated or pursued seriously. When I got to college, for the first time I was away from home and somewhat free to make my own choices; I switched from a biology major to an art major just as The Two Towers came out, and I was struck by her fear of being caged, her desire to make her own path, one that was different from what was expected of her, and ultimately her seizing the opportunity for glory in battle as Dernhelm. I saw her act of secret rebellion as akin my decision to choose my own major, but unlike Eowyn I did not kill a foul dwimmerlaik. Instead, I saw that a huge public research university was probably not the best place to get an art degree if I wanted to actually learn skills (and not just do weird avant-garde pieces), so I switched back to biology. I did, however, decide to be a science teacher instead of a researcher, which ultimately meant that I had the opportunity to get my theater costuming feet wet via high school drama productions. Later, once I became a more seasoned teacher and didn't have to spend every waking hour thinking about lesson prep or grading, I was able to make time for actual sewing, drafting, and costuming classes at a local community college. In a not dissimilar arc, Eowyn was able to make peace with her role and place in society and chose to be a healer. Both of us found a compromise in our lives that eventually brought peace and joy, not a feeling of being caged. All this to say, making and wearing this Eowyn costume was a dream come true, and a fitting conclusion(ish beginning to a new story). 


Oh! And the flag of Rohan! That was a ridiculous process of experimentation that I documented on my IG highlight, should you care to see all the wibbling I did about making it (and the rest of Eowyn). Tl;dr if you don't want to watch the story: I did an Elmer's glue resist in the outline of the Rohirric horse on a pillowcase, then painted it with watered down acrylic paint and used various gold paint pens to outline the horse. I used vintage bias tape to secure the flag to a spear (made from foam, duct tape, and a wooden dowel) leftover from a drama production. I hadn't even really planned to make it, but when I was planning for the photo shoot I realized that I didn't have a sword and I really need some kind of prop to hold or else I don't know what to do with my hands...I'm so glad it turned out as well as it did!


Wednesday, February 12, 2020

A Brandy Cinderella Dress for a Small Human Being

Cinderella was my first favorite princess. My dad likes to remind me that when I was in preschool, he read the Disney Cinderella book to me every night at my request until he had memorized it. Cinderella was the reason why my parents started calling me Cindy (because my name is not actually Cation), and I watched the movie so many times that I have to think it must have had some effect on my eventually learning to sew, because I'm pretty sure it has the longest sewing sequence in a kids' movie. My parents were too frugal to ever buy dedicated costumes or dress-up clothes, but no doubt I would've worn a fancy Cinderella dress to rags (in a bizarre reversal of the movie's progression) had I owned one. I don't love Cinderella now (I much prefer my princesses to have more agency and badassery, like Mulan), but I will always have a soft spot in my heart for her. So when SHB#2's best friend, K, who loves Cinderella and dressing up, turned three last month, I knew I wanted to help make her princess dreams come true.

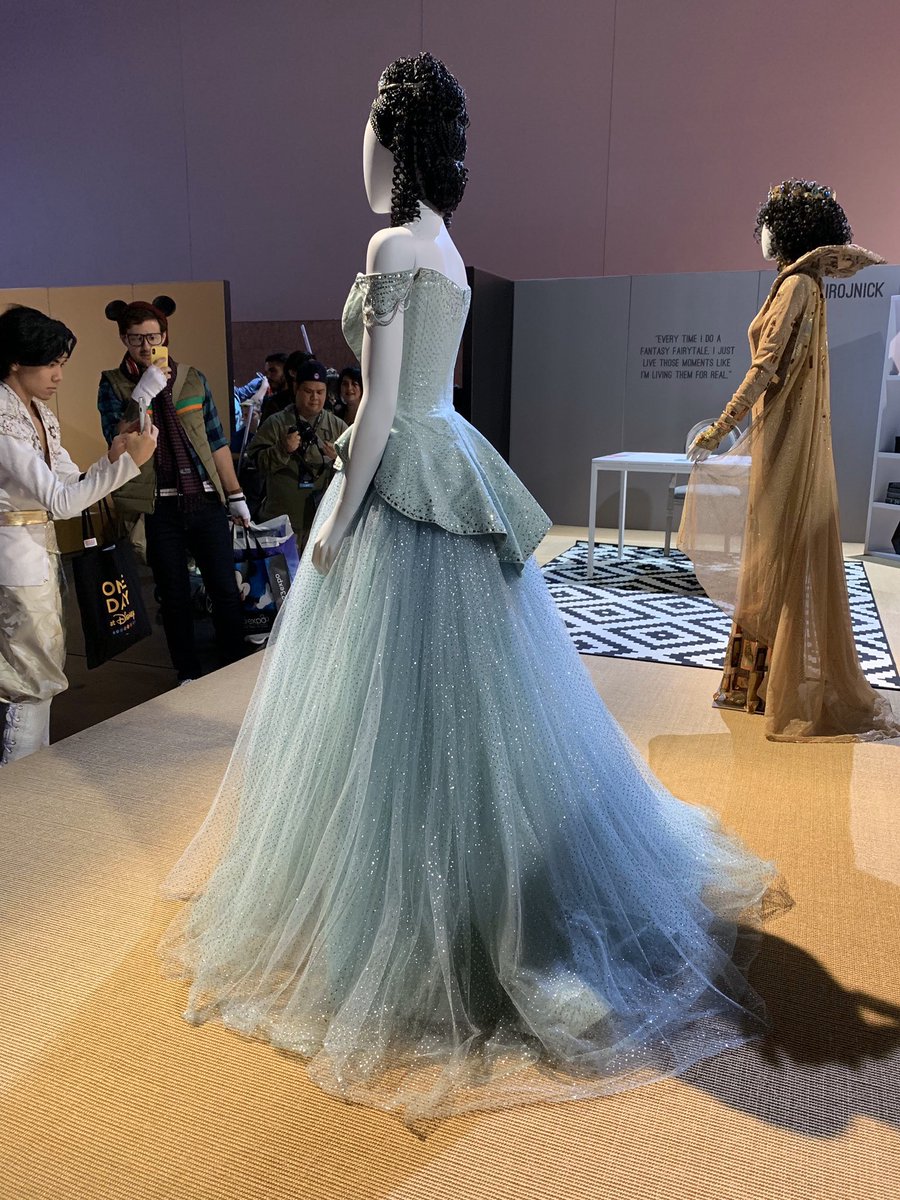
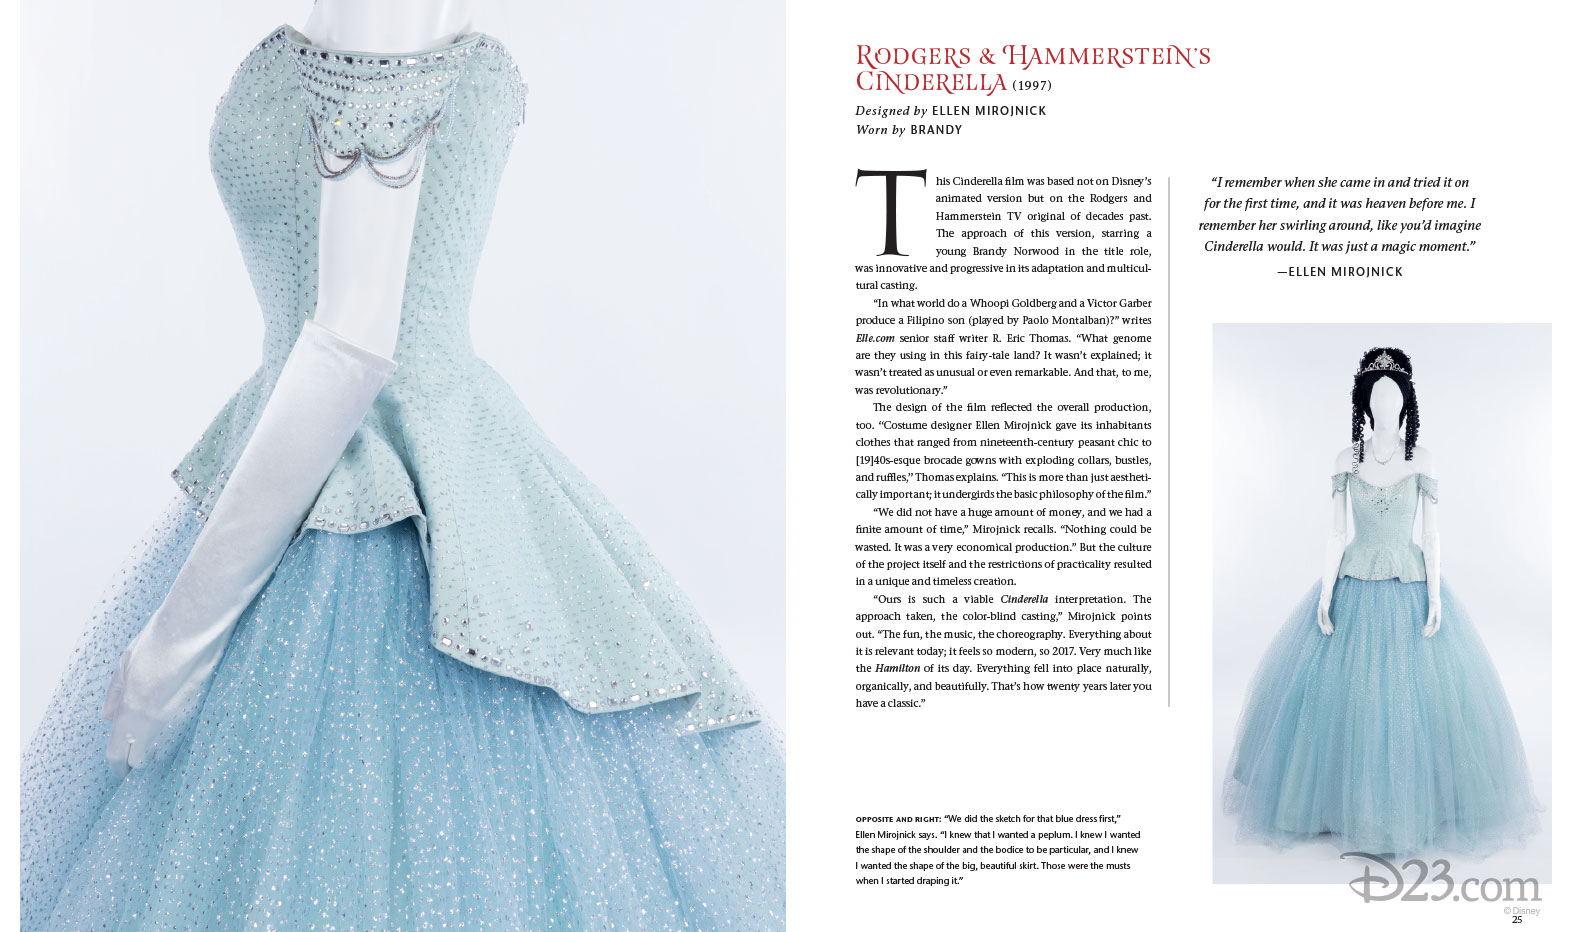
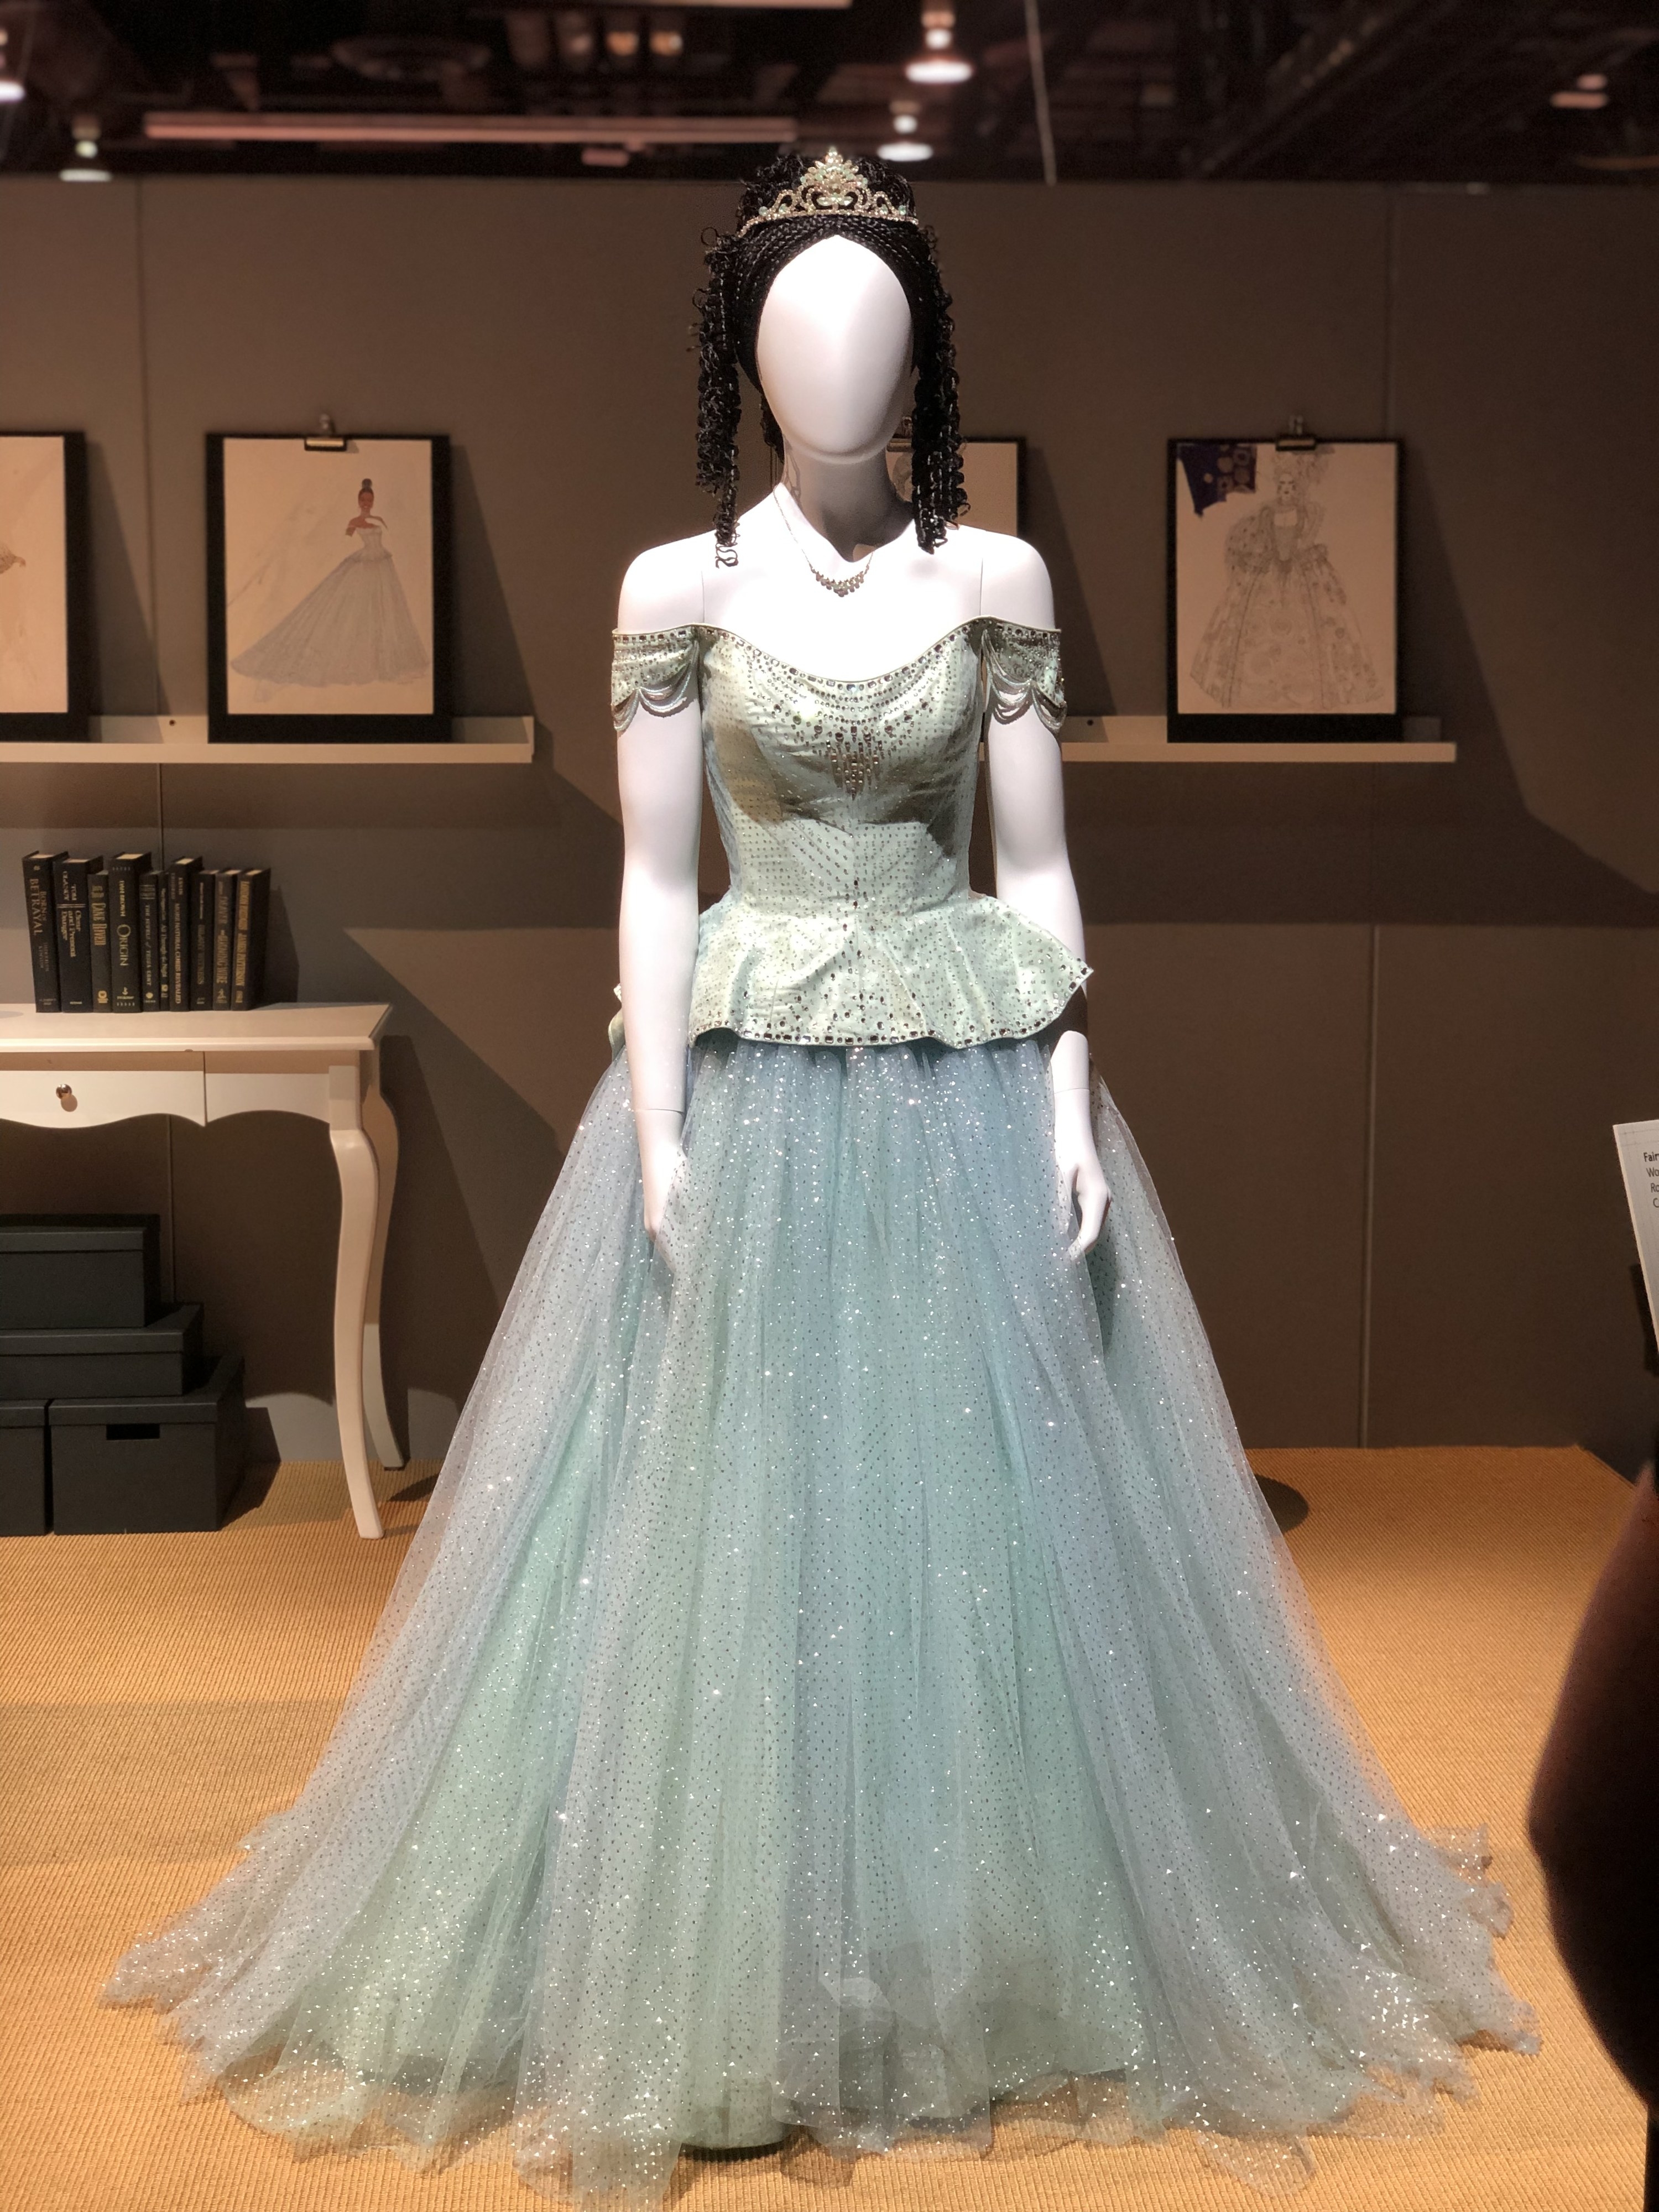
Here's the catch: K loves the 1997 Brandy version of Cinderella, and not the classic animated Disney one. There are tons of tutorials and patterns out there on teh interwebs for the classic Disney dress, but not much for Brandy's ball gown. Thankfully, at last year's D23 Heroes and Villains costume exhibit, the Brandy gown was on display so there were plenty of good reference pictures available even though the film came out awhile ago. I picked up a couple of different light blue sparkly fabrics from Joann's remnants selection (I make exceptions to my no new fabric buying rule for gifts, but even then I try to shop the remnants for small pieces that other people may not want) and started plotting about how to make this dress happen for a very small human being.


I love that  on the left you can see an Asian guy dressed as Paolo Montalban's prince taking a picture of the dress on display...I mean, how often does one get a canonically Asian, non-animatedprince?  


Having taken the evening gown construction class, I now know that a waist stay and boned bodice are essential for having a strapless dress stay up, but obvious I wasn't going to be putting such structure into a child's dress. Also, the fabric I found for the bodice was stretchy, because I wanted this to be a comfy, easy(ish) to put on fun costume. I decided that clear swimsuit elastic was the way to go, in the form of straps to hold up the top while the little droopy sleeve swags just hung decoratively. I knew that K and SHB#2 were more or less the same size, so I used one of her tops to draw up a vaguely raglan-sleeve-type pattern, where the sleeve had enough room to fall off the shoulder to look like Brandy's dress. I sewed some pintucks on the front and back to visually mimic the Vs made by the rhinestones on Brandy's dress, and added some pearls and silver beads from my stash to give the suggestion of a jeweled dress without covering the entire thing. Since the velvet is sparkly, I think the overall effect is sufficiently fancy. After semi-blinging out the top, I cut and attached a circular ruffle that was longer in the back to match the peplum on Brandy's dress.

Sorry, these are really not the best pictures because 1) glittery/sparkly throws off my phone camera, 2) our house does not get great light, and 3) SHB#2 was grabbing me while I was trying to quickly snap some pictures before wrapping it up to leave for the birthday party.

Tiny silver and pearl beads at the bodice neckline! Also, the tiara was one I bought for a costume party in high school, wore once, and forgot about until my mom was cleaning and found it and gave it back to me. I figured it should go to a little girl who could actually appreciate it. 
Back!


Brandy's skirt has layers and layers of fluffy tulle, but I couldn't find a good color match at Joann's. I did find half a yard of this nylon net with embroidered glittery flowers, though, which I deemed to be good enough. I layered it over some white dotted net (leftover from this top) and periwinkle blue knit fabric (leftover from making Mulan costumes) to get the blue-ish layered look, which worked pretty well, I think! The three layers were gathered into a white 2"-wide soft elastic waistband, then I hemmed the knit, innermost layer with some horsehair braid to help it stand out and away from tiny feet. The dotted net layer I left unhemmed, and the outermost embroidered flower layer has a whopping five inch hem. Since I didn't want a line of stitching going around the skirt, I just hand-tacked the flowers together where they overlapped. The nylon net is sheer enough (and there enough going on in the underlayers) that the overall effect is a mostly invisible hem, with the added bonus of the wide hem helping the overskirt to poof out more. With such a generous hem and the elastic waistband, there's plenty of room for growth (at least in the skirt, if not the top) for years to come.

Sparkles and glitter abound!


You can see the three layers of fabric here. 
Here's a close-up of how I folded over the outer layer. The flowers lined up very nicely, and the stiffness of the embroidered flowers at the bottom also help to keep it from collapsing in on itself. 


I think the finished outfit was received pretty well, considering K put it on right away and has been wearing it regularly ever since. I know the Selfish Seamstress (oh how I miss her presence in the sewing blogiverse!) says that sewing for kids is not to be done, but alas, motherhood has changed me and I am less selfish about sewing for others now. That said, I'm still only going to sew fun things, like costumes!

Blurry again, because have you ever tried to get a photo of a three year old in the evening, indoors?


The only problem is that throughout this process, I kept trying it all on SHB#2, such that by the end she thought it was for her. She was a little disappointed that it went to her bestie, so I think this means I need to make a floofy princess dress for her now...

Thursday, January 9, 2020

A Very Star Wars Halloween

Raising Small Human Beings is oftentimes an exercise in simultaneous frustration and amusement, and the selection of Halloween costumes is a prime example. When SHB#1 was three, he was obsessed with zebras, so he wanted to be a zebra for Halloween. That was fairly easy to make, and the fleece zebra suit I made for him got plenty of wear afterwards for pretend play. The next year, he was into construction vehicles and dinosaurs, so he alternated between wanting to be a pteranodon, a stegosaurus, or a "construction stegosaurus." I managed to convince him that a stegosaurus would have a hard time fitting a construction vest over the plates on its back, and together we settled on his being a "construction zebra" since the zebra suit still fit. I had to laugh when I saw his class picture: so many store-bought superheroes and princesses, and a lone zebra wearing a neon vest.

Here's a picture of the zebra costume, with a red cape so that he could be Superhero Zebra (4yos are nothing if not literal) for his third comic con. His stuffed zebra is also wearing a tiny red cape so that they can match! I was dressed as Dark!Rey. 

This past year, he was into the Octonauts for a good deal of it, so he went back and forth between wanting to be Tunip or Kwazii. I was despairing about finding teal or orange pants at the thrift store when he suddenly, in the last month before Halloween, got super into Star Wars, and decided he actually wanted to be Darth Vader. SHB#2 wants to do everything big brother does, so she immediately declared that she, too, would be Darth Vader (despite my best efforts to convince her that she would make an adorable Ewok). SHB#1 then decreed that we should be a Star Wars family, so I had to be Rey and Mr. Cation had to be Luke Skywalker. I can't lie; since Star Wars was one of my first fandoms I was super proud of the kids' geeky decision and secretly thrilled to have an excuse to make all these cool costumes!

Both kids already had black pants, and finding black turtlenecks at the thrift store was easy, so then it was just a matter of figuring out how to make Darth Vader's iconic chest plate, belt and cape. I thought about trying to applique all the pieces onto the turtlenecks, but that sounded like waaaaay too much work, plus I wanted them to be able wear the tops for regular, non-costume things. In the end, I decided to cut all the little buttons and "lights" out of tape and put them on black felt that I had leftover from a school costuming project. Gray duct tape worked for most of the details, and for the red and green bits I just used Sharpie to color over masking tape. After I showed the completed chest box to SHB#2, though, she immediately tried to take off all the "stickers," and I realized I would need to find a way to make them more durable to survive kid handling. I bought some iron-on vinyl and put that over the chest box and belt pieces and it worked perfectly; the tape seemed to really meld into the felt and it was easy to stitch it onto some scraps of black fabric and ribbon in order to allow it to all be tied on. The capes were just half circles cut from stash black jersey knit and sewn on with some elastic to gather the top and allow for easy slipping on over the kids' large heads.


Finished costume, a little worse for wear after being stuffed into a backpack, but still holding up fine! 


On Halloween, with their matching lightsabers. SHB#2 absolutely refused to wear a DV mask. 


Since SHB#1 hadn't specified which version of Luke he wanted Mr. Cation to be, I went with the easiest to put together, the ANH Tatooine Luke. I borrowed a gi top from a friend, and then it was just a matter of wearing his own khaki-colored linen pants and a dark brown leather belt with the buckle turned to the back. I also wrapped some strips of brown linen around his calves to mimic Luke's puttees.

Rey was the last costume to come together, even though I've been working on her the longest. I was originally planning on making her Resistance outfit to Rebel Legion standards, but stalled when I realized how difficult it was going to be to thrift the right fabrics. I'm committed to making my costuming greener where I can, and if that means not being screen accurate, then so be it. Costumes already get so few wears, I'd rather not add to their environmental burden by buying new fabrics for each one. Anyway, a year ago I thrifted some long brown pants; I cut off the bottoms and used those to make the kneepads. The shirt is made from a tea-dyed large white polo shirt, and the belt and wrist cuff were purchased from a seller in the Rey FB group. I found a very 80s grey wool herringbone coat at the thrift store for $10 that I initially thought might work for Rebel Legion approval, but upon closer examination, I realized that it was actually black and white herringbone, which together looked gray from far away. At this point I was too disappointed to continue work on Rey, so I stuffed everything into a garbage bag for a year.

From (a galaxy) far far away, it reads as gray, but up close it's pretty obviously black and white ;__;


A year in a naughty bag gave me time to get over the sting of disappointment, and when I pulled the coat back out, I felt okay about making the vest to complete our family costume. Thankfully, I still had the pattern pieces that I'd drafted and the mockup vest, so after what felt like miles of seam ripping to take apart the coat, I managed to get the pattern pieces to mostly fit.

From my Instastory. See the welt pocket I had to work around on those top pieces?

I ended up using a bunch of the scraps to practice the closed blanket stitch that's used on the edges of Rey's vest.
Why I chose to put in the time for that tedious that detail for a non-RL-approvable vest is beyond me. 


I did have to fudge a little by sewing some buttonholes closed, but it worked out in the end. I lined the inside of the vest with gray cotton flannel, which, with the interfacing that was already fused to the wool, made the vest stiff and heavy enough. I did reinforce the center front edges of the collar with some ironed and stretched horsehair braid, a technique I learned from my evening gown class with Lynda Maynard. After that, it was just a matter of adding the hand-sewn closed blanket stitch to all the edges. That took forever, and I only finished it just before we had to leave for trick or treating!

See that buttonhole I had to sew up right next to the side seam? Also I probably should've done something about the bulk at the shoulder from all the layers of wool+flannel+batting+turned seam allowances, but at that point I no longer cared. 

Look at all that time I spent carefully doing all that ladder-stitching by hand!
Gray flannel lining and wool held together by closed blanket stitches, and also all the whipstitched edges on the shirt.
So. Much. Hand. Sewing.

And here we all are! 


During trick or treating, it was so fun to hear people react to SHB#1's costume -- "Aww, a tiny Darth Vader!" -- and then to hear the even more excited reaction when they saw SHB#2 come up to the doorway right afterward -- "OMG AN EVEN TINIER DARTH VADER!!!" -- because obviously the smaller something is, the cuter, right? Only a couple people realized I was Rey, and not just somebody with somewhat odd clothing choices, but Halloween is really about the kid costumes. I would like to finish making my knock-off Po-Zu Rey boots at some point in the future, but in the meantime I'm just glad I finished this vest so that I could remove at least one UFO from my costume list and make my son happy at the same time.

Then again, maybe his happy face is due to the fact that he just ate a piece of his trick or treating loot. 

Monday, December 30, 2019

A Dangerous Coat

I used to think the 1910s and 1920s had the worst fashions, but the VPLL 1912 Project, Downton Abbey, the new Great Gatsby movie, the Fantastic Beasts movie, and Phryne Fisher have all conspired to totally change my mind about that. I now love love love these eras, so much so that when at a loss for what to do for my Cañada College fashion department classes, I've just sort of defaulted to the 1920s. I drew drop-waisted dresses for my fashion illustration classes, made a summery cloche for my millinery class, and for this past semester I've worked on making a 1920s-ish coat for my tailoring class.

This tweed+fur coat of Phryne's was my inspiration.

When McCall's started releasing updated vintage patterns as part of their Archive Collection, I immediately snatched up a copy of M7259, a (sadly now out of print) caped coat pattern, and filed it away for "someday when I have a good reason/the time and skills." Since I can only take classes at night, and tailoring was the only class I hadn't taken yet for this past fall's evening classes, that gave me the reason, and presumably I would learn the skills and make the time. Admittedly, it's not a very difficult coat to make (it's even rated as "easy" on the pattern); a shapeless boxy coat doesn't require a lot of fitting, there's no notched collar or vents anywhere, and not even a welt pocket! But I knew I would have a busy semester already, what with parenting in general, Halloween and cons, and costuming. Did I feel a little embarrassed about the simplicity (even though it's a McCall's pattern...haha sorrynotsorry) of my pattern choice when I saw my classmates making five or more muslins, making all sorts of alterations, drafting new collars and sleeves, and putting in eight welt pockets? Maybe a little. Was I grateful I kept it uncomplicated when, after finishing up the drama production I had a little over a week to put together all my coat pieces and do all the fussy hand-stitching? You bet! Besides, I know I would never wear a blazer, and I already have two perfectly serviceable RTW coats that I love, so I might as well get going on my dream of having a Phryne-esque wardrobe.

The pattern: I was definitely swayed by the brilliant red sample. 


My little compilation of scraps to give me
an idea of how things might look together.
First step was selecting fabric: I knew I only had a couple of pieces of yardage with the right length, drape, and fiber content (our professor preferred natural materials, especially wool because of its "pressability"), so it was basically between a dark green wool blend suiting material or a gray wool tweed suiting with little colored specks in it. We decided that the gray tweed would hide more sins, what with this being my first serious coat, and I did have a little more of it so as to allow me to make the cape as well.

Next step was to do a pinned-together paper mock-up, which to me seemed a little pointless, but I can see how it would be a cheaper, faster way to get a sense of major size or fit issues without the effort of making a real muslin. As it was, I only had a very minor swayback adjustment to make, but then I do realize that I am extremely fortunate that I usually fit Big-4 patterns with very few adjustments (usually only swayback, narrow back, and small bust adjustments). Then we made actual fabric mock-ups with cotton muslin, and again, not much to report here, other than that I decided to shorten the cape significantly so as to keep it from being visually overwhelming.

Without and with the cape, with dark threads marking the grainline on the sleeves and the center front line. 

I sewed my mock-up with the side seam pockets that the pattern called for, but decided later that I didn't like them; they made things hang weirdly, I didn't like the bulk of the pocket bag, and they were too far back to feel natural when I put my hands in them. I decided that I needed to make pockets on the front of the coat, but at that point I had a minor crisis about what kind of pockets to make, and proceeded to flood my IG with way too many stories debating various pocket types and placements and their historical accuracy vs. general aesthetic vs. ease of use. Since I was also in the thick of drama costuming, the pocket issue gave me an excuse to not work on my coat for a month. I did assemble the cape (but not hem it), but three weeks before the coat due date, and I had really only a bunch of fashion fabric pieces (that I had at least interfaced with soft fusible knit interfacing; since my fabric was so thin and loosely woven, it really needed some extra support) and lining pieces.

This was what I was primarily deciding between: a shield-shaped patch pocket, or a swoopy-looking patch pocket that would be sewn into the side seam. Although the swoop won by a small margin on IG, I realized that I really preferred the look (and historical accuracy) of the shield and went with that option. If you want to see all my ridiculous wibbling about the pockets (and other construction bits), you can check out my 1920s coat highlights on my IG here.

The antepenultimate week (and also the week leading up to the show, so lots of last minute decisions, fittings, and runs to various stores for accessories and such), I sewed together the facing, lining, and lining patch pockets. The lining patch pockets were hand-stitched so that I wouldn't have topstitching thread showing, per this extant 1920s coat (I did briefly consider smocking the tops of my pockets, but then dismissed that idea as that of a person with more time than I had), which looked lovely but took a long time.

Here's what the facing + lining looked like hanging on Cecily. You can also see the only dart in the entire thing where the shawl collar is. Ignore the stack of toddler clothes storage boxes in the background...


The penultimate week (and also the week after the show, i.e. all the tasks of costume striking to be completed by me, the one-person costume shop), I sewed together the fashion fabric fronts and back, and sewed the sleeves (but didn't set them in) and brought them in to class to have them hung by my professor (I put on the coat and she pinned them in place in the position that caused the least drag lines. Since many of us work on computers, we have forward sloping shoulders and lining up the shoulder seam notch and underarm/side seams may not actually be the best position for a lot of people; my sleeves needed to be rotated forward about 3/8"). I basted the sleeves in by hand in class, then brought them home to set in by machine. I also had decided on shield-shaped patch pockets as being the best compromise between historical accuracy (while there are some examples of welt pockets on coats of the era, the vast majority of them had large patch pockets...or no pockets at all, but that was a non-option for me), general aesthetic (a heckin' large square, while historical accurate, looked a little too boring to me, so I went with a slightly more interesting shield shape), and ease of use (I placed them low enough that it wouldn't be awkward to put my hands in them, even if the perfectly vertical placement is a little less ergonomic than a slanted one). Like the lining, these patch pockets were hand-stitched invisibly, and thanks to the busyness of the fabric, they don't break up the lines of the front as much as I was afraid they might.

That last week, I set the sleeves in, put in all the tailor-y bits (homemade shoulder pads, sleeve heads) attached the outer shell to the facing/lining, and then went about the tedious business of evening out my hems and catch-stitching everything down. For the hem of the cape, I catch-stitched the fashion fabric and the lining separately, then used French tacks to secure the two together at the side seams and center back. I had previously attempted to attach the lining entirely, but couldn't get it to sit right with a jump hem on the bias portions, so I opted to let it hang separately.

You can see the shape of the cape here, as well as the snaps that hold it onto the coat. 

For the coat, it took a couple of tries (and lots of staring at the coat on Cecily as a pinned, glared critically, repinned, glared again, etc.) before I got everything to hang right without pulling, but eventually I got it all sewn down (again, by hand) with a jump hem and everything! Oh, and I also tacked the lining to the coat at the neck seam allowance and the side seams so that the lining wouldn't billow out separately from the outer shell of the coat. I finished all the hemming with two days to spare, but the next day was full of frustration as I attempted to sew in the fabric-covered snaps and large button in exactly the right places and without any weird pulling anywhere. The morning the coat was due, I plopped SHB#2 in front of Sesame Street so that I could sew on all the snaps that attached the cape to the coat, and then I was finally done!

Without the cape, with nicely-blending-in pockets. 

Hello, 1920s-esque ulster coat!


Summary
Pattern: McCall's 7259, part of the archive pattern collection, circa 1927
Fabric: A little over 3.5 yards of a 60" wide, dark gray, tweed wool suiting with little flecks of ivory, burgundy, black, cornflower blue, and mauve; I originally purchased this from an antique furniture store in Berkeley seven years ago when I found a tiny little shelf in the back of the store that had some random yardage. The lady said she had got it for herself to make something fabulous, but had come to realize she likely never would, and she just wanted it to go to a good home. I paid all of $30 for it, which I now realize was an absolute steal for fabric of this quality. The 2ish yards of 55" wide lining fabric was mostly this dark burgundy floral damask polyester satin, which is on the thick side for a lining, but that just makes it feel extra luxurious. This was from my best friend Elaine's partner's stash, that they passed on to me when they moved (out of Arizona, ultimately back to the Bay Area!), so when I look at the lining I'm reminded of their generosity. It wasn't quite large enough for me to be able to cut all the lining pieces, even with the shortened cape, so I supplemented with some black Bemberg rayon for the sleeves since they wouldn't be seen.
Notions: 3 yards of 20" wide fusi-knit interfacing, which I used on every pattern piece except for the lining pieces and the back piece. I didn't have enough to do the large back piece (and actually had to piece together bits for the side edges of the front, and didn't want to wait to order more, so I just used black silk organza to underline the back piece. The organza was a fortuitous find from the free shelf in the back of the sewing classroom, and I still have yards left! I also purchased six 3/8" metal snaps for the cape attachment, a 1.5" covered button kit for the coat closure, and used a set of 1" metal snaps (covered with fashion fabric) from my stash for the inner closure. The facings on both the cape and coat are piped with black silk dupioni left over from my bustier project, and the hem of the cape lining is finished with burgundy-colored lace hem tape from an inherited stash.

I love that the inside is so secretly beautiful, even if nobody will ever see it!

Will you make it again? Unlikely, since I don't really need another coat like this. I do want to make another Phryne-inspired 1920s coat though, maybe a lighter duster in linen?
Total cost: $30 for the wool, lining was free, about $15 for the interfacing, and $5 worth of snaps/buttons = about $50! Of course, throw in the cost of the class tuition + toll + parking...and all the hours spent...
First worn: Just in class to show off and for pictures, but I'd like to wear it to go see the Phryne Fisher movie when it comes out next year!
Final thoughts: I'm really glad that I was able to make this coat almost primarily from stash/secondhand fabric, thereby keeping to my unofficial pledge to not purchase new in order to stay as green as possible in all my sewing endeavors. Things like interfacing or the exact size of snap are hard to come by secondhand, so I'm making an allowance for those things, though. I'm in love with the (detachable!) drama that the cape provides, and the instant Sherlock-y vibes of a caped coat. I have a little bit of wool leftover; maybe I should make another deerstalker? Actually, I would rather try to make it into a 1920s hat to match, so maybe if I find a suitable pattern one day. Without the cape, the coat is a little boring, but that's fine, because I decided to splurge a little and buy myself a fabulously fluffy, white faux-fur collar from Amazon that I can throw over the shawl collar of this coat to up the Phryne-ness of it!

This was taken by the fashion department's blogger. 


I'm really pleased with the whole tailoring class experience: I got a lovely coat out of it (even if I later realized that I had made myself yet another grey wool coat (aforementioned RTW coats in my wardrobe are also grey wool, so I guess I have a definite coat type...), and while mine didn't have more technically challenging bits like bound buttonholes, welt pockets, or a notched collar, at least I got to practice those skills when I made my samples, and best of all, I got a scheduled sewing time every week (and I even got to throw in the bonus of regular conversation with another adult, since my costuming friend @simply_mi was also in the class!). Even though the lead up to class is always stressful (get dinner ready! make sure the house is somewhat in order! spend some time with SHB#1 when he comes home from school! make sure my bags are all packed with all the sewing things I need!), in the end it's really nice to know that I'm guaranteed at least three hours every week to do something just for me.

Sometimes I feel guilty for taking so much time for myself every week -- it's not just the sewing class itself, but the commute there and back, the time it takes me to do my assignments for the class, and the time it takes to go out and acquire the materials I need to do my assignments -- but just recently I fell down the rabbit hole of Bernadette Banner's historical sewing videos, and she mentioned Cathy Hay's Worth peacock gown reconstruction project, which then led me to this very helpful video where she talks about how not to feel guilty about sewing when you have a family. She quotes Iyanla Vanzant: "My cup runneth over: what runneth over is for you, but what's in the cup is for me." At first, it seemed like just another variant of the "put on your own oxygen mask first" mantra that I blogged about before, but upon further rumination I realized the problem with that: oxygen masks are vital to life, so it makes sense to take care of your own basic needs first. But sewing costumes, or just giving in to my drive to make things: that's not *really* a basic need, is it?

I don't know if it's the child-of-immigrants, sacrifice-everything-for-your-family, just-work-harder rhetoric that was drummed into my head growing up, or leftovers of my childhood church's very conservative, Puritan-esque suspicion of anything that seems like too much fun, but it's very, very difficult to let go of the feeling of guilt that I should be spending all my free time doing something less frivolous. Like I said, I already have two fine coats, and there's always something more productive I could be doing with my time: research on developing children's emotional intelligence, integrating NGSS into my science teaching, or figuring out how to reduce waste in our family. I go ahead and pursue my hobbies anyway, because I'm a selfish Slytherin like that, it's just that I carry along a lot of guilt with it that prevents me from fully enjoying it. I'm not sure where to draw the line, since I know it's obviously not an either/or issue. Taking time for myself is healthy, but parenthood does inherently involve some sacrifice, and there must be a balance somewhere...and what if I just have a really, really big cup and "need" lots of replenishing time before I give the runoff to anyone else? See how I'm hesitant to even call time to create a need, I mean it's not one of those things that form the foundation of Maslow's bogus hierarchy of needs now, is it? If any other sewing moms out there have any brilliant insights, I would appreciate them!

Anyway, all this to say, it's so hard to know how to break out of societal constraints and expectations for women and undo the years of programming. A man cave is, if not expected, definitely not frowned upon for a stereotypically male breadwinner to be able to relax, get away from responsibilities, and putter around. How that translates in my mind for a non-breadwinner is trickier until I remember that I'm trying not to devalue traditional "women's work" like childcare and sewing, and I want to set an example for my kids of self-care and not self-martyrdom. So I suppose it's kind of perfect that my coat has four nice large pockets, perfect for carrying leaflets to spread sedition? Or, you know, fairness, kindness, and equality. Ladies, I guess I did take the advice of Irish poet Sharon Owens, and sewed myself a dangerous coat made of pockets and sedition (go read her fabulous poem if you aren't already familiar with it).

Pockets! (Photo courtesy of my professor, Ronda Chaney.)

[Apologies for the mostly terrible photos in this post. Most of the construction photos were taken at night, since that's when I sew, and I kept thinking I would take better finished garment photos in an atmospheric location, but let's be honest, that's probably not happening anytime soon and I'd rather get this blogged before I forget all about how I made it! Also, more about my lab garment, a 1920s-ish evening gown, in the next blog post!]