Thursday, February 7, 2013

Sew Grateful Week + Giveaway


Many thanks to Debi for hosting Sew Grateful week every year to remind us how much there is to be grateful for in the sewing blogiverse! I feel like I've written pretty extensively fairly recently about how glad I am to have discovered sewing, and what sewing and the online community have done for me, so I won't rehash that here. I still wanted to reiterate, though, that I am still so incredibly thankful to Mr. Cation and my friends for their support, Walnut for being cute, and all of you out there who are encouraging and informative through your own blogs and your comments on mine. This community is a pretty special place, isn't it?

Walnut gives his best coy look. Dawwww...

There are some pretty amazing giveaways going on, and while I can't compete with say, a book on  tailoring or a new Colette pattern, I can throw in an assortment of goodies for multiple winners!

#1: The Sophia Trench Coat pattern by Serendipity Studio, uncut, sizes XXS-XXL. It's a raglan-sleeve coat, so it should be easier than one with set-in sleeves. I originally bought it as part of a coat-making class at my local sewing shop, but I ended up not being able to make the class dates. I still have the pattern, though, so this would be a good beginner coat project for you if you're looking for one! Here's an example of a less loud version of it.


#2: McCall's 7385, a raglan-sleeve knit dress pattern in petite. It's from the eighties, which was not the best era for fashion, but I liked the stripe/chevron version they picture. And again, since it's a raglan-sleeve, it should be an easy first dress. Don't forget the personalized instructions by Palmer & Pletsch!


#3: McCall's 9071, a 1967 sheath dress pattern with some cool seaming, in size 16 (bust 38). I originally got this as part of a whole packet of patterns, but the bust is much too big for me.


#4: Butterick 4790, a reprint of the 1952 walkaway dress, uncut, sizes 8-14. I'll be honest, it requires so much fabric I'm unlikely to ever make it up, but it's definitely a cute retro dress!


#5: A 1965 Simplicity sewing book. I came across it in one of my thrifting adventures, and while it's not in pristine condition, the information in it is still good. There are sections covering pattern and fabric choice, alterations for fit, step-by-step illustrated instructions for how to put together common items like dresses, skirts, blouses, and men's shirts. There are also sections covering useful things like types of fastenings, embroidery stitches, seam finishes, basic tailoring, etc.


To enter the giveaway, just leave a comment saying which set you would like. I'll even go so far as to say you can enter for multiple items if they all strike your fancy! And just out of curiosity, tell me what's your least favorite fashion era -- mine is, in fact, the 80s, which might explain why I'm giving away the second pattern! I'll close the giveaway on Sunday night at 11:59 pm PST and announce the winners on Monday.   This giveaway is now closed! Thanks for entering!

One more gratuitous cat picture. Sometimes I look at Walnut and think it's just unreal that he's so fluffy.

Monday, February 4, 2013

February Stashbusting: the LOVE CHALLENGE

Well, we're one month into our year-long stashbusting sewalong, and it's been amazing seeing what you all can whip up from less than a yard of fabric! Emily has selected some of her favorite makes from both the Flickr group and the link party, so if you haven't already seen her post, go check it out! And now, since it's a new month, we prepare to dive into sewing for our loved ones. Since February is the month of Valentine's Day/Singles Awareness Day/Hearts and Hooves Day, it's only appropriate that we make a dear family member or friend the recipient of our time and efforts. To kick off the month, I used stash fabric to make an underbust corset for my little sister.

Isn't this fabric awesome?
This is the same lining as my pair of Elizabethan bodies. 

My sister, coincidentally also named Emily, has helped me with so many ridiculous projects over the years, and, being similarly science-minded, she really liked this skeleton print. Since I had less than a yard to work with, and its drape is inappropriate for tops, I knew I had to turn it into a corset. I used Jacci Jaye's free corset pattern on Burdastyle as a starting point, but graded it down to fit her much tinier torso. The finished corset is a size 21.5, meaning that if it were laced all the way shut, the waist would measure 21.5 inches. Of course, one wouldn't actually wear it laced all the way shut, so it's not quite as scary as it sounds. Since I'm going to have to wait until the President's Day weekend to deliver it to her, I went ahead and modeled it for you all. It's a little small for me, but you get the idea.

Front!
Side!
Back!
I'm pretty pleased with my pattern placement at the center! 

This is what it looks like laced down to 25 inches, two inches less than my normal waist size. It feels like a tight hug. 

Summary:
Fabric:  1/2 yard of 44" wide Alexander Henry's "Osteology" print on a high-quality quilting cotton, purchased at my local quilting store last year, underlined with cotton muslin and lined with home-dec canvas.
Notions: Hook and eye tape, grosgrain ribbon for the waist stay, black bias tape for the binding, 24 two-piece silver grommets, 7 yards of 1/2" black satin ribbon for lacing, heavy duty cable ties for boning
Techniques: Using my new walking foot! It really made sewing all the layers together so much easier; I don't know why I waited so long to get one! Since corset-sewing requires so much accuracy and lining up pieces and sewing them without shifting, the walking foot made my life easier, and this corset turned out much better than my first one.
Casualties: 3 sewing machine needles, 2 finger stabs that bled just a tiny bit, from when I was trying to pull the needle through the many layers.
Hours: Four hours to cut and sew the corset and boning channels, another hour to cut and file down the cable ties for boning, all of the Super Bowl to hand-sew the binding, and another hour to figure out grommet placement and set them...probably about eight hours total.
Will you make this again? I don't think I'm going to make another underbust corset, but then last time I made this pattern, I said I wouldn't and I did.
Total cost: The fabric cost $7, the hook and eye tape $3, the binding $2, the grommets were $4, the lacing $0.50, and the cable ties $4, so about $20 for the whole thing.


Final thoughts: I suppose I should reserve my final thoughts for when my sister gets to actually try this on, but for now, ummm, I really like this and I'm pleased with myself? It's been almost exactly a year since I made my previous iteration of this pattern, and it's cool to see how much I've grown as a seamstress. When I made my red corduroy one, I wasn't confident enough to grade it down, and the insides looked messy, not to mention the fact that it took almost 20 hours. This time, the sewing just felt easier, and even with all the fussy hand-sewing it took less than half the time. Does this mean that if I make this pattern again in a year or so, it will take four hours??

Playing around with old-timey filters, because corsets are old-timey. Totally makes sense. 


I can't wait to see what this looks like on my sister! And I know I promised after my Regency costumes that I would get back to real clothing, and corsets are not exactly everyday wear, so...next time, I promise.

Friday, February 1, 2013

Channeling Caroline and Charlotte


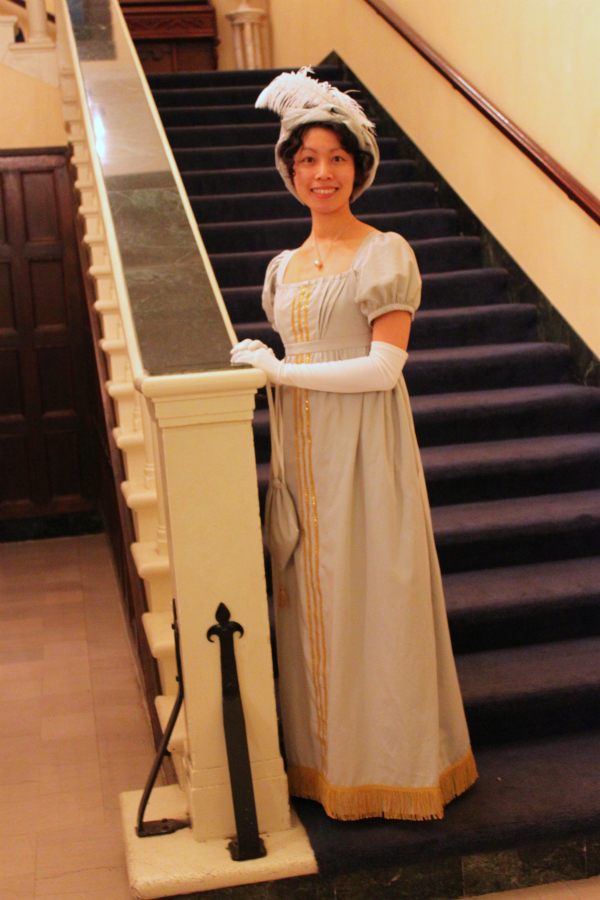
I'm finally getting around to blogging about the inspiration and details of my Jane Austen Evening ball gown! I actually intended to finish it for the first HSF challenge, but since it was a new pattern, I had only finished muslining the bodice by the time the deadline rolled around. Just as well, since I didn't really have any other historical costume UFOs that would've worked for this challenge.

A very nice gentleman obliged me by snapping these photos for me. One of the hugest downsides of going to event on your own is you don't have a photographer to take a bazillion pictures of your costume for you!

When I first started planning for this costume, I pictured a ball gown in that ubiquitous white muslin that everyone thinks of when they imagine Regency era dresses. Unfortunately, none of the fabric stores I visited had the right kind of white cotton for what I was willing to spend. Just as well, since the celadon-colored sheet that I ended up with was definitely more unique and cheaper to boot! Having decided on a color, I then had to figure out how to dress it up so that it would look appropriately fancy. After browsing the collections at the Met and the V&A, and combing other people's Pinterest boards, I finally settled on these three gowns as my main inspirations. Since I had quite a bit of gold trim, and Ackerman's Repository plates show a recurring motif of vertical trim for the 1810s, I eventually settled on "copying" Princess Charlotte of Wales' blue "Russian" gown as my main inspiration for trim.

This gown actually used to be a rich, dark blue, as shown in an 1817 painting by George Dawe. 

Since my hair is so short now, I knew I wouldn't be able to do the mass of curls that seems to be the norm for Regency hair. I settled for rag curling the longer pieces in the front, then hiding the rest underneath a turban. I've loved the turban+feather look ever since I first saw it on Miss Caroline Bingley in the 1995 BBC Pride and Prejudice miniseries, and I was really pleased with how the overall look turned out!


True story: this balloon jammed into a plastic trash can was my sorry excuse for a head mannikin. The whole time that I was tacking it together, I was scared to death that I was going to accidentally jab the balloon with my needle and have my turban fall apart before I'd secured all the perfectly-arranged folds.  
I used this very helpful page to construct my turban. I started with a big tube of fabric tied around the balloon with the ends tucked strategically into folds, then just started stitching random bits to other bits until it all stayed together when I picked it up to put on my head. It's crowned with a single ostrich feather, because that's all I could justify buying. In the end, it turned out to be a bit of a hazard while dancing; since I'm so tall, every time I turned under while dancing with a shorter partner, the feather would get knocked askew. 

To complete the whole outfit, I made a little reticule from my remaining fashion fabric, using this pattern, but with only two panels. I added a little gold tassel at the bottom, and in it I placed a handkerchief, my "calling cards" (which remained unused), and my phone and lip gloss. I was also fortunate enough to find a pair of long white gloves at a thrift store for two dollars for the dancing part of the evening.


I already talked about how the actual tea and ball went, but I just wanted to reiterate that even though it was scary to go on my own, it was really fun in the end and I met such nice people. The highlight of the evening was getting to "talk shop" with other people who had made their costumes. One lady totally made my night when she came up to ask if Princess Charlotte's gown was my inspiration -- I was so gratified that that came through in my execution and someone recognized it!

Just the facts, ma'am:

The Challenge: UFO...this was a UFO for only about a week; I put it aside after making a toile of the bodice so that I could make my Regency day dress.
Fabric: I wouldn't be me if I didn't make a ball gown from sheets! I didn't thrift it, but it was a very nice cotton sateen queen-size flat sheet. I loved that it was soft and drapey and had a faint sheen to it, but was still stable and easy to work with since it was cotton.

Not the best picture, but you can see that the fabric does have a faint sheen to it. Also, a slightly better look at the amount of material gathered into the small back and my asymmetrically placed belt loops...

Pattern: I used the 1798-1805 Salisbury Museum drop-front gown in Janet Arnold's Patterns of Fashion. Fortunately, I'm about the same size as the original gown wearer; the only modifications I made were to get rid of the train and shorten and widen the sleeves, so as to make the whole dress more suitable for a ball and dancing. I also changed the bib front from the original wide rectangle to a trapezoid, which works better for my bust size.

Best cheap method for scaling up the Janet Arnold patterns: wrapping paper with a pre-printed 1" square grid on the back! Here you can see how much I shortened and widened the sleeve pattern to get the poofy look of a Regency ball gown. The top piece was the original sleeve pattern piece, which results in a sleeve like my day dress. Even though my modifications looked pretty extreme, I feel like I could've gone even poofier!

Here's what the insides looked like: the underpieces in front are pinned together, then the skirt front is tied on at the waist with ties that loop around the back, and the trapezoid-shaped stomacher front is buttoned on over all of it. I don't think metal snaps are period, but that's what I had on hand that worked. There's a drawstring at the top to bring in the neckline over the bust. The bright cyan seam binding is there to cover up a raw edge. Many thanks to Koshka and Tea in a Teacup for their detailed dress construction diaries. 

Year: Even though the gown pattern is from the turn of the century, my vertical trim inspiration was taken from the fashion plates and extant gowns of the 1810s.
Notions: Five yards of metallic gold trim, appropriately purchased in England at a blogger meet-up with Handmade Jane, and an additional three yards of gold tasseled rayon trim for the hem.

It was harder than I thought it would be to get the three vertical lines to match on the bodice and skirt. 
I would never have thought to add this trim at the bottom if it weren't for Princess Charlotte's gown inspiration, but it's really the perfect finishing touch on this dress. 

How historically accurate is it? I'd say that the pattern and overall look are very historically accurate, but the construction and materials was not. As always, I stitched most of the main seams by machine, saving the hand-stitching for finishing the waistband, lining, and sleeve bands. And while cotton isn't an anachronistic textile for the era, a ball gown would probably have been made from silk.
Hours to complete: I probably spent at least 30 hours on this gown, if not more. At a certain point, I just stopped keeping track.
First worn: Saturday, January 26, 2013, for the Jane Austen Evening.
Total cost: $25 for the fabric, $15 for the trims, $3 for thread, $4 for the ostrich feather, and miscellaneous bits of seam binding for the drawstrings and ties, plus muslin for the bodice lining...so about $50 for a complete fancy ball outfit!

Bad iPhone photo, but it's the closest I have to a full-length front view without obstructing staircases. 


Now that the ball is over, I'm happy to leave the Regency era alone for a while and get back to normal everyday clothing! Or at least, as normal as my clothes ever get, what with being made from sheets and all.

And now the question is, what do I do with my ball gown? 
I haven't the faintest idea how to clean it or pack it away!

Wednesday, January 30, 2013

A Regency Day Dress Made from Sheets

Many thanks to all of you who weighed in on my sheet choice dilemma two weeks ago; although many of you were in favor of the IKEA duvet cover, in the end, research seemed to back up the choice of the more colorful floral sheet instead. To refresh your memory, here's what I was choosing between:


ElleC helpfully pointed me towards examples of brightly colored, floral print cottons, especially the work of William Kilburn, and that was enough to convince me that it wouldn't be totally wrong to use the sheet on the left. Besides, there was more white in the fabric, and even though there are examples of  non-white-and-poofy Regency gowns, in the end the delicacy of the floral just read more stereotypically Regency to me.

William Kilburn's floral designs for cottons were definitely brightly colored!
An extant gown with a vaguely similar print from the Manchester City Galleries, circa 1795-1800. 

I used a frankensteined amalgamation of the two Regency era dresses in Janet Arnold's Patterns of Fashion; it's the gathered bodice and skirt of the V&A dress and the back and sleeves of the Salisbury Museum dress, combined with the drawstring neckline and closure that was demonstrated on Sense and Sensibility's pattern site. Unfortunately, some aspects got lost in the frankensteining process, and the back is much lower than I intended. The problem with using Cecily as a model is that she has a larger (and less compressible) bust than I do, and that threw off the fit of the bodiced petticoat and the length of my shoulder straps, which in turn caused the bizarre sloping toward the back. This is especially sad since research shows that the backs of the gowns should be higher and smaller, and mine is exactly the opposite -- larger and lower! Ah well, now I know for next time, because you can bet your Regency britches that I'm going to be making another one! Regency dresses are so easy to make and comfortable to wear, and I'm already dissatisfied with my workmanship on this gown, so I'm itching to make another, better one.

From the Fyeahtheregency tumblr.

After all my dithering about how the bodice looked, I became pretty dissatisfied with the gown, and it turned into a fairly slapdash effort to finish it up before the Jane Austen Evening. It's almost entirely machine-sewn, even the drawstring channel, and I didn't even bother blind-stitching the hem. The whole thing is unlined, too, so at some point I'm going to need to go back in and either bind or overcast my seam allowances. Anyway, enough disclaimers. Here's what I ended up with for my tea dress!

These pictures were actually taken the day after the tea, since I was in a rush to get out the door on the day of. 
I need to fix the bodice of my petticoat, since it's not doing an adequate job of lifting and separating the little I have to work with. 
Wearing my fichu askew and untucked. You can see here that the back waistline is much lower than it should be. 
Better view of the back. There's a ribbon drawstring at the waist and at the neckline, along a with a few hooks and eyes to help hold it all closed. Like I said, the back turned out lower than I expected, so I actually had to unbutton the top button of my petticoat and tuck it down so it wouldn't show! 
Why do Regency dresses conspire to make the wearer look pregnant? 

The bonnet was also thrown together from materials I already had -- a thrift store straw hat that was originally part of my Ren Faire ensemble, bias tape left over from my hobbit maid costume, a long cream-colored ribbon from my one attempt at being a wedding florist, and fake flowers pulled off of another thrifted hat.  I followed this very helpful tutorial to cut apart, line, and re-trim my bonnet.

I sewed in part of a wire coat hanger to shape the rim of the bonnet. 

It was mostly hidden by the bonnet's ribbons, but I was also wearing a book locket! 


This outfit is technically part of my Historical Sew Fortnightly sewing queue, so here are the facts:

The Challenge: #2, the UFO challenge, although mine was more of an unfinished idea than an unfinished object.
Fabric: One flat sheet and half of a fitted sheet, twin size, 50/50 poly-cotton blend, apparently from JC Penney's at least a decade ago, if not more. It's been in my stash for two years, so I'm simultaneously stashbusting as well!
Pattern: An unsuccessful combination of two different extant Regency gowns from Janet Arnold's Patterns of Fashion
Year: 1800-ish
Notions: Hooks and eyes, ribbon for the drawstring
How historically accurate is it? Not very. There's the anachronistic materials and construction, and even my attempt to at least use a period pattern was thwarted by poor fitting. At least I tried to do my research for the fabric print, even though I was still trying to make do with what I already had!
Hours to complete: About 12. Even though actually sewing the gown was easy, I spent a while futzing with the pattern pieces and the fit, as well as hand-sewing the inner waistband and the sleeve bands.
First worn: Saturday, January 26, to the tea portion of the Jane Austen Evening.
Total cost: $5 for the sheets, $5 for the straw hat, $5 for a white cotton voile shirt that I cut up and re-sewed to make a triangular fichu, and all the notions were leftover from other projects...all in all, $15 for a fake Regency outfit!


Even though my final outfit didn't turn out very historically accurate, it did provide a good reason to actually do a lot of research on Regency era textiles and extant gowns. So even though what I learned didn't necessarily make it into the gown, I at least know where I deviated from historical accuracy. And really, isn't that the goal of the HSF? To be encouraged to do research? See how I'm trying to excuse myself? Anyway, since this dress is already more costume-y than historical, and since I have a wooden katana from my college martial arts days, I'm thinking that I might actually try mixing up some fake blood to splash onto it, and go for a Lizzy Bennet of Pride and Prejudice and Zombies costume. Not sure when I would ever wear it, but when has that ever stopped me from making a costume?

Zombies are coming! Fly, you fools! Oh wait, that's the wrong story. 

Tuesday, January 29, 2013

January Stashbusting: Itty Bits Link Party!

I know I promised more pictures of the Jane Austen ball, but I suddenly realized that January is drawing to an end, which also means that all you stashbusters should be wrapping up your projects involving scrap fabric! Of course, if you've been just doing your own thing, that's fine too, but for those of us who need direction in our sewing, January was supposed to be the month of using pieces of fabric that were less than a yard. I made a few pouches and a mountain range, and Emily sewed up some delightfully adorable pocket playsets! Seriously, nine year old me would have been all over these, so if you haven't checked out her scrapbusting blog post yet, you should do so!

Rather than having Emily and I go poking all over the sewing blogiverse looking for your stashbusting projects, we've decided on having a link party at the end of each month for you all to link up your creations. We'll highlight our favorites, but you should still check out what your fellow sewasauruses have been up to and leave some friendly encouragement. Remember, it takes a village to bust a stash!

[ETA: If you haven't finished your project or haven't taken pictures yet, don't worry! You've got until Sunday night to link up your pictures! Also, when you fill out the "name" section, put the name of your project, not your own name.]


Oh, and if you're wondering what's up with the February LOVE CHALLENGE, here's the deal:
  • This month's theme is sewing something for a loved one -- a family member, a friend, a pet, a favorite piece of furniture (j/k). Much as I love the Selfish Seamstress, sometimes it's good to remember that we can use our skills to the benefit of others. 
  • Any month that says CHALLENGE means that if you sew along with our theme, you can enter your finished project in a contest! We'll all vote on our favorite makes and you'll get bragging rights and a tiny prize. And we promise that the prizes aren't just pieces from our stashes that we want to get rid of!  ^__~
  • If you don't want to enter this challenge, there's always the Vibrant Color Challenge in April or the Knits Challenge in May!
  • To actually qualify for the contest, your entry must be made in the month of February, using mostly stash fabric (notions like buttons or elastic or interfacing can be purchased new). 
  • Near the end of February, I'll be hosting another link party where you can link up your projects, and then we can get to the voting and picking our favorites! We'll announce the winner the first week of March.  
As always, if you don't want to follow along with our theme, that's fine, just know that you won't be eligible for the contest. But hey, the important thing is that stash fabric is being used up in any way possible!

Monday, January 28, 2013

The Year of Magical Doings

[I feel slightly bad about hijacking my blog post title from Didion's Year of Magical Thinking book, considering that I didn't read it (and in fact ranked it fairly low in our book club's book-of-the-month vote) and don't actually know much about it...but it seemed like an appropriate title for what I want this 2013 to be. I know, I know, it's almost February and I'm just now talking about my plans for the year.]

See, Mr. Cation and I keep talking about the possibility of thinking about maybe trying to produce a small human being (note the many levels of uncertainty) once he starts his new job and we get health insurance. While we're still decidedly ambivalent about the idea, what we are sure of is that this is the year to do all the things we've always wanted to do, before any SHBs come along and tie us down with their nap schedules. For me, this means going to the TORN Oscar party in February, as well as finally doing all the things I've wanted to do. Since I'm a huge nerd with an aversion to the outdoors, that doesn't mean classically exciting activities like bungee jumping or skydiving, it means making the Regency dresses I've always wanted and attending a high tea and a ball. It's only appropriate, since this year marks the bicentennial of the publishing of Pride and Prejudice, one of my favorite books ever! I'll do more detailed posts about my costumes once I take better pictures, but in the meantime, here are some teaser photos:

These are really horrible iPhone photos in a dimly lit place, but I was just so excited to show off my ball gown!  Oh an hey, there's a Carson lookalike coming up the stairs behind me!

The back of my gown. Bonus points if you know what
extant gown mine is based on/inspired by!
Saturday was a major milestone for me, and not just because it was my first experience making and wearing historical costumes. As I've said before, I'm not good with new people and big social events, and the Jane Austen Evening was a heaping helping of both. Since Mr. Cation showed no interest in getting all Beau Brummell-ified, I went on my own. I'll be honest, I was pretty anxious on Saturday morning, and when our garbage disposal decided to go kaput, I was tempted to take that as an excuse to not go. Thankfully, the 50+ hours I'd already spent making the costumes (and the ticket money) were burning a hole into my mental pocket, so I decided to suck it up and drive out to Pasadena. It was pretty awkward at first, since I didn't know anyone and the tea portion of the evening was open seating. I ended up plonking myself down by the door and eating my cottage pie by myself and watching everyone else socialize. It was very reminiscent of middle school lunches spent with only a book for company; I couldn't help but think of Mr. Darcy saying "I am ill qualified to recommend myself to strangers...I certainly have not the talent which some people possess, of conversing easily with those I have never seen before. I cannot catch their tone of conversation, or appear interested in their concerns, as I often see done."

If you're a P&P fan, you'll know that Lizzy then calls out Darcy on not practicing his socializing skills. I suppose I could have gone up to random people and introduced myself, but I decided to just take it as a victory that I had even gone on my own in the first place. I've already spent a good number of years looking at historically themed, costumed events and wishing that I knew somebody who would go with me. This year is the year that I just go ahead and go to them, even if nobody else will go with me. And if I haven't yet worked up to going by myself and talking to strangers, well, at least I'm not bothered by being the odd duck wandering around the event on my own. I've had lots of practice being a loner, after all, and I don't feel the need to perform to strangers.

There's nothing like dancing to a live band!

And lest you think gosh, what's wrong with you, you just spent all evening in the corner by yourself?! Well, after the awkwardness of the tea portion, things got much better. I ran into people I remembered from the practice class, and then danced with and met more people, and all in all got a lot more social as the evening went on. In the end, I was really glad that I stopped waiting for people in my life to suddenly develop a love for historical costuming; going on my own was scary, but well worth it for an opportunity to dress up!

I was channeling Miss Caroline Bingley's fabulous turbans...


Speaking of dressing up, I got a bonus costume opportunity last night when Mr. Cation and I got invited to The Magic Castle! I hadn't actually heard of it before, but all I had to hear was "NPH is the president" and "you can dress up and people wear all sorts of kooky things" and I was all for it. Mr. Cation loved the magic aspect, and while I enjoyed that part, the highlight for me was really that I got to wear all my thrifted costume-y pieces and wander around a castle.

Getting ready to go: I had my cape and muff and fascinator, and Mr. Cation looked sharp in his new gray suit.
One day,  I'll talk him into wearing ruffled poet shirt. 
The mesh top was from one of Shayna's clothing exchanges, the cheap black corset and and fishtail lace skirt were thrifted.  I always secretly wanted to dress like this in high school, but never had the guts (or budget, or parental permission) to. It only took a decade for me to finally step out in a vaguely gothy outfit! 

All in all, this weekend was quite magical and I'm excited to carpe the annum. I know the typical blogger thing to do is to come up with a 30 before 30 list, but I think I'll just settle for saying that this is the year I do things that I always wanted to do, even if it involves being a little uncomfortable or having people look at me funny. Here's to more costumed events!