
I'm finally getting around to blogging about the inspiration and details of my Jane Austen Evening ball gown! I actually intended to finish it for the first HSF challenge, but since it was a new pattern, I had only finished muslining the bodice by the time the deadline rolled around. Just as well, since I didn't really have any other historical costume UFOs that would've worked for this challenge.
 |
| A very nice gentleman obliged me by snapping these photos for me. One of the hugest downsides of going to event on your own is you don't have a photographer to take a bazillion pictures of your costume for you! |
When I first started planning for this costume, I pictured a ball gown in that ubiquitous white muslin that everyone thinks of when they imagine Regency era dresses. Unfortunately, none of the fabric stores I visited had the right kind of white cotton for what I was willing to spend. Just as well, since the celadon-colored sheet that I ended up with was definitely more unique and cheaper to boot! Having decided on a color, I then had to figure out how to dress it up so that it would look appropriately fancy. After browsing the collections at the Met and the V&A, and combing other people's Pinterest boards, I finally settled on these three gowns as my main inspirations. Since I had quite a bit of gold trim, and Ackerman's Repository plates show a recurring motif of vertical trim for the 1810s, I eventually settled on "copying" Princess Charlotte of Wales' blue "Russian" gown as my main inspiration for trim.
 |
| This gown actually used to be a rich, dark blue, as shown in an 1817 painting by George Dawe. |
Since my hair is so short now, I knew I wouldn't be able to do the mass of curls that seems to be the norm for Regency hair. I settled for rag curling the longer pieces in the front, then hiding the rest underneath a turban. I've loved the turban+feather look ever since I first saw it on Miss Caroline Bingley in the 1995 BBC Pride and Prejudice miniseries, and I was really pleased with how the overall look turned out!


 |
| True story: this balloon jammed into a plastic trash can was my sorry excuse for a head mannikin. The whole time that I was tacking it together, I was scared to death that I was going to accidentally jab the balloon with my needle and have my turban fall apart before I'd secured all the perfectly-arranged folds. |
 |
| I used this very helpful page to construct my turban. I started with a big tube of fabric tied around the balloon with the ends tucked strategically into folds, then just started stitching random bits to other bits until it all stayed together when I picked it up to put on my head. It's crowned with a single ostrich feather, because that's all I could justify buying. In the end, it turned out to be a bit of a hazard while dancing; since I'm so tall, every time I turned under while dancing with a shorter partner, the feather would get knocked askew. |
To complete the whole outfit, I made a little reticule from my remaining fashion fabric, using this pattern, but with only two panels. I added a little gold tassel at the bottom, and in it I placed a handkerchief, my "calling cards" (which remained unused), and my phone and lip gloss. I was also fortunate enough to find a pair of long white gloves at a thrift store for two dollars for the dancing part of the evening.

I already talked about how the actual tea and ball went, but I just wanted to reiterate that even though it was scary to go on my own, it was really fun in the end and I met such nice people. The highlight of the evening was getting to "talk shop" with other people who had made their costumes. One lady totally made my night when she came up to ask if Princess Charlotte's gown was my inspiration -- I was so gratified that that came through in my execution and someone recognized it!
Just the facts, ma'am:
The Challenge: UFO...this was a UFO for only about a week; I put it aside after making a toile of the bodice so that I could make my Regency day dress.
Fabric: I wouldn't be me if I didn't make a ball gown from sheets! I didn't thrift it, but it was a very nice cotton sateen queen-size flat sheet. I loved that it was soft and drapey and had a faint sheen to it, but was still stable and easy to work with since it was cotton.
 |
| Not the best picture, but you can see that the fabric does have a faint sheen to it. Also, a slightly better look at the amount of material gathered into the small back and my asymmetrically placed belt loops... |
Pattern: I used the 1798-1805 Salisbury Museum drop-front gown in Janet Arnold's Patterns of Fashion. Fortunately, I'm about the same size as the original gown wearer; the only modifications I made were to get rid of the train and shorten and widen the sleeves, so as to make the whole dress more suitable for a ball and dancing. I also changed the bib front from the original wide rectangle to a trapezoid, which works better for my bust size.
 |
| Best cheap method for scaling up the Janet Arnold patterns: wrapping paper with a pre-printed 1" square grid on the back! Here you can see how much I shortened and widened the sleeve pattern to get the poofy look of a Regency ball gown. The top piece was the original sleeve pattern piece, which results in a sleeve like my day dress. Even though my modifications looked pretty extreme, I feel like I could've gone even poofier! |
 |
| Here's what the insides looked like: the underpieces in front are pinned together, then the skirt front is tied on at the waist with ties that loop around the back, and the trapezoid-shaped stomacher front is buttoned on over all of it. I don't think metal snaps are period, but that's what I had on hand that worked. There's a drawstring at the top to bring in the neckline over the bust. The bright cyan seam binding is there to cover up a raw edge. Many thanks to Koshka and Tea in a Teacup for their detailed dress construction diaries. |
Year: Even though the gown pattern is from the turn of the century, my vertical trim inspiration was taken from the fashion plates and extant gowns of the 1810s.
Notions: Five yards of metallic gold trim, appropriately purchased in England at a blogger meet-up with Handmade Jane, and an additional three yards of gold tasseled rayon trim for the hem.
 |
| It was harder than I thought it would be to get the three vertical lines to match on the bodice and skirt. |
 |
| I would never have thought to add this trim at the bottom if it weren't for Princess Charlotte's gown inspiration, but it's really the perfect finishing touch on this dress. |
How historically accurate is it? I'd say that the pattern and overall look are very historically accurate, but the construction and materials was not. As always, I stitched most of the main seams by machine, saving the hand-stitching for finishing the waistband, lining, and sleeve bands. And while cotton isn't an anachronistic textile for the era, a ball gown would probably have been made from silk.
Hours to complete: I probably spent at least 30 hours on this gown, if not more. At a certain point, I just stopped keeping track.
First worn: Saturday, January 26, 2013, for the Jane Austen Evening.
Total cost: $25 for the fabric, $15 for the trims, $3 for thread, $4 for the ostrich feather, and miscellaneous bits of seam binding for the drawstrings and ties, plus muslin for the bodice lining...so about $50 for a complete fancy ball outfit!
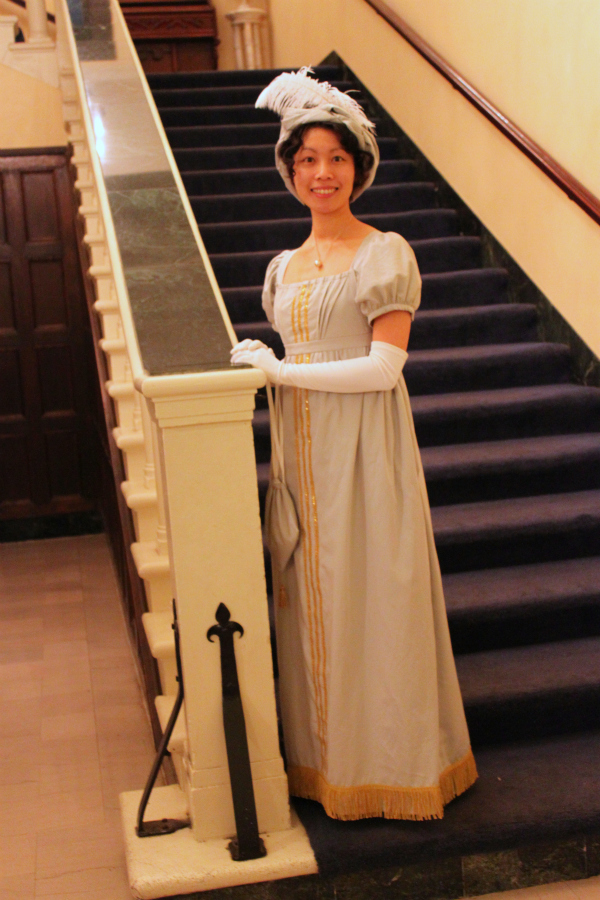
 |
| Bad iPhone photo, but it's the closest I have to a full-length front view without obstructing staircases. |
Now that the ball is over, I'm happy to leave the Regency era alone for a while and get back to normal everyday clothing! Or at least, as normal as my clothes ever get, what with being made from sheets and all.
 |
| And now the question is, what do I do with my ball gown? |
 |
| I haven't the faintest idea how to clean it or pack it away! |
I'm so impressed w/ your dress - and by the fact that you went by yourself! Way to go!! :)
ReplyDeleteThanks! I'm not sure sure which felt more difficult -- making the dress or going on my own!
DeleteYou look lovely. The turban really suits you. I wasn't sure about the fringe at the bottom, but given its historical precedent, I agree it was a perfect finish. Well done!
ReplyDeleteWhen I was sketching my gown designs, I really liked the look of the vertical trim, but felt that it needed something at the bottom to tie it all together...good thing Charlotte's gown survived, so that I could see the unexpected trim at the bottom!
DeleteYou do look lovely and I LOVE your turban! I know exactly which costume you mean as the 1995 P&P is my favorite and I have watched those episodes many times. I am so impressed how you were able to complete the turban without popping the balloon. You are the master of thrifty sewing and resourcefulness!!
ReplyDeleteThanks Shams! Good to know there are other P&P fans out there who've watched it enough to know the costumes (and turbans!). I would like to get an actual head form some day, but in the meantime I've still got the rest of the pack of balloons!
DeleteIt's so wonderful I can't even think of any decent words! Your make-shift wig-head is ingenious and hilarious at the same time!
ReplyDeleteSpot clean any areas you think might need cleaning (standard Wet Ones work well for a lot of little stains) and then you can use it as a dust cover for Cecille (I forget if that's how you spell the name of your dress form) or just leave it hanging on the door of your sewing space. =) Most fancy theatre and film costumes don't even get complete cleanings - just spot-treated and sprayed a little with something like End-Bac, Fabreeze, Lysol, or even vodka.
~ Brooke
I actually only thought of using the balloon as a head because I had my Eye of Sauron balloon hanging out in the sewing room. I saw it and thought hmmm, at its largest it was probably about head-size...
DeleteThanks for the advice about cleaning; I'm going to raid the liquor cabinet now!
Sensational! Everything about your dress and accessories made me think of the 1995 P&P!
ReplyDeleteYay, that comment means so much to me!
DeleteWow, fantastic work - I love the colour of the dress, and I love the trim too. Go you for going to the event by yourself. Your photographer did a great job too!
ReplyDeleteI think that celadon color is one of my favorite colors! Thanks for your kind words, and if only I could somehow pass them on to the random gentleman I stopped for pictures!
DeleteYour dress looks amazing! A lot better than some of the ones I have seen in recent Regency dramas! What amazing work!
ReplyDeleteHehe, if only I could give costuming for a Regency drama a try! But then again, that might be more trouble than fun...
DeleteIs there anything a random balloon stash CAN'T do? Bravo!
ReplyDeleteNope, a random balloon stash can do just about anything. This just validates my penchant for keeping around all sorts of craft materials...
DeleteYou look so lovely! The dress is divine, and the whole look just came together beautifully.
ReplyDeleteLaura Mae did a post about protecting her special dresses. I thought that she made a perfect point at the end: "Is this necessary? Probably not. But after spending goodness knows how many hours creating the gown, I might as well spend an extra hour protecting her." I have been keeping this in mind with all sorts of things, as of late!
http://www.lauramaedesigns.com/2012/11/tips-and-tricks-how-to-protect-extra.html
Thanks for the link! That's a great philosophy for this type of gown, and I'm pretty sure I have some stashed sheets that would work well!
DeleteYou did such an amazing job on this, and I think you look lovely! I love your balloon trick too, your genius never ceases to amaze me.
ReplyDeleteI'm not usually one to brag on my own brilliance, but I have to admit that I was pretty pleased with myself when I came up with the idea of using a balloon as a makeshift head!
DeleteI've lurked your blog for awhile now and always enjoy seeing your latest creations (especially everything LOTR). This is incredibly awesome!! I am so impressed with your creative skills. I'm glad you attended the festivities and had a good time.
ReplyDeleteAwww, thanks for taking the time to de-lurk and let me know!
DeleteYour outfit is gorgeous! I love how you created the turban; Miss Bingley would be proud! Thanks so much for sharing your evening with us. It's quite inspiring.
ReplyDeleteGlad to be of inspiration :)
DeleteActually, I'm pretty sure Miss Bingley would have looked down her nose at my makeshift efforts, her being all London high society and all!
What a gorgeous job! I wish there fancy English Country Dances by me! I'm definitely going to have to steal that gridded wrapping paper idea. Also, Laura from Lilacs & Lace posted awhile back about making her own garment bags for special dresses. As for hats, I've made a few straw ones & keep them in boring cardboard boxes with tissue paper for stuffing/padding.
ReplyDelete