
Hello friends!
I am so very honored to be posting at Cation Designs today! Cindy's blog is one of my favorite blogs of all time--she's a classy geek girl after my own heart. Star Wars snowflakes? Lord of the Rings Valentines? Not one, but TWO super hero dresses?!! And who can forget her Hunger Games Girl on Fire dress? *Sigh* Color this girl envious!After my initial squee of delight and bout of Snoopy dancing, I immediately settled on a project. I was going to use Simplicity 3503 to make a maxi-length dress out of this delicious white organic cotton jersey I'd purchased for a song ($2 a yard!) and, once the dress was completed, I was going to ombre dye it using this dark purple Dylon dye I'd won in an online giveaway.
Secretly, I was already calling this my Miami Beach Dress--I pictured myself walking barefoot down the beach with this dress flowing breezily behind me as the warm ocean water occasionally lapped at my feet:
| Like this... only in purple. |
 |
| Or like this in my sexier moments! (But, you know, in purple! ) |
I totally had enough time to finish this dress, friends, DESPITE lollygagging. Friday (August 17) I traced the pattern and cut out the pieces with plenty of time to sew the bodice portion together. I had grand plans to attach the skirt portion Saturday morning and then dye the thing. Sunday was reserved for picture taking and post writing.
And then, as I was winding my bobbin, my machine -- my beautiful little darling of a machine -- went KA-CHUNK. I panicked for a moment, but felt some-what better when the bobbin continued to wind in a *seemingly* normal manner. Yet... the machine wouldn't thread. The short version: the hook thing on my bobbin casing fails to meet with the needle so the bobbin thread and needle thread aren't making a loop. I suspect this has something to do with the bobbin casing (which was missing a piece of thing metal on the side) or the small nut I found when
And I regrouped.
One of the things Cindy suggested for a post was me-mades while on vacation. Which got me thinking about how to take my/our little hobby with us while on vacation. Flight/airplane regulations make it impossible to take things like knitting needles (though I've had great success accidentally "sneaking" wood needles) and pins and needles on the plane. And I imagine that taking a sewing machine presents it's own sort of logistical nightmare. But there's nothing that says one cannot CHECK a project, right?
Summer is definitely too hot to knit, so I tend to embroider a lot (okay, some). There are a plethora of really awesome ideas on how to incorporate embroidery into clothing sewing projects --I personally love Casey of Casey's Elegant Musings Bumble Bee Circle Skirt and Lauren at Lladybird Colette Ceylon:
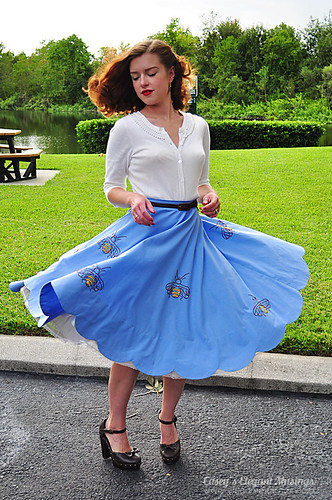 |
| Take a look at the rest of Casey's photos here |
 |
| See more of Lauren's beautiful work here |
Now, as my machine has taken ill, I sadly won't be whipping up a dress to embroider. However, friends, I thought I could share some tricks and tips for getting started on your own embroidery project!
The Supplies
- Fabric. You can embroider on any sort of fabric, really. All it requires is the right kind of needle and thread. However, I find it easier to use a thinner fabric like cotton, cotton broadcloth, or maybe a fine muslin fabric.
- Hoop. There are pretty much two hoop options: wood or plastic. I highly recommend wood over plastic. My experience with plastic is that the screw portion--necessary to tighten the hoop--through multiple uses ends up stripped; once it's stripped you can't tighten the hoop. I prefer a smaller hoop to a larger hoop, but really the size of your project should dictate hoop size.
- Floss/Embroidery Thread. There's a whole section of this in the stores in a ridiculous Crayola Crayon array of rainbow colors (some sparkly! OOOO!). Usually, before I start a project, I take a moment to print out, copy, or sketch my design and tap into my inner grade schooler and have some fun coloring! This helps me plan my color scheme.
- Needle. Needles depend on the fabric. You're not going to use a fine needle on say, burlap, and you definitely wouldn't use a yarn needle on silk. Just make sure the needle is sharp!
Still with me friends?
Good. This next part is my probably my favorite step in the whole process...
Selecting an Image
When I select and image I look for something that doesn't have a lot of really tiny details and has a decent amount of empty space UNLESS I'm specifically making something that's a bit more "artsy"--as in will be framed so that sharp little kitty claws don't snag and pull threads that were lovingly sewn over many many (manymanymany) months and may or may not have resulted in more than a little loss of blood, sweat, and tears. I typically look in the following places for inspiration:Good. This next part is my probably my favorite step in the whole process...
Selecting an Image
- The internet. Lets be real, friends. I totally acknowledge that I
rip offborrow a lot of stuff from the webnets. Google search is my best friend. And don't even get me started on Pinterest. - Sublime Stitching. Jenny Hart runs this little phenom of a business out of Austin, TX. Her designs are funky, fabulous, and easy to replicate. She provides both PDF versions as well as iron-on transfers. Also, she provides a number of tutorials to get one started. I <3 her.="her." li="li" nbsp="nbsp">
- Urban Threads. They're kinda the same deal as Sublime Stitching.
- Hoop Love on flckr. This is a vintage(ish) collection of embroidery images. Some of them would look cute on things like circle skirts, others look like things you might find on pillows at Grandma's house (which is not a bad thing!).
I'm really obsessed with mermaids right now so, for this project (a tea towel that'll probably be converted into a pillow), I chose this image:


Transferring the Image
- Use a tracing wheel and dressmakers transfer paper
- Heat transfer pens act as a sort of one-shot deal to create your own iron-on transfer. Trace the image using one of these pens on the BACKSIDE of the image you printed out and then iron onto your fabric. PRESS the image, not back-and forth it with your iron as it *just might* cause the pattern to smear all over your fabric and, as a result *just might* cause one to swear like a sailor.
- Print out the image on t-shirt transfer paper, iron to fabric, and embroider. This isn't my favorite method as you then have to deal with the iron transfer itself (it leave behind a plastic-y surface) which requires some extra steps to get rid of. (Mostly washing and ironing until it's gone). Therefore, friends, I only really use this if I'm embroidering something large on something that doesn't get a lot daily use.
- Pouncing is the old fashioned way of transferring. After you print out your image, poke holes at regular intervals along the pattern. Secure the paper to your fabric and using a soft cloth or paintbrush work some sort of powder (chalk or special powder found in the needle craft section of your sewing store) into the holes. Et voila!
The method I use the most, however, is the good old light-source tracing trick. I tape the printed out image to a window (I suggest doing this at a height that is comfortable), tape my fabric over top, trace with a fabric pencil!


Final Thoughts Before You Begin
- Keep your scissors handy. I always end up with frayed ends of thread that need clipping. I hate having to search for my scissors.
- Keep the fabric INSIDE the hoop taught and the work will go much more quickly. Saggy fabric leads to yucky stitches.
- I wrap the ends of my thread around their little bundles and put everything--scissors, project, thread--into a large sized Ziplock plastic bag for travelling. It fits nicely into my bag and doesn't get all mucked up.
- Use a variety of stitches to achieve the look you want! In addition to the Sublime Stitching link above, there's this one, this one, and this one. I also suggest using a combination of thread thickness. Most floss comes in six strands. Sometimes, such as when I'm doing features on a face or outlines, I use only two or three threads instead of all six.
- Embellish! I love using beads, sequins, and sometimes ribbon or lace to add a little pizzazz to my projects.
Now the fun begins!


Unfortunately, my mermaid design isn't done in time for publication. However here are some shots of the embroidered Valentine's Day valentine I made for Mr. Retro. We don't really *do* Valentine's Day -- the commercialism really bugs me as does the concept in general -- so we give each other cheesy/funny little gifts instead. It works for us and some how ends up being more meaningful. This year I made him a "Yoda One for Me" pillow for his office chair. It's not done (as in I have not yet made the tea towel into a pillow case, but whatev... I'll have it done by next Valentine's Day. What? Stop looking at me like that! I SWEAR.). He's a HUGE Star Wars fan--like ridonkulously huge Star Wars fan. He can quote all the movies forwards and backwards and kicks my butt every. single. time. we play Star Wars Trivial Pursuit. Seriously, he can answer the "Who was the best boy key grip in The Empire Strikes Back?" type of questions. I was worried that it was *too* cheesy but he LOVED it (or at least was very good at pretending he did...). Gives me hope for next year's valentine surprise!


So there you go, friends. So sorry this is so...word heavy! Regardless, some tips and tricks to get you started with embroidery! What will YOU embroider first? Something for these last days of summer or something fall/winter-ish?
Tina, I could not love that pillowcase any more -- that Mr. Retro is a lucky guy to have you! And I do hope your machine recovers soon from its temporary incapacitation. Readers, I've done some geeky embroidery myself, but nothing so ambitious as this pillowcase! Thanks for sharing your work with us, Tina!
LOVE your embroidery, Tina! You use such fun graphics and pretty colors!
ReplyDeleteAnd you gotta love the built-in vertical light box (aka window) that comes with every home - I use it all the time for all kinds of projects. =)
This post is super helpful! I've just started trying my hand at embroidery but was totally lost on transferring images. Thank you for posting this!
ReplyDeleteGah! My spelling/grammar/format errors are TERRIBLE!
ReplyDeleteBrooke--I've placed a "for realz" light box on my Christmas wish list. I love using my vertical light box but boy does it make my shoulders/back ache!
Meg--Check out Sublime Stitching. I love her stuff and she frequently has sales.
Your embroidery work is magnificent! Major props on the Yoda! Anything Star Wars is okay in my book. I hope that purple dress is wonderful!
ReplyDeleteOkay, that yoda embroidery is FIERCE! Love it, Tina!
ReplyDeleteThanks for all the info, really useful. will be going to embroidery soon.
ReplyDeleteI didn't know you embroider too! I like using the water soluble paper. You print right on it in your printer, baste or pin it to your fabric, embroider through it and wash it way in the sink when you are done. That is how I made this:
ReplyDeletehttp://sphotos-a.xx.fbcdn.net/hphotos-ash4/207166_1961919083366_2717482_n.jpg
Which now hangs in my bathroom.