Tuesday, March 25, 2014

And Now, the Construction Post

Now that I've finished Lynda's bustier class, I alternate between thinking 1) my goodness, it's a small miracle that Elaine's wedding dress turned out as well as it did, because I didn't know what the heck I was doing, and 2) go me, because I actually made up something that wasn't too far off from what it was supposed to be! I learned so much from taking an "official" class, which makes me wonder what else I'm missing as a self-taught seamstress. Anyway, I thought some of you might be interested in seeing more of what went on to make this deceptively simple-looking little black top.


I left off with fitting the coutil/lining inside in my last (and only) construction post. This inner layer was just the pattern pieces cut in both coutil and a cotton quilting fabric for underlining, and then sewn together. I decided to keep things simple and just do boning channels over the seams. These channels were made from bias strips of coutil, 1.25" wide, which is enough to accommodate two 3/8" wide channels for 1/4" bones. I got my bones pre-tipped at Lacis in Berkeley, where they cost anywhere from $0.40-$1.00 each, depending on length. I've got a whole roll of spiral steel leftover from making Elaine's corset, but frankly, I didn't feel like dealing with cutting and tipping all twenty-plus bones myself. I really need to get me some steel cable cutters to make the process easier on my hands!

Lynda had us sew the inner layer with 1" seam allowances, so when I sewed my boning channels on, there was no awkward flapping of seam allowances underneath to get caught up in the boning. 
Zoomed out a bit, so that you can see how densely this thing is boned! According to Lynda no more than 3" should go by without there being bones. Because mine was a fairly small size with narrow panels, I could get away with only boning over the seams, and then one more set in the widest back panel. 

After sewing on the boning channels, I added the grosgrain waist stay, stitching it on only at strategic points. This waist stay is sewn to the inside and remains hidden, and only exits close to the zipper through two buttonholes. Lynda recommended a 1.5" wide ribbon, which is larger than my buttonhole foot can handle, so I had to improvise with a tiny zigzag stitch. To secure the waist stay, I went with my usual swimsuit bra hook instead of hooks and eyes. Whenever I have hooks and eyes at my back, they dig in uncomfortably and make me itchy. At this point, I also sewed in my zipper. It's a heavier duty 12" separating zipper, but still plastic.

Pretty good free-hand buttonhole, right? Except that the two sides don't quite match up...shhh!

Since the largest swimsuit hook I had was 5/8", it wouldn't quite fit on the 1.5" waist stay, so I had to add a tinier piece of petersham ribbon at the ends to make it work. 

After all the hardware that went into the inner layer, it was almost a relief to make the outer fashion fabric layer. Like the inner layer, it's two pieces of fabric: my black silk dupioni, underlined with flannel. The flannel provides some cushioning for the thin silk, so that all the boning channels and such don't show through. Lynda wouldn't allow us to clip the coutil seam allowances at all since it would create weak points, but with the outer layer, since it's not taking any of the strain, I notched away. Unfortunately, I had never learned that one should never notch at the same point on either side of the seam (it creates a hinge point), but now I know and I will never do it again! The most time-consuming step was then hand-stitching down all the seam allowances so that they would stay nice inside the garment.

You can see at the top of the picture the start of my shameful clipping :(

The final step was to put the two layers together. I don't know why, but I found this seriously nerve-wracking! With previous corsets, I've always sewn them wrong sides together and then bound the top, but this time I decided to go with a new-to-me method and sew the top and bottom right sides together, then flip it all right side out (this was tricky with all the bones in...good thing spiral steel is flexible!). This method creates a clean edge without having to fuss with binding, but it does create a lot of thickness due to the four layers of seam allowance + four layers of fabric! My machine was a trooper, though, and I only had to hand-wheel through some parts. The real last step was to topstitch all the way around, being especially careful at the zipper since there was a bone right next to the stitch line.

The only thing worse than trying to photograph black or red is trying to photograph black and red. You all know what topstitching looks like though, so I think you get the picture. 
All done! Much red! So cats! Very polka dot! Wow!

Summary:
Pattern: Simplicity 5006
Fabric: 1 yard black silk dupioni, 1 yard purple houndstooth print flannel, 1 yard coutil, 1 yard quilting cotton
Notions: black plastic 12" separating zipper meant for jackets, less than 1 yard 1.5" wide black grosgrain ribbon, one 5/8" swimsuit bra hook, lots of spiral steel boning
Hours: At least sixty, spread out over a month and half. That includes fitting, multiple muslins, cutting and sewing four layers, lots of hand sewing, and lots of wibbling.
Will you make it again? Elaine went to Thailand and brought back lots of yummy silk in both her colors and my colors, so I think that means yes. I think new makes will take much less time, though, now that I know what I'm doing and have patterns already fitted.
Total cost: The fabrics listed above were $15, $8, $30, and free, respectively, the spiral steel was $13, and the rest of the notions were about $5. So we're looking at a $70 garment here, and that's just for the materials. No wonder why custom corsetry is so expensive!
Final thoughts: Um, I love it? It looks and feels amazing, if I do say so myself, and in black silk, it feels very versatile. If I pair it with a nice (normal) skirt, it makes for lovely formalwear, and black is a good base for many villain/superhero costumes. I want to do a Maleficent costume with this, even if I'm dubious about the upcoming movie. Mr. Cation was pretty thrilled about the Ursula costume too, so that was a plus!

Because nothing says Ursula like a satellite dish in the background, amirite?

So that brings me to my big question: would anyone be down for a bustier sewalong? I learned so much from this class, and while I had some idea of what I was getting into because of Elaine's corset, I have to say that a bustier/corset top is one of those things where it looks impressively scary, but is actually not that hard to sew when you break it down. Obviously, I'm not nearly as knowledgeable as Lynda, but I think it'd be fun to share the process in more detail with other seamstresses who might have always wanted to make one, but thought it was too intimidating. If people are interested, I'm thinking of running the sewalong during the summer, when I've got more bandwidth than the during school year. Let me know in the comments if you'd be interested!

Sunday, March 23, 2014

"Spur of the Moment" Ursula Costume

*taps mic* So...ummm, anyone out there tonight?

I know, I know it's been a shamefully long time since I last updated to say that I was in the middle of making my bustier. I guess I was being a little optimistic in that assessment, since there turned out to be a lot of "finishing" steps. What with school busyness and only having an hour here and there to sew, I ended up not being able to finish it before class ended. Thankfully, Lynda gave everyone an extension. And then even after I finished it on the ides of March, I decided that before I could write up a blog post about it, I had to make something to wear it with. If you give a mouse a cookie costume geek a plain black bustier, she's going to want to make a matching skirt. And once she makes a matching skirt, she'll realize that she needs a necklace as well. Necklace in hand, she'll finally get around to a blog post only after a sufficiently sunny day where Mr. Cation is also around to take pictures of the whole get-up. I think it was worth it, though...


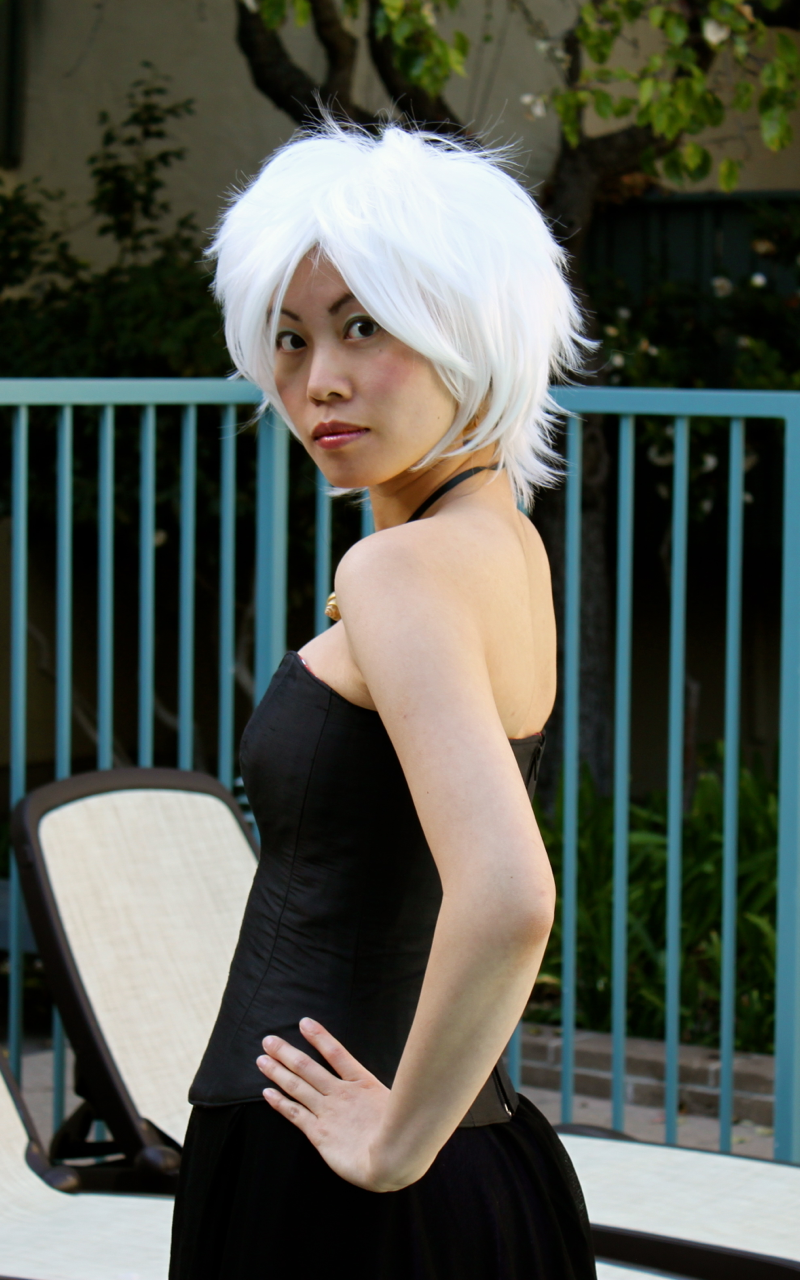
I had to really play around with the lighting on these shots in order to be able to show any detail at all on the bustier. Black is so danged hard to photograph! And of course I would be wearing a white wig. 
It's not perfect by any means, but I'm still pretty pleased with how it turned out!
"Don't even underestimate the power of body language!"
Back view. It was ridiculously hard to find a 12-inch separating zipper that would be sturdy enough.

I mean, I guess I could've just taken pictures wearing the bustier with jeans or something, but that just wouldn't seem right, you know? Besides, I had nine yards of black and purple stretch mesh that was burning a hole in my stash. I've had it set aside for an Ursula costume since April of last year, but it just didn't happen until now. I guess it doesn't really fit the "wardrobe building" March theme, although it definitely fits February's "make something that represents something you love" theme -- I love dressing up! -- so it still counts.


I used Simplicity 9172, a vintage half-circle skirt pattern, to make three layers of skirt -- black, purple, and then black again -- and since it was stretchy material, I just went with the easiest method and attached it all to a piece of wide black elastic for a no fuss, closure-less pull-on skirt. Then I went to town on the top black layer, snipping it away to make a nod to Ursula's tentacles. At that point, the skirt was nicely full, but still missing a certain je ne sais quoi, so after some brainstorming and remembering how floofy standard ballroom dance skirts are, I used Julia Bobbin's helpful fishing line tutorial to hem the skirts. It was really remarkably easy (but tedious to do for two layers of full-length half-circle skirt), and my 50-lb. fishing line more than adequately swirled up the hem of the skirts. It helps hold out the skirts so that they look fuller and make walking without tripping easier, which is a definite plus!

Now, it's the little things that pull a costume like this together, so besides making the skirt (which took a whole day -- thank goodness for Spring Break!), I had to make the iconic golden shell necklace that Ursula uses to hold Ariel's voice:

In my stash of craft supplies, I managed to unearth this seashell that I've been holding onto for eight(!) years...I just painted it gold and hot-glued a loop of wire to the back so that I could thread a ribbon through. 

And of course the finishing touch was the short white wig, which I already had from my Dr. Blitzmeyer costume. Even though I just wore this to our apartment complex's pool for pictures, it was so fun to put this outfit together. Sometimes you just have to make things that make you happy, even if there's nowhere to wear it! Maybe one day I'll get to cosplay Ursula at a con, but until then I'll settle for twirling around the pool.


I still intend to write about all the steps that had to happen to make the bustier, but I'll save that for a separate construction post, since this one is already glutted with pictures.