Saturday, May 2, 2020

Slytherin Gibson Girl Undergarments

There are certain tenets of historical costuming that everyone knows, like always put on your shoes before your corset, or don't choose polyester to make your ren faire outfit unless you want to pass out from heat exhaustion. Probably the most important one, though, is to always get your undergarments squared away, including the corset or stays, before making the pretty stuff that goes on top. Which is why, when I decided to make a Slytherin Gibson girl outfit, I started with the shirtwaist and then backtracked to the undergarments without ever having made or acquired an appropriate S-bend corset. And when I say undergarments, I really mean middle garments, because I made a corset cover, petticoat, and bum pad, not a chemise and drawers. Can it really even be called a corset cover if it's not covering a corset? Well, you know what they say: you gotta know what the rules are so you can break them, or some such nonsense.

Case in point: you're supposed to sketch your goal look before making the outfit so that you know what you're aiming for. I drew this after I made everything because I forgot that it was required for my assignment. 


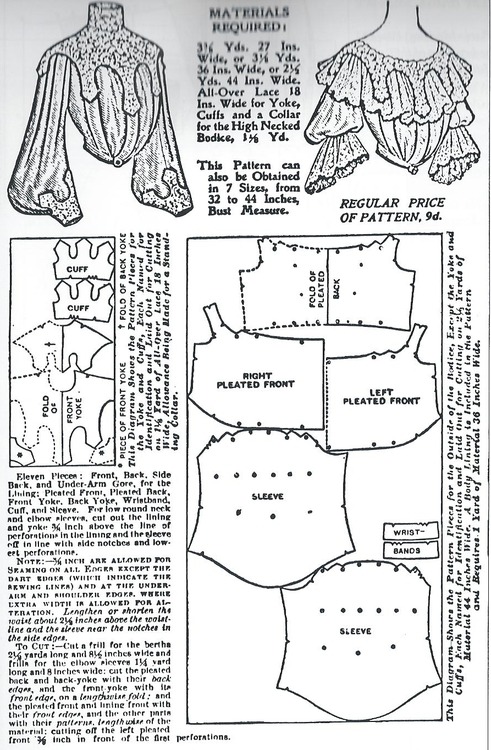
In Canada College fashion department classes, besides the regular homework and the final outfit (of which the shirtwaist is the top half), we usually have to also turn in a lab garment. This is just another full outfit (covering an entire dress form, so a top and a skirt, or a dress) that demonstrates the skills we are learning, so we have to include the quarter- and full-scale patterns with the garments to show how we manipulated the basic sloper. At first, I had grand plans to make a tailored jacket to go on top, but that would 1) not be a complete outfit covering the dress form, and 2) take more time than I have to do it well. I think I'm going to save that for when I take Advanced Tailoring at some point in the future. In the interest of making a related but faster/easier lab garment, I decided to make a corset cover (basically, a sleeveless top that goes over the corset to disguise the hard lines of its edges) and a petticoat.

From here


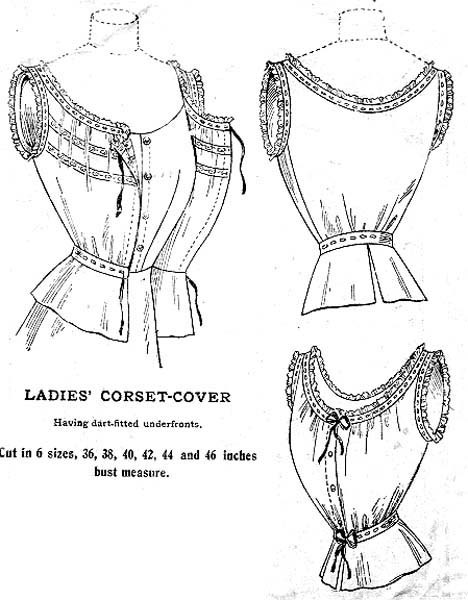
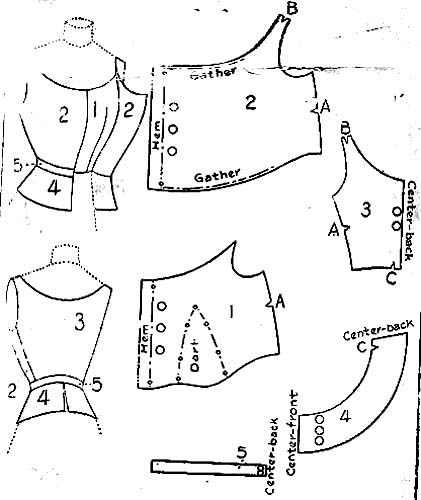
I'm so glad that there are a lot of images floating around Pinterest that show pattern pieces or drafts for how to make a corset cover; that made it easy to manipulate the sloper to "match" the historical pieces. I also looked at a lot of extant corset covers (thank you to the Met for allowing me to just search "corset cover" and not the usual generic "undergarments" because that really made it a lot easier than having to sort through thousands of other kinds of undergarments) to get an idea for what kinds of variations were permissible. You know, so that I could then ignore them and do my usual "ehh, that's close enough" thing. I shifted the bust dart to the waist and then converted that dart to gathers, and converted the back darts to gathering at the neckline. The peplum was made by putting together the top sections of the skirt sloper to take out the darts, almost like making a skirt yoke, so as to keep it low profile when tucked into the petticoat.

Quarter-scale pattern work.
The finished corset cover. 

The back! Compare to this one from The Met, which is looser. 


The front closes with buttons, plus a hook and bar at the waist and a ribbon at the top. I decided to go Bernadette Banner and make hand-worked buttonholes...and let's just say that it's a good thing these will be under the shirtwaist. I still enjoyed the process more than making machine buttonholes, though, so it was still a net positive.


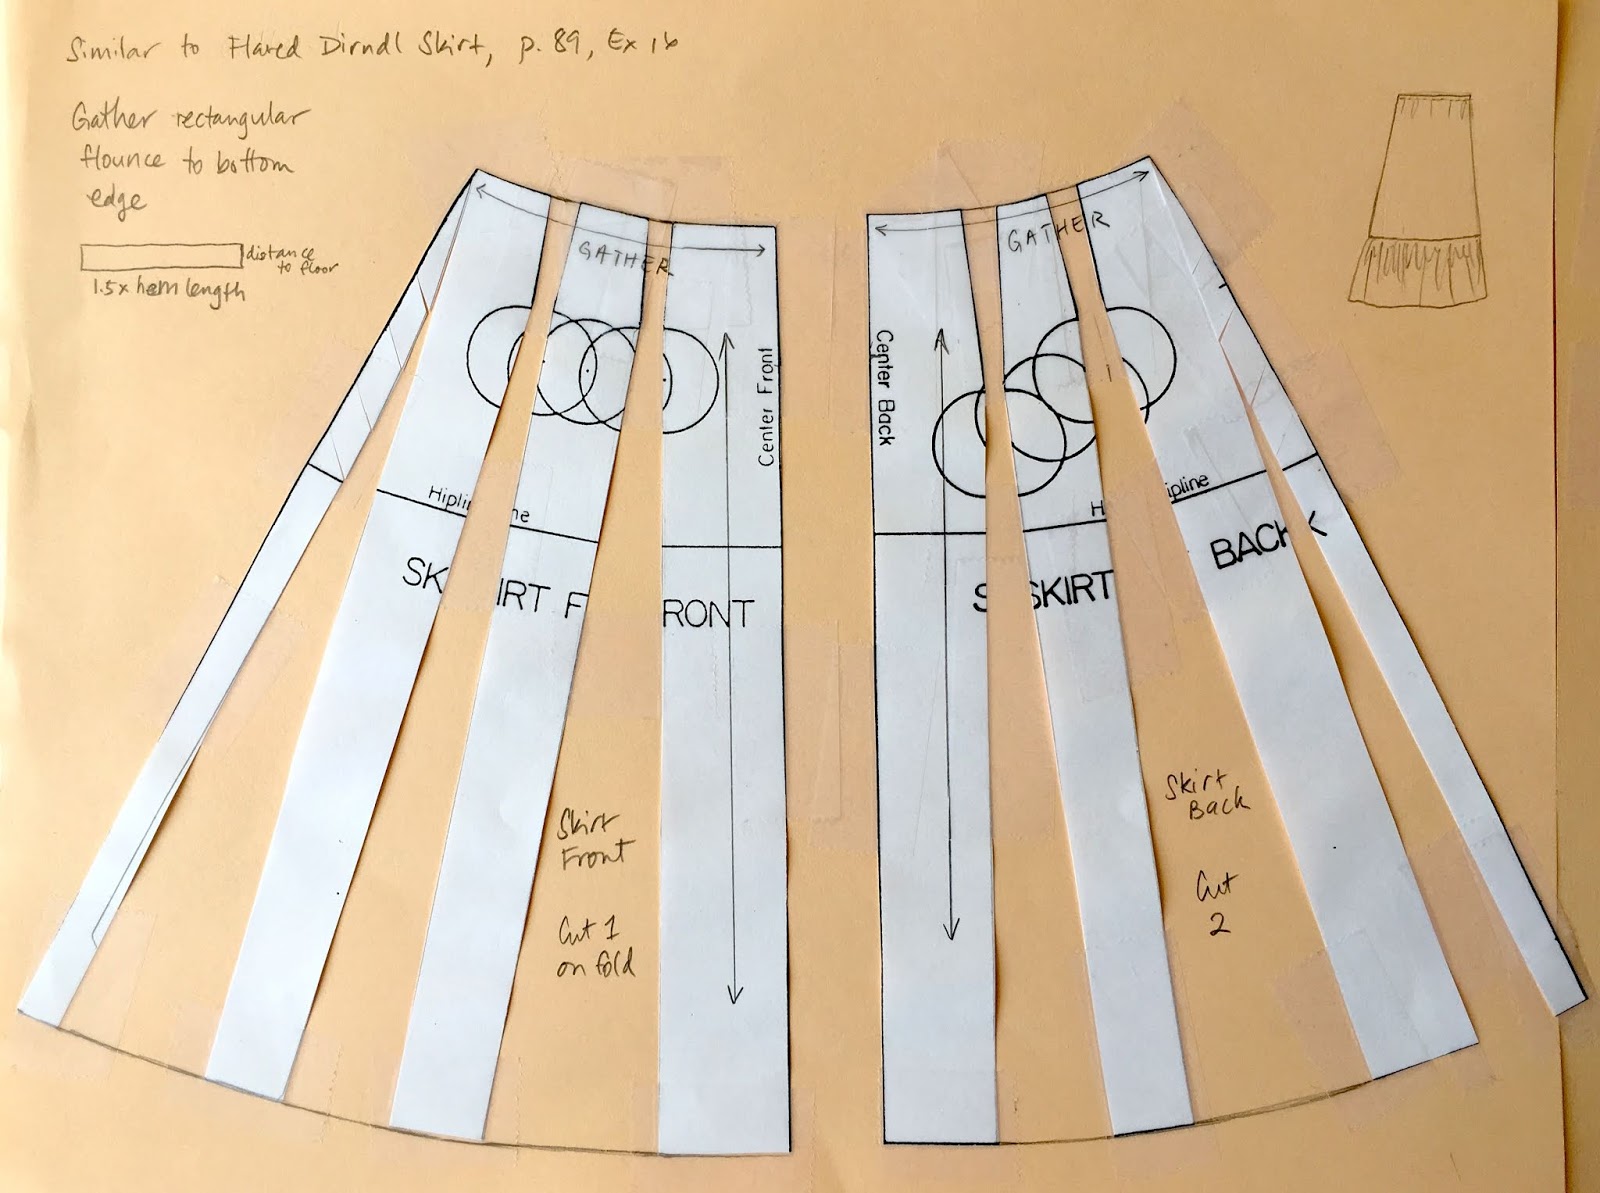
For the petticoat, I referenced the excellent material collected on Sew Historically and ended up doing what were basically curved trapezoids that gathered at the waist with a drawstring, with the ruffle being just a long rectangle gathered to the hem of the trapezoids. Ideally I would have had lace at the ruffle seam, and probably some tucks to help hold out the ruffle more, but in the interest of time, I left it plain.

I'm glad the historically accurate finish for the waist is so simple: slap on some bias tape to make a casing, and no need to even add a placket or closure to the opening.
I used the rolled-hem foot on my machine to finish all the yards of hem. 


Since I don't have an S-bend corset, nor do I plan on getting one just for this ridiculous little project, it was imperative that I have a bustle pad to help get closer to the right silhouette. I just sketched out a little curved semi-circle shape like the one in this historical patent, cut it out of muslin and then stuffed it with Costco bear innards (one of my students gave one to SHB#1 without my prior knowledge/consent, so I've been slowly deflating it every time I need stuffing) and sewed on a piece of twill tape for a waist tie. Once again, Bernadette Banner's video was very helpful, even if I mostly didn't do what she did.


My hair has gotten ridiculously long (I haven't cut it since getting pregnant with SHB#2, which was three years ago, so it's down to the small of my back) so I figured I would give the Gibson girl hairstyle a try. I used the black pudding plushie I made nine years ago as a hair rat, then used oh, a hundred or so bobby pins to secure my hair over it. I think it worked fairly well for a spur of the moment hairstyle!

Of course, I realized *after* I did my hair that I was wearing a t-shirt and not a button-up shirt. Rather than take it off over my head to change, I had to awkwardly shimmy it off over my hips. Good thing it's just an old work shirt from Mr. Cation, so it doesn't matter that the neck hole got all stretched out! 

So here's what it all looked like together:

Oh hai, I'm the Chinese Camille Clifford knock-off. 

My hair was falling down in the back. Looks like a hundred bobby pins wasn't enough. 

Nice rounding out of the bum area provided by the little bustle pad!

And why are all these pictures so awkwardly cropped? Because the small human beings were entranced by Mommy's funny hair and clothes and were hovering around.


Summary

Pattern: Self-drafted, based on historical pattern pieces/drafting directions

Fabric: For the corset cover, I used a leftover piece of thrifted white cotton sateen sheet (the rest of the sheet went to a Princess Leia costume for a friend). I dyed it with coffee to get it match the lace. The petticoat is a (unfortunately) polyester microfiber sheet in a pale mint green that somebody gave me "because you like sewing with sheets, right?" I used it because it fits the Slytherin color scheme, and all my other sheets were too patterned or earmarked for other projects already.

Notions: Three very anachronistic clear buttons for the corset cover, and a hook for the waist closure. I ran out of bars so I made a thread bar for the first time! The lace for the top is from a vintage fair I went to eight years ago, so I'm glad I finally got a chance to use it. The bias tape for the petticoat drawstring casing is from my school librarian's neighbor's destash, and the drawstring itself is cut off of an old bathrobe.

Hours: A couple hours for drafting, a couple for cutting out, 1.5 hours for sewing the petticoat, and probably four for the corset cover. Total: let's just say 14.

How accurate is it? The corset cover should be made with thinner fabric and probably should have a drawstring at the waist, too. The petticoat should probably be made with stiffer fabric and have more lace, tucks, and ruffles.

Total cost: The fabrics were all stash, given to me, or leftover from other projects, so I'm going to say $5 when counting the little bit of lace, cotton sheet, and buttons. And once again, I didn't buy anything new!

Final thoughts: The corset cover is a little tight in the armscye and bust area, so I'm thinking of going in and adding a little triangular wedge at the side seam. Again, we're theoretically not designing garments for ourselves, but for a mannequin, so I'm not surprised, but I would like it to be a little more comfortable to wear. I think once I do that and get a blousier fit, I'll be pretty pleased with the overall "ooh, I'm in my historical undahwears!" look though!


Old-timey filter!


Friday, May 1, 2020

Flat Pattern Class


In this unprecedented time of #canceleverything, I am grateful for the things that have not been canceled. I've missed out on a historical dance, a historical tea, and a cookie exchange with historical costuming friends, as well as several birthday parties. My school's play, A Little Princess, for which I was doing historical costumes (sense a theme here?), was also canceled. What *is* still happening, though, is the Flat Pattern Class I'm taking at Canada College. Of course, it's been moved online, but I'm glad that I happened to be taking a class more suited to distance learning than say, tailoring or fashion illustration. Our professor is still showing how to do pattern manipulations on Zoom, and we are emailing pictures of our patterns and garments. Obviously, we don't all have mannequins on which to display or test our garments, but it's working fairly well, all things considered.


But back up a little: if you don't know what flat pattern manipulation is, it's where you take a basic sloper pattern (plain fitted bodice + sleeve + straight skirt with darts in "standard" places) and by shifting darts around, adding fullness, and contouring, can totally change the pattern pieces to make anything you want. I realized after the class started that I'd basically already been doing this to a lot of my TNT patterns in order to get the style lines I wanted for various costumes, but it was nice to learn it "officially" so that I could pick up on the little tidbits of information I missed as a self-taught sewist. Things like the industry standard for how far to back dart tips off from the apex (instead of my usual "ehh, that looks about right!"), or the proper way to add fullness (slashing and spreading at multiple points, then truing the stitch line, instead of my haphazard scooting the pattern piece over until it looked right...are you sensing a theme here, too?). I confess I do get a little impatient sometimes about the pace of the class, because I feel like all these manipulations are obvious, but then I have to remind myself to take a deep breath because not everyone taking the class has been doing this for years. Teachers really do make the worst students sometimes.


Anyway, so one of our assignments was to make a top with a sleeve of some kind and a collar that had a closure, and show the pattern manipulation work that went into it. I didn't want to make some variation of a cutesy Peter Pan collar on a button up shirt with puff sleeves, which which is what a lot of people went with. So I started brainstorming...and coming off of my mourning for the Victorian costumes that I made for A Little Princess that would never be worn, I decided that I was going to make a turn of the century, early 1900s-style blouse, with a high stand collar, bishop sleeves, and a full gathered front, pouter-pigeon look. And as I looked at the fabrics available to me in my stash (lots of gray, green, and black), I decided that I was going to go all in and make myself a historical Slytherin costume. The final garments for this class have to include a top and a skirt (or an entire dress...basically it has to cover a dress form so that it's dressed "decently"), and if I made a top for this assignment, then I could just make a skirt to complete the final outfit. Was I making a lot of extra work for myself, drafting such a complicated outfit? The answer is yes. Did I care? No. I'm using all my Canada College classes as an excuse to indulge in my love for historical fashion (see Exhibit A, Fashion Illustration classes, and Exhibit B, Tailoring Class).


Here's what my quarter scale work looked like. We're supposed to work out our designs in quarter scale first so that the professor can check our work, then we make the full-scale pattern and mock it up. I didn't bother with a mock-up and just went straight for fashion fabric, because 1) we're designing for a standard size 8 mannequin, which is basically my size so I have a fairly good idea how things should look/fit, and 2) my fashion fabric is thrifted sheets, so no big loss if it doesn't work out. I did dress it up more with some stash lace, which was so shifty that I had to hand baste it all in place before I could start sewing, so that was also obviously an excellent time-saving decision in this time of extra work due to home-schooling.

I'm pretty pleased with how centered I got the lace motifs!

I think the side profile has the right kind of poofy pigeon-breast look. 

Oops, Cecily's skirt, my stand-in until I make the real one, is slightly off-center. It's a thrift store find that used to be a too big, 90s-tastic, empire-waisted, tea-length, burnout-velvet dress, so I cut off the top portion and redid the top edge with a petersham ribbon facing to make it into a floor-length skirt.


The back closes with hooks and bars, as do the sleeve cuffs, mostly because I had lots of them leftover from our anniversary trip to the UK, where I found a vintage pack of a hundred at a charity shop. I've gotten a lot better/faster at sewing them on now, but I still don't like doing it and mine aren't particularly neat. But they're all hidden, and black on black is hard to see, so I think ultimately the pragmatic Slytherin thing to do is to get them done functionally and save all the agonizing over perfection for when Voldemort is actually watching the parts that are actually showing.

More Slytherin secrets: the inside seams aren't finished. 

I had to look up how to finish the sleeve placket because I haven't done one in oh, at least five years. 


Summary

Pattern: Self-drafted, but based on period illustrations/patterns like the one below.

Source: the Original Pre-1929 Historical Patterns tumblr is a treasure trove.


Fabric: Half of a full-size flat sheet in gray cotton sateen, thrifted and leftover from drama costume making, for the main blouse fabric. The yoke was overlaid in black lace from a 1/2-yard remnant that I bought from Joann's years ago. I don't know the fiber content anymore, but it's definitely synthetic. For the cuff and collar lace overlays, I used scraps from a remnant pack that I bought at the Dark Garden trunk sale years ago. The strip of black fabric for back closure was from another thrifted cotton sateen sheet scrap, and the bias tape binding at the hem is silk dupioni leftover from my Ursula bustier. I'm really pleased with how I've been able to use all leftover pieces of fabric from my stash for this!

Notions: Interfacing for the collar, cuffs, and back closure, pieced together from the leftover of my tailoring class coat, and souvenir hooks and bars

Hours: A couple hours each for drafting and cutting, another hour of hand-basting lace, maybe five hours for actual sewing, and then another hour of hook and bar sewing, so let's say 11 hours total.

How accurate is it? Like everything else I do, not really: a cotton shirtwaist would need to be in thinner material, and obviously synthetic laces are right out, but I tried to get the overall impression of the look right? I think the thickness of the sheet fabric prevents the gathers from falling as nicely as they should, but my pattern pieces are pretty good I think.

Total cost: It's made from so many little scrappy leftover bits, it's hard to say, but I would say definitely less than $10.

Final thoughts: It's hard not to focus in on the one mistake I know I made: I cut the center front piece wrong, so there's something wonky going on in the middle. Plus, the stiffness of the sheet fabric makes for an awkwardly puffy-looking blouse (as opposed to period-accurate puffiness), so I feel like I should go back and redo it. That would involve A LOT of seam ripping though, so I may wait until the full ensemble is done to see if it still bothers me enough to warrant fixing it. I am hoping that once I finish everything else (skirt, belt, and Eton jacket/bolero-y thing), the overall look will be good enough that I won't feel like I need to.

Fingers crossed!