Tuesday, April 30, 2013

The Antisocial Behavior Dress

If you could do anything humanly possible with complete assurance that you would not be detected or held responsible, what would you do? We were talking about social influence and deindividuation last week in my AP Psych class, and when presented with the above question, 36% of college students responded with some kind of antisocial activity (e.g. criminal or spying behaviors, with most people actually saying "rob a bank"), 19% cited some other non-normative behavior, 36% neutral, and only 9% of the respondents named a prosocial behavior (Dodd, 1985). I'm pretty sure that of all the responses, 0% of them said "enter a sewing contest without using the official contest pattern."


Unless you've been hiding under a rock, you've probably heard that Colette Patterns recently released a new sewing pattern, the Laurel shift dress, and not only that, but they sponsored a huge contest with absolutely fabulous prizes. Who wouldn't love all that free money to buy fabric and notions with?! Unfortunately, I'm a cheapskate when it comes to buying sewing patterns. I love the sales at Joann's, but even those are a bit pricey when you can buy vintage patterns for $0.25 each at thrift stores. Which means that when it comes to having to pay over $10 for a pattern...well, I just couldn't bring myself to do it. Especially for such a simple shift that I could probably make up on my own. I bid a sad goodbye to thoughts of free Spoonflower fabric of my own ($18/yd, even for my own design, is something I can't justify right now. I'll have to settle for drawing or printing my own), but somehow the idea of a simple shift wouldn't leave me alone! Even though I was pretty underwhelmed when I first saw the Laurel pattern announcement, Debi was right -- contests really do inspire me to rethink my initial assessments of a pattern (or in this case, a look) that I'd previously dismissed as unsuitable for my body type/personal style.

So...what did I finally make for my if-I-could-I-would contest entry? Well, let's just say that velociraptors, especially as depicted in Jurassic Park, are the ultimate in antisocial behavior:

Okay, I know, this isn't a velociraptor*, but it's still pretty awesome to find metal dinosaurs outside a random car wash in TCOCC. 
A wash and wax for $9.95! They actually do a pretty good job, as Mr. Cation car can attest. 
There was a Sewasaurus Tyrannosaurus Rex too!

I could also wear this on days that I'm feeling particularly introverted, because there's nothing more antisocial than a dress printed all over with ominous words/phrases like "Keep Out! Danger! Caution! Warning!"Also, Mr. Cation swears he will not walk next to me when I wear this in public, so that's even less social interaction...

You mean you don't want to be associated with me? At least Amanda will join me in making dinosaur poses!

When I first received this Jurassic Park sheet in the mail, I was so excited, but I couldn't figure out what to do with such an awesome (and large-scale, and multi-colored) print! Thanks to Brooke, who suggested that I make it into a shift dress with as few interrupting style lines as possible, I decided to make this not-a-Laurel. While I can't exactly enter it into the contest, I still think it would've been a pretty fabulous entry for the showing-off-a-print category.


I started with Simplicity 8722, which I've used in the past, but only with knits. In order to get the more fitted look that I wanted, I ended up making a whole bunch of modifications, taking in the side seams and back (at both the CB seam and by making larger back darts), almost totally redrafting the sleeve, and of course, axing the facings and replacing them with bias strips. Now that I've finally done the work of modifying the pattern, I'm surprised by how much I like the shift dress look! It's simple and classy (as long as you're not using dinosaur sheets from the 90s) and not nearly as awful on my body as I was expecting.


Summary:
Fabric: Just half of a 70/30 poly-cotton twin sheet. I love that shift dresses use so little fabric! This means I still have enough fabric left over to do something else, although I don't know what yet.
Notions: Bias tape for the neckline, seam binding on all the inside bits (there are no raw edges anywhere, because this fabric frayed like fraying was its only goal in life), a 20" zipper, and a hook and eye
Hours: Eight, for all the fiddly fitting and seam binding everything within an inch of its life.
Will you make it again? Now that I've figured out how to wear a shift dress well, you bet I'll be making more! Colette, I'm sorry for ever doubting the brilliance of the Laurel. However, I'm still not paying you $14 for it.
Total cost: Thanks to the generous NYC sewing bloggers, this was a free project! All the notions were in my stash already, but I guess if you had to count how much they originally cost me, I'll say it was $1.
Final thoughts: This might be one of the more ridiculous things I've made. And that's saying a lot, since I've made quite a few ridiculous things in the last couple of years! Unlike the other geeky dresses I've made, which were all a sort of uniform blue with a slightly more subtle print (you wouldn't think they'd be subtle, but I've hung out with people and had them not notice until several hours in that I've got Jedis or superheroes all over my dress), this dress boasts all the primary colors in a huge, blocky print. Dinosaurs just don't do subtle. Still, I think the colors and pattern actually add to the mod 60s look. Hah! Obviously I don't actually know anything about the mod 60s look. At any rate, the nicest thing Mr. Cation could think to say about it (actually, I'm not sure he was trying to be nice...he might have just been confused) was that it looked like a pediatric nurse's scrubs. You know, the kind with teddy bears all over to keep children calm. Well, watch out, children, these terrible lizards aren't even pretending that the shot won't hurt! They're all like caution danger warning this shot is going to hurt like a dinosaur bite. Still, despite all that, this dress makes me really happy because it's just SO WEIRD.

Even better, though? I'm not alone in my weirdness! Gingermakes, of Mood Sewing Network fame, and one of the NYC bloggers who was in on sending me this sheet, kept a JP sheet for herself...and she also made it into a shift dress (but she used the real Laurel...I guess I'm just the Chinese knock-off)! I'm pretty sure that when Andrea announced the S.O.S. challenge, she never thought it would be applied to such fabric. But there you have it, sister fabrics...go check out her make!

At this point, Mr. Cation was like, are we done yet? 

*A true-to-life statue of a velociraptor wouldn't be very fun to take pictures with, though, since they're not nearly as scary as the Jurassic Park movie portrayal. As expressed so delightfully in one of my favorite nerdy songs, Hollywood Raptor, velociraptors should be feathered and more or less turkey-sized. Incidentally, The Doubleclicks are an absolutely brilliant pair of sisters who write awesome stuff -- if you're into D&D at all, you'll love This Fantasy World.

Monday, April 29, 2013

DIY Anthropologie: Edisto Wide-Leg Trousers

When I first started sewing, one of my big motivators was wanting to make my own versions of Anthropologie clothes for much, much cheaper. In fact, that was a big theme of many of my earlier makes, but it's been over a year since I was inspired by anything in their catalogs. I don't know why they got so Bohemian for a while, but I was thrilled to pieces when their latest catalog was suddenly full of things I wanted to make. I love being inspired by their colors and prints, so even though my sewing queue has just doubled in length, I'm (not so) secretly pleased.

In the past, I've only tried to copy their dresses and skirts, so I decided that I should take on the challenge of pants. I mean, now that I've more or less successfully sewn pants and shorts, a whole new world is open to me and I should take advantage of it. Enter the Edisto Linen Wide-Legs in red, gloriously vibrant and with big contrasting buttons on the side. I've been cautiously entertaining the idea of brightly colored pants ever since seeing Erica B's gorgeous coral pair and Sunni's season opener, but wasn't sure if I could pull it off. There's nothing like a hey-look-at-me color on bottom to bring doubt into the mind of a pear-shaped lady, but I had the perfect fabric in my stash, and, well, it's the year of magical doings. If pulling off orange pants isn't magical, then I don't know what is. Also, it's only fabric -- if I don't like the final result, it's not like I was making pants out of baby penguins. So...how did they turn out?

ZOMG red-orange is a ridiculously difficult color to photograph.
I'm in love with these buttons. 
My best attempt to mimic the Anthro picture. Not nearly as fun as the Japanese sewing books. 
Boom! Butt! 

If you look closely at the enlarged picture of the Edisto pants, you can see that besides the side-button feature, they also don't have a waistband or darts at the front -- there's only a line of stitching that gives the suggestion of a waistband, but is more likely just to tack down the facing on the inside. With that in mind, I used OOP Simplicity 4099 as my base pattern, which I won in Leah of Struggle Sews a Straight Seam's giveaway last summer. It has very similar features (no front dart or waistband, wide leg), minus the side buttons, but I figured it would be easy enough to make that part up. 


To make the side-button placket, I cut two placketish-looking pieces, finished the edges, and sewed one to each side of the left side opening. On the front pants piece, I pressed the placket under and topstitched it down, then put in five buttonholes. On the back pants piece, I left the placket piece flopping out towards the front, understitched it, tacked on a piece of twill tape to act as a button stand (I recently read this blog post about button stands in historical tailoring, and it made so much sense that I elected to jury-rig one for these pants. It works marvelously and I don't have to worry about my fabric distorting or ripping, and the closure feels deliciously secure), then added my five lovely nautical buttons. I am seriously in love with how this closure looks, plus it puzzled Mr. Cation because he couldn't figure out how the pants came off.


Yaaaay I look eleven feet tall!
Summary: 
Fabric: 2 yards of 60" wide, suiting-weight orange wool-blend twill, part of my stashbusting pledge pile. The lady who was cutting it for me at F&S said it had some polyester in it, and it certainly presses that way, and I suspect it's got a bit of Lycra in it as well, since it's slightly stretchy. While the original Anthro pants are a linen-tencel blend, I opted not to use a similar fabric because 1) reviews said that it got really wrinkly, and 2) who am I kidding, I didn't want to go out and buy new fabric. Hopefully the polyester means that these won't get too wrinkly!
Notions: 5 brass anchor buttons from Fabrix in SF, lots of seam binding, thrifted twill tape and 2" hem facing 
Techniques used: My first time trying hem weights, thanks to the tip on Erica B's blog post! Seriously, best twenty cents I've ever spent...my pants looked ridiculous and horrible and I was ready to cry about all my wasted time, but then I tried adding in those four nickels and seriously guys, it was like magic. Suddenly everything was hanging a lot better, and these pants were saved from the UFO pile. If your wide leg swingy pants aren't hanging right, TRY IT. 
Hours: Eight or so over this past weekend...because right after making and sending off a corset, I felt the need to start (and miraculously, finish) an untried pattern. 
Will you make it again? Probably not. I don't think I need any more wide-leg trousers, although these are awfully comfy and swooshily fun in a way that I thought only skirts and dresses could be. I credit the hem weights for adding a certain gravitas when I stalk about purposefully.
Total cost: You're not going to believe this -- less than $4!!! I got the fabric for $1/yard when F&S was cleaning out old inventory, and the buttons were $0.10 each. Add in some seam binding and of course, my four nickels, and I've saved myself $94 off the original price of the Anthro pants. Sewing FTW!!
Final thoughts: When I first walked out of the sewing room to show my husband, he was speechless. I was already afraid that I looked like some negligent prison escapee who'd forgotten to change pants, but then he pronounced them interesting, and that the cut/style was fine, but the color was a little shocking. Finally we decided that I looked like a very stylish member of the Rogue Squadron. I do like them, though, resemblance to various jumpsuits aside, and even though the fit isn't perfect, I'm glad I gave it a try! I still need to work up the courage to wear them out for more than just pictures, though.

See, if I just stand normally, the back is all wrinkly. Not any worse than my RTW work pants, but still...it feels more egregious when it's orange. Also, I opted not to include welt pockets because let's face it, I'm still not mentally ready yet.
That's okay, though, because I'll just stand like this all the time. 

I think these actually look pretty similar to 1930s trousers, so these could *almost* be a HSF entry too...I mean, check out these pictures:

Wide legs: check! Side buttons: check! No front darts or waistband: check! Darts on the back with no pockets, check!  [source]
Oh hey, these are even orange! [source]
Pretty similar, right? I do find it interesting that the historical versions both end at about ankle-length, which I feel looks pretty weird. I hemmed these to just skim the ground, reasoning that my legs look longer that way. Since most of my height is from my long torso, I feel like the length of the pants + the high waist helps visually even out my proportions a bit. 


On that note, it's time to close out Vibrant Color month in the Stashbusting Sewalong! I vowed to use the brightest fabric in my stash this month, and I did...what about you? Let's see your brightly-colored makes from April -- just add your link to the party below. 


Also, in case you forgot, April was also a challenge month, which means that we'll be voting for our favorite project, and the lucky winner gets a small surprise in the mail! You've got until the end of the week to add your project, and then voting will start on Saturday, May 4, and end on Tuesday, May 7. 

Sunday, April 28, 2013

Because I Needed A Break

After all the corset-making intensity of the last week, I needed a relatively quick, non-stressful project that wouldn't involve taxing my arms anymore. I still managed to prick myself a bit with the felting needle, but it's still much better than accidentally stabbing yourself with an awl.

Dawwww, look at that face!
He's rolling around on his back, hoping for a belly rub!
His big secret: that patch of white on his back is actually rabbit fur, from my friend Cindy's adorable bunny June!


There's not much to say about this addition to the felted cat hair family; it's still the same techniques, and of course, obligatory posing with the original!

Walnut cautiously inspects the new guy.
Poor neutered Walnut with the only progeny he will ever have. 

Some people will be pleased to know that there is no longer enough hair in the stash for another felted cat. Of course, Walnut is always shedding more...

Oh what, I have to interrupt my morning lounging in the sun to take more pictures with this guy?
Fine, let's get this over with. Is this pose similar enough for you?

I can destroy you with one paw, tiny doppelganger. Come on and fight me if you dare!

Saturday, April 27, 2013

Wedding Dress Progress Post #5


I know it seems like it's just wedding dress posts all the time now, but you know what? That's all I've been working on, so...yeah. The good news is, it's almost done! I finished just about everything, and it's in the mail on its way to Elaine for a final try on before I tack on the appliques.


Can I just say that I never expected to be sore from corset-making? I woke up this morning feeling like I'd worked out, and I promise you, I haven't been. It's just that between cutting spiral steel, stuffing it into my very tight boning channels, inserting grommets, and extensive use of the hand-wheel on my machine for parts where I was sewing through eight layers of fabric, well, my hands and arms have been put to work.


This experience (and I'm more or less mentally/blogally wrapping up the experience since almost everything is done) has taught me that:

  • steel is sharp. I kept inadvertently jabbing or scratching myself while trying to cut and file the boning. Next time, gloves and not-shorts might be in order.
  • the people at Orchard Supply Hardware do not know what they're about. I wasted an hour being misdirected from aisle to aisle while looking for heat shrink tubing and grommet-setting tools. They also recommended aviation snips that were only barely sufficient for cutting the steel boning. I made it work, but my right arm did not thank me.
  • Steam Ingenious is seriously a genius for coming up with the heat-shrink tubing method of tipping steel boning. It was ridiculously fun watching the pieces of tubing shrink up around the bones. I want to heat shrink everything now!
  • when using the heat shrink tubing method, though, make sure to allot an extra eighth of an inch of length on either end for the extra tubing that has to stick out, or else you'll be a sad, sad person when it comes to binding the edges. 
  • I hate making holes for grommets, especially through multiple thick layers -- they have to be just the right size to be tight, but not so tight you can't wiggle the grommet in. Also, if you've got the same fabric on both the outside and inside of the corset, it's a good idea to make sure that the grommet is going in the right way. One of my grommets ended up the wrong way; thankfully the right side and wrong side are fairly indistinguishable when inserted properly. I really don't think anyone at Elaine's wedding is going to notice...right? And don't even get me started on getting them all perfectly lined up. 
  • those Clover bias tape makers are totally worth it. I actually don't have one for the size I needed for the corset binding, so I spent a good hour-plus cutting and pressing the misbehaving cream-colored poly-satin from the underskirt leftovers into 1/2" double-fold bias tape. Polyester just does not like holding a crease! I'm pretty pleased with how nice it looks in the end, though it would've been a lot faster and easier if I had the little doohicky. 
  • there's a reason why real corsetiers use special brocade for the fashion fabric in corsets; it's just a lot more stable and tightly woven. This slippery poly-satin that I used was cheap, but it was a pain when it came to fraying, bubbling, and shifting. I think I made the best of it, but if I were to do this again, I'd underline it with some stable cotton. It's unfortunate that I still had to be learning as I went while making a wedding garment, but I guess that's what Elaine gets for trusting an amateur. At least I saved her a lot of money?
On that note, custom corsets are totally justified in costing hundreds of dollars. While I mostly enjoyed the learning and the experience of making this corset for Elaine, I'll be honest -- there's no way I would do this for anyone other than a very, very, incredibly close friend that I like a lot! I'm glad I got a chance to do this, and I'm glad to be able to save her several hundreds of dollars, but I'm not in a hurry to do it all again anytime soon. I'm so relieved that it's (mostly) done.

Now I just need to figure out the applique(s). What do you think?
(My greatest fear: that the appliques will look like a violin's f-holes.)


Like I said earlier, it's now in the mail to her in Tucson, and I'm trying to hold back the anxiety that it will 1) somehow spontaneously combust en route, 2) not fit, despite having done a muslin and extensive comparison to a corset she already has, and 3) fall apart in the middle of the wedding day.

Remember that tornado of fabric that spit up in my sewing room? Well, this has now been added to the floor. 

Tuesday, April 23, 2013

Wedding Dress Progress Post #4

Cat checks out the new lace trim. 
Can you tell where I joined the two ends of the lace together? Am I awesome or what? Actually, it was just my luck that I didn't end in the middle of a scallop, because I certainly wasn't going to measure a seven yard hem that accurately.
Apologies for all the really yellow pictures...I've been working late into the nights!

I know it isn't Friday, but after a good fourteen hours of work over the last few days, I just had to share: Elaine's skirt is done, and the corset is somewhat assembled! I sewed on the 7+ yards of lace veeeerrry slowly, taking the entire two-hour Hobbit soundtrack to do so. And all the corset pieces are sewn together and boning channels have been created, and the busk was inserted with no little apprehension. Seriously you guys, I was hyperventilating a little when I sewing all these seams. Since the satin shows holes and the coutil is so tightly woven and my stitch length was so small, well, seam-ripping would have been a pain and everything felt awfully permanent. I knew that messing up wasn't an option (although I do have enough extra coutil and satin for another corset, I'd really rather not make a whole new one. Confession time: I actually cut and sewed half a "practice" corset so I could get a feel for how the fabrics handled and the seam allowances I needed to use. I even went to far as to insert a busk and then cut it back out), so I was extra careful and extra tense while I was sewing. I told Elaine afterwards that this is probably the most important thing I will ever sew, at least until I have a daughter get married, at which point I will have just forgotten how nerve-wracking making a wedding dress really is. Now I "just" need to:
  • purchase spiral steel boning, cut and tip it, and insert it all
  • wait for the front lace applique to arrive, then sew it on by hand
  • wait for the lace trim to arrive, then sew it on by hand
  • finish attaching the floating lining at the back, then insert all the grommets
  • bind the top and bottom
And then I'll be done! In the meantime, I'm eternally grateful for Steam Ingenious' tutorial on making a corset without having to be ultra nit-picky about everything matching up...I'm sorry, but I just can't do that perfect seam allowance thing. This way, I can just slap on a floating lining to hide my icky insides. 

Look at all those raw edges! I added a couple pieces of twill tape in the middle of the largest panels for additional boning.
I used this gray IKEA cotton for the lining since I wanted there to be a natural (but also somewhat coordinating) fabric against the skin. For the pieces closest to the busk, I fused the satin to the cotton so there would be no chance of gray showing through at the front. 

Steam Ingenious also has a tutorial about using heat-shrink plastic tubing to cap spiral steel bones, which I'm looking forward to trying. Thank goodness that Richard the Thread is not too far from me in TCOCC! It's tempting to stock up and buy all the hair canvas, coutil, batiste, and grommets I might ever need while I'm still so close, since I know most people don't have the luxury of having an endless supply of busks et al ten minutes away. 

In the meantime, I'm still trying to squeeze out one more vibrantly-colored item before the end of the month; it's too bad that AP exam prep is kicking my butt. Good thing the exams I'm concerned about are all over on the first day (May 6), so I can spend the rest of the time in between then and Elaine's wedding working on painting and calligraphing her ketubah. Goodness gracious, does she trust me too much, or does she trust me too much?

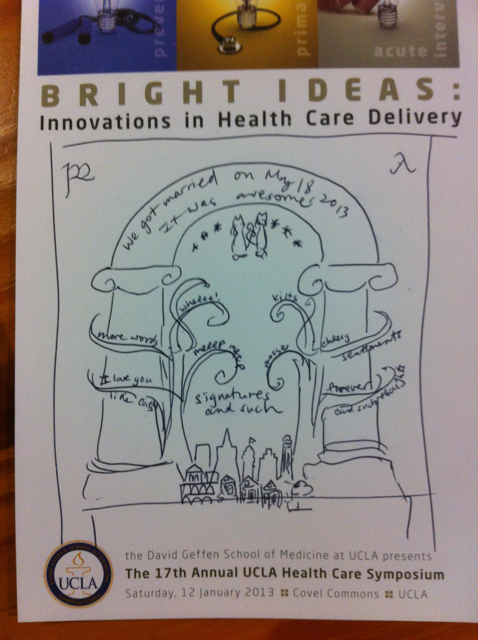
My rough sketch: it's based on Durin's Door, because, you know, I'm so good at that imagery, with the hammer & anvil replaced with a pair of cats, and the San Francisco skyline at the bottom between the pillars. The runes at the top are her and her fiance's initials, and the obviously the words I scribbled in will be replaced with the real text. Man, I have not painted anything in several years, so this will be a challenge!

Saturday, April 20, 2013

Thursday, April 18, 2013

Historical Sew Fortnightly: By the Sea

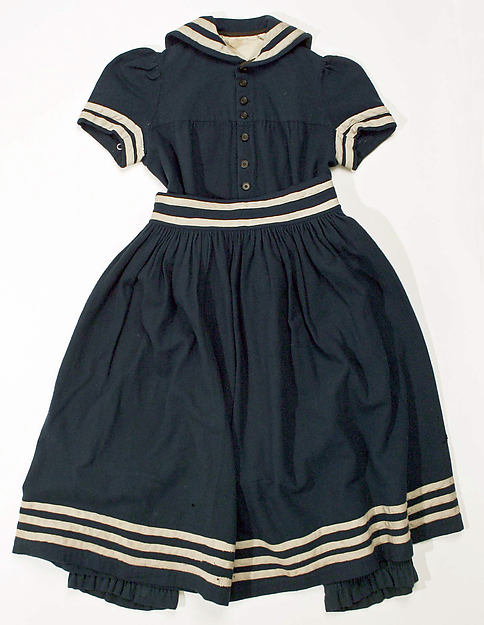
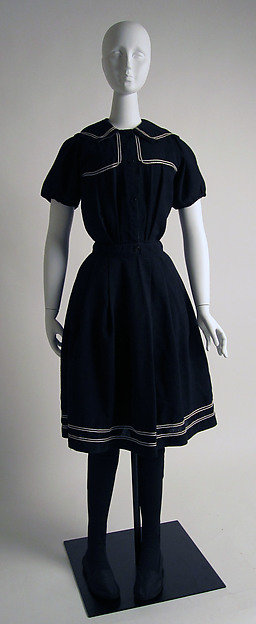
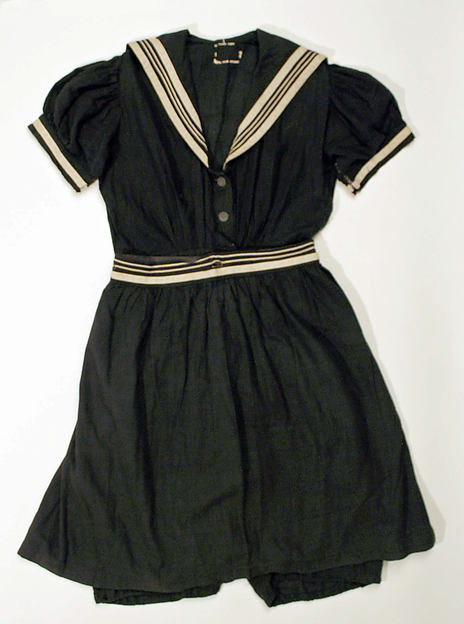
As soon as I saw the "By the Sea" challenge, I knew that I wanted to make a Victorian/Edwardian bathing suit, i.e., the ubiquitous be-sailor-collared dress with the lines of trim all over the place. When I first started sewing "for real," I actually made a similarly-inspired nautical dress (coincidentally, also for a Sew Weekly challenge!) which is one of my favorite early makes, but it's quite dark and, being a 50/50 poly-cotton blend, is quite warm on sunny days. I knew it was time to give the sailor collar another chance, and this was the perfect opportunity.

Now, me being me, you already know my garment is going to fail the historical accuracy test on a couple of counts: 1) machine stitching instead of hand stitching, and 2) made from bedsheets. This dress is no exception, as it's actually made from a 1970s dress pattern, Simplicity 7439, which was gifted to me by Meg the Grand last summer. Still, the differences between the authentic historical look and this modern adaptation are pretty minimal, at least in my mind; the same elements get used over and over again in nautical-inspired dresses, which is probably why people can sell generic versions.

After looking through loads of extant garments on Pinterest and museum sites, as well as fashion plates from the era, I came away with:

1) Light colored bathing suits are rare, but still possible. They don't all have to be dark blue!
"Women on the beach," by Maud Stumm, 1904. [source]
Thanks to The Dreamstress for sharing these images from this 1906 Girl's Own Paper! Check out the girl on the right.

2) They were not afraid of red.
Edwardian bathing suit, c. 1910 [source]
3) The sailor collar can start higher up; it doesn't have to dominate the front bodice.

[source]
4) Yokes, tucks, petal sleeves, and a waist sash are all design options.
Petal sleeves galore! Also yokes and tucks/pleats. Lastly, note that they don't all have to be super-puffy in the bodice. c. 1883. [source]
On the very left: petal sleeves with trim, and a sash at the waist, c. 1873. [source]

5) Trim on the collar, sleeves, and skirt bottom are pretty common.

Two bands of trim at the bottom of the skirt, as well as a yoke and pleats.  Also see #3.

6) Most bathing suits from the era are actually a jumpsuit-type deal with a bloomer bottom, and then a skirt is worn over the bloomers to create the "dress" look.

Buttons disappearing into the skirt! Also see the previous picture and picture #3. [source]

7) Bare feet is okay!
Well, I guess bare feet are only allowed if you're wearing full-length trousers too, but...ummm....yeah. c. 1868 [source]


So add up all of those elements, throw in a dash of 1970s, run it all through some old-timey filters, and this is what you get:


Okay, enough of the antique effects, here's what it really looks like:

It was ridiculously bright out. 
The bodice with its non-functional buttons disappearing into the sash so as to look like the inspiration garments.
It was also way too windy for my hat to stay on.

Since I wanted to work only from stash, I had to settle for the lightest-colored sheet I had, hence the totally anachronistic print. I go back and forth between thinking it looks vaguely science-y and thinking it looks like a hospital gown. At any rate, the light blue was begging for some vibrant pop of color, and hey, guess what, April is Vibrant Color Challenge month! When I first started sewing, I bought, for some unknown reason, something like ten packs of bright red bias tape. I'm really not sure why. Three years later, I've still got two packs left, so I figured I would go ultra-preppy and do the light blue and red combo. I guess I'm all set for July 4th celebrations this year?

To make the petal sleeves, I started off with this helpful picture tutorial from A Sartorial Statement, but I ended up doing lots of basting and trying on and taking off and seam ripping to get the shape and size right. I'm really pleased with the final look, though, so it was worth it!

A better look at the petal sleeve.

The insides -- you can see the yoke and the elastic across the back. Also,
I used a tan-colored bias tape for the neck binding, the better to hide dirt from
 wear. Hah! Actually, it was just because I wanted to use up that scrap.
Summary:
Fabric: 100% cotton twin flat sheet, thrifted (by Emily, then gifted to me), part of a white thrifted sheet for the collar.
Notions: Six yards of red bias tape and five buttons, both originally from Joann's. More bias tape for the sleeve and neck facings. Elastic for the back, and seam binding on all the insides.
Hours: At least twelve...all that trim took forever to apply, and those sleeves weren't helpful either!
How historically accurate is it? Kind of? I mean, minus the construction and materials, it's got all the right elements.
Will you make it again? Probably not. I've already got way too many nautical things in my wardrobe!
Total cost: less than $10? I don't know how much Emily spent on the sheet, but the notions were about $5.
First worn: To lunch with Mr. Cation on my day off, then for a walk along Venice Beach (possibly the most un-Victorian beach ever). It felt so incongruous to be taking pictures for the HSF while surfers were wandering around and hip hop music was blaring from the Muscle Beach Gym. Didn't Mr. Cation do a great job snapping photos at opportune moments so as to avoid too many obviously anachronistic elements?

Black and white, now, because that's really Victorian.
It's too bad I don't know how to photoshop those sunbathers out of the picture!  

Although my materials weren't originally included in my stashbusting fabric list, the sheet and the notions have both been in my possession for over six months, if not more, so I'm counting it as a stashbusting project!