 |
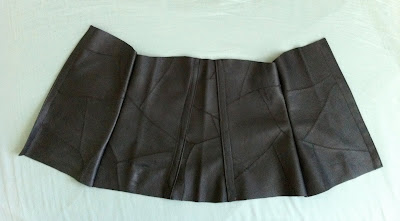
| My "pattern" pieces: not to scale. |
Directions to make my Bellatrix costume underbust fake corset:
(fake because its only corset-like aspect is lacing and grommets; click on any of the pictures to see a larger version)
 1. Get a pair of leather pants, or some other source of leather from the thrift store (skirts, large men's jackets, tote bags, etc.) I recommend thrifting your leather to reduce the number of animals killed for their hides, to promote less waste/reusing/recycling/reducing the number of tanning chemical released into the environment, and simply because it's cheaper than buying new. Alternately, you could use synthetic pleather, but I don't know what working with it is like. The pants I used were a lovely buttery soft texture which made it a pleasure to work with (aside from the grandma smell).
2. Decide how tall you want your corset to be and draw a vertical line on a large piece of wrapping paper ($1/roll at Target!). Figure out your underbust, waist, and hip measurement and draw them so that the vertical line bisects each line. Sketch curved lines to connect the lines, making a shape that roughly approximates your body shape. See my diagram below.
3. Cut out your paper pattern and use it to cut out four pieces of leather: front right, front left, back right, back left. Sew a bunch of zig-zag stitch lines all over the pieces to approximate Bellatrix's patched-together look.
4. Fold over the straight side of your back pattern pieces and stitch in order to make a thicker section for attaching the grommets. Wonder why the leather isn't feeding through the sewing machine properly, then realize it's because it's slightly sticky. Sandwich with tissue paper, then run it through again to great success.
5. Tear off the tissue paper. Pick off the little bits that are still stuck to the seams.
6. Sew the side-seams for your pattern pieces. Hold up the pieces to your body, only to realize that for some reason the front pieces don't meet properly. Realize that it's because you forgot to put in seam allowances. Draw and cut out a trapezoidal piece (see above "pattern" piece) to fill in the gap. Remove the napping cat, who has taken advantage of your temporary absence from the sewing desk chair.
 |
| "But I'm too cute to disturb!" |
 |
| All the pieces together. |
 |
| Close-up of the trapezoidal piece. |
 |
| View of the inside. |
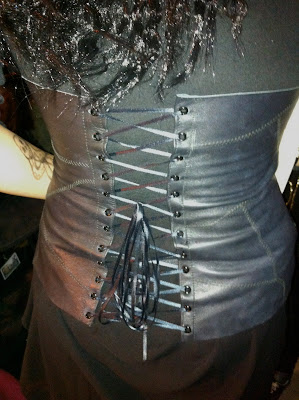
8. Put grommets into the back pieces, about 1 inch apart. Curse the thickness of the leather that defies your hole puncher's best efforts. Realize that it's not the hole puncher's fault, as it was meant for paper. Cut 3 yards of ribbon and lace up the back following this helpful tutorial.
 |
| Trying to take pictures of black things and still capturing the detail is ridiculous. |
9. After you come back from the HPDH2 midnight showing, realize that you should harvest the rest of the leather from the pants, resulting in this:
 |
| Hmm...what can I make with all the leftover leather scraps? |


Very cool! I went through something similar the first time I tried to make a corset and to this day, having made 4 of them, I still haven't used a busk and I've learned that large zip-ties are a very effective alternative to "real" boning.
ReplyDelete@hellesbelles86 Thanks for checking out my fake-torial! Wow, I'm impressed that you've made 4 corsets. I am planning on making one with boning someday, and I hear that a cut up milk jug makes excellent boning.
ReplyDeleteThis is great! Too hard to find a good Bellatrix costume and you've done a great job with the hardest part.
ReplyDelete@twilightcupcakeThanks! Indeed, all of the costumes I saw were expensive AND cheap-looking. Which is probably the worst combination ever! This was definitely the little money, lots of time route.
ReplyDeleteYayyy, thank you! I've really been wanting a corset that doesn't actually alter my body shape, because I would look disturbing, and i might try this sometime. =) Although I'm terrible at sewing. So maybe I'll pay a relative to do it. XD
ReplyDeleteyour awesome! You have so much talent even not being a "real" corset.
ReplyDeletethanks so much! so doing this! im making a medieval dress right now and needed a coset for the costume! every one els at vbs will love it!! oh i thats my fav. part of sewing to!! thanks again!!!
ReplyDeletethis is great!! just what I needed to make a corset out of robot fabric for Time Traveller" weekend at our Ren Faire. love your blog and especially your "geek dresses" section! :D
ReplyDeleteWorked like a charm for MY Bellatrix costume! Thank you so much!!
ReplyDelete