Saturday, April 27, 2013

Wedding Dress Progress Post #5


I know it seems like it's just wedding dress posts all the time now, but you know what? That's all I've been working on, so...yeah. The good news is, it's almost done! I finished just about everything, and it's in the mail on its way to Elaine for a final try on before I tack on the appliques.


Can I just say that I never expected to be sore from corset-making? I woke up this morning feeling like I'd worked out, and I promise you, I haven't been. It's just that between cutting spiral steel, stuffing it into my very tight boning channels, inserting grommets, and extensive use of the hand-wheel on my machine for parts where I was sewing through eight layers of fabric, well, my hands and arms have been put to work.


This experience (and I'm more or less mentally/blogally wrapping up the experience since almost everything is done) has taught me that:

  • steel is sharp. I kept inadvertently jabbing or scratching myself while trying to cut and file the boning. Next time, gloves and not-shorts might be in order.
  • the people at Orchard Supply Hardware do not know what they're about. I wasted an hour being misdirected from aisle to aisle while looking for heat shrink tubing and grommet-setting tools. They also recommended aviation snips that were only barely sufficient for cutting the steel boning. I made it work, but my right arm did not thank me.
  • Steam Ingenious is seriously a genius for coming up with the heat-shrink tubing method of tipping steel boning. It was ridiculously fun watching the pieces of tubing shrink up around the bones. I want to heat shrink everything now!
  • when using the heat shrink tubing method, though, make sure to allot an extra eighth of an inch of length on either end for the extra tubing that has to stick out, or else you'll be a sad, sad person when it comes to binding the edges. 
  • I hate making holes for grommets, especially through multiple thick layers -- they have to be just the right size to be tight, but not so tight you can't wiggle the grommet in. Also, if you've got the same fabric on both the outside and inside of the corset, it's a good idea to make sure that the grommet is going in the right way. One of my grommets ended up the wrong way; thankfully the right side and wrong side are fairly indistinguishable when inserted properly. I really don't think anyone at Elaine's wedding is going to notice...right? And don't even get me started on getting them all perfectly lined up. 
  • those Clover bias tape makers are totally worth it. I actually don't have one for the size I needed for the corset binding, so I spent a good hour-plus cutting and pressing the misbehaving cream-colored poly-satin from the underskirt leftovers into 1/2" double-fold bias tape. Polyester just does not like holding a crease! I'm pretty pleased with how nice it looks in the end, though it would've been a lot faster and easier if I had the little doohicky. 
  • there's a reason why real corsetiers use special brocade for the fashion fabric in corsets; it's just a lot more stable and tightly woven. This slippery poly-satin that I used was cheap, but it was a pain when it came to fraying, bubbling, and shifting. I think I made the best of it, but if I were to do this again, I'd underline it with some stable cotton. It's unfortunate that I still had to be learning as I went while making a wedding garment, but I guess that's what Elaine gets for trusting an amateur. At least I saved her a lot of money?
On that note, custom corsets are totally justified in costing hundreds of dollars. While I mostly enjoyed the learning and the experience of making this corset for Elaine, I'll be honest -- there's no way I would do this for anyone other than a very, very, incredibly close friend that I like a lot! I'm glad I got a chance to do this, and I'm glad to be able to save her several hundreds of dollars, but I'm not in a hurry to do it all again anytime soon. I'm so relieved that it's (mostly) done.

Now I just need to figure out the applique(s). What do you think?
(My greatest fear: that the appliques will look like a violin's f-holes.)


Like I said earlier, it's now in the mail to her in Tucson, and I'm trying to hold back the anxiety that it will 1) somehow spontaneously combust en route, 2) not fit, despite having done a muslin and extensive comparison to a corset she already has, and 3) fall apart in the middle of the wedding day.

Remember that tornado of fabric that spit up in my sewing room? Well, this has now been added to the floor. 

Tuesday, April 23, 2013

Wedding Dress Progress Post #4

Cat checks out the new lace trim. 
Can you tell where I joined the two ends of the lace together? Am I awesome or what? Actually, it was just my luck that I didn't end in the middle of a scallop, because I certainly wasn't going to measure a seven yard hem that accurately.
Apologies for all the really yellow pictures...I've been working late into the nights!

I know it isn't Friday, but after a good fourteen hours of work over the last few days, I just had to share: Elaine's skirt is done, and the corset is somewhat assembled! I sewed on the 7+ yards of lace veeeerrry slowly, taking the entire two-hour Hobbit soundtrack to do so. And all the corset pieces are sewn together and boning channels have been created, and the busk was inserted with no little apprehension. Seriously you guys, I was hyperventilating a little when I sewing all these seams. Since the satin shows holes and the coutil is so tightly woven and my stitch length was so small, well, seam-ripping would have been a pain and everything felt awfully permanent. I knew that messing up wasn't an option (although I do have enough extra coutil and satin for another corset, I'd really rather not make a whole new one. Confession time: I actually cut and sewed half a "practice" corset so I could get a feel for how the fabrics handled and the seam allowances I needed to use. I even went to far as to insert a busk and then cut it back out), so I was extra careful and extra tense while I was sewing. I told Elaine afterwards that this is probably the most important thing I will ever sew, at least until I have a daughter get married, at which point I will have just forgotten how nerve-wracking making a wedding dress really is. Now I "just" need to:
  • purchase spiral steel boning, cut and tip it, and insert it all
  • wait for the front lace applique to arrive, then sew it on by hand
  • wait for the lace trim to arrive, then sew it on by hand
  • finish attaching the floating lining at the back, then insert all the grommets
  • bind the top and bottom
And then I'll be done! In the meantime, I'm eternally grateful for Steam Ingenious' tutorial on making a corset without having to be ultra nit-picky about everything matching up...I'm sorry, but I just can't do that perfect seam allowance thing. This way, I can just slap on a floating lining to hide my icky insides. 

Look at all those raw edges! I added a couple pieces of twill tape in the middle of the largest panels for additional boning.
I used this gray IKEA cotton for the lining since I wanted there to be a natural (but also somewhat coordinating) fabric against the skin. For the pieces closest to the busk, I fused the satin to the cotton so there would be no chance of gray showing through at the front. 

Steam Ingenious also has a tutorial about using heat-shrink plastic tubing to cap spiral steel bones, which I'm looking forward to trying. Thank goodness that Richard the Thread is not too far from me in TCOCC! It's tempting to stock up and buy all the hair canvas, coutil, batiste, and grommets I might ever need while I'm still so close, since I know most people don't have the luxury of having an endless supply of busks et al ten minutes away. 

In the meantime, I'm still trying to squeeze out one more vibrantly-colored item before the end of the month; it's too bad that AP exam prep is kicking my butt. Good thing the exams I'm concerned about are all over on the first day (May 6), so I can spend the rest of the time in between then and Elaine's wedding working on painting and calligraphing her ketubah. Goodness gracious, does she trust me too much, or does she trust me too much?

My rough sketch: it's based on Durin's Door, because, you know, I'm so good at that imagery, with the hammer & anvil replaced with a pair of cats, and the San Francisco skyline at the bottom between the pillars. The runes at the top are her and her fiance's initials, and the obviously the words I scribbled in will be replaced with the real text. Man, I have not painted anything in several years, so this will be a challenge!

Saturday, April 20, 2013

Thursday, April 18, 2013

Historical Sew Fortnightly: By the Sea

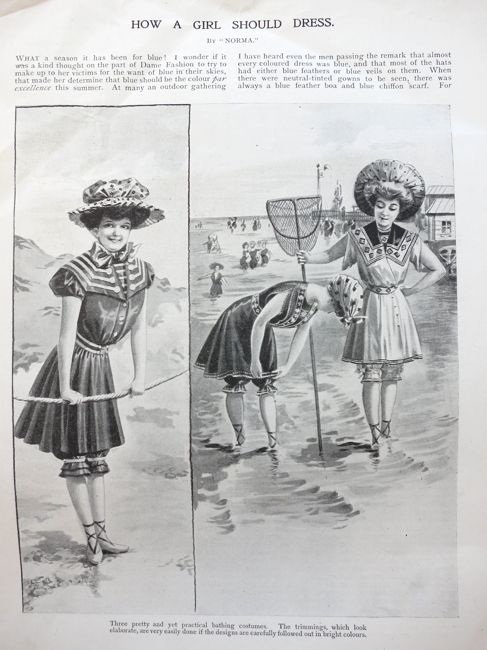
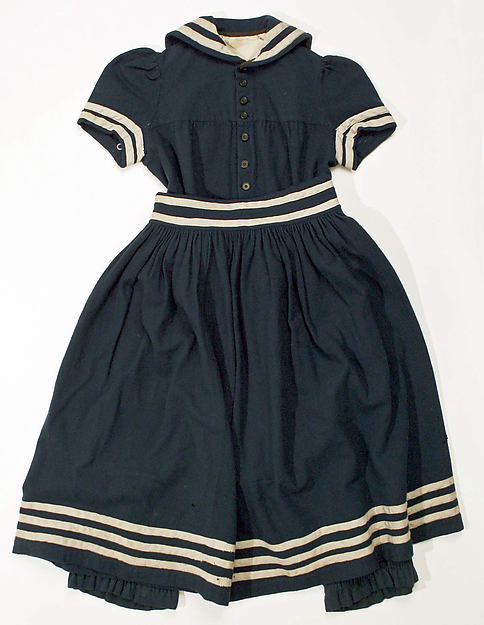
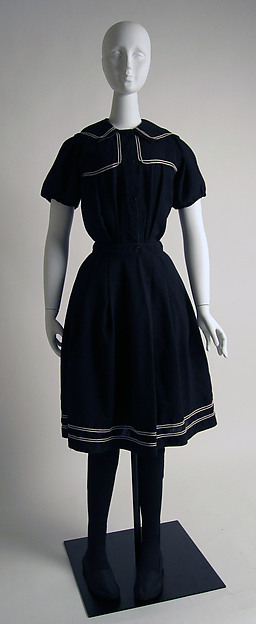
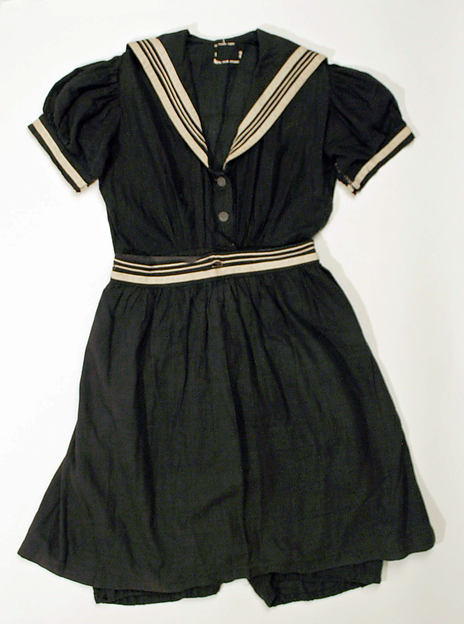
As soon as I saw the "By the Sea" challenge, I knew that I wanted to make a Victorian/Edwardian bathing suit, i.e., the ubiquitous be-sailor-collared dress with the lines of trim all over the place. When I first started sewing "for real," I actually made a similarly-inspired nautical dress (coincidentally, also for a Sew Weekly challenge!) which is one of my favorite early makes, but it's quite dark and, being a 50/50 poly-cotton blend, is quite warm on sunny days. I knew it was time to give the sailor collar another chance, and this was the perfect opportunity.

Now, me being me, you already know my garment is going to fail the historical accuracy test on a couple of counts: 1) machine stitching instead of hand stitching, and 2) made from bedsheets. This dress is no exception, as it's actually made from a 1970s dress pattern, Simplicity 7439, which was gifted to me by Meg the Grand last summer. Still, the differences between the authentic historical look and this modern adaptation are pretty minimal, at least in my mind; the same elements get used over and over again in nautical-inspired dresses, which is probably why people can sell generic versions.

After looking through loads of extant garments on Pinterest and museum sites, as well as fashion plates from the era, I came away with:

1) Light colored bathing suits are rare, but still possible. They don't all have to be dark blue!
"Women on the beach," by Maud Stumm, 1904. [source]
Thanks to The Dreamstress for sharing these images from this 1906 Girl's Own Paper! Check out the girl on the right.

2) They were not afraid of red.
Edwardian bathing suit, c. 1910 [source]
3) The sailor collar can start higher up; it doesn't have to dominate the front bodice.

[source]
4) Yokes, tucks, petal sleeves, and a waist sash are all design options.
Petal sleeves galore! Also yokes and tucks/pleats. Lastly, note that they don't all have to be super-puffy in the bodice. c. 1883. [source]
On the very left: petal sleeves with trim, and a sash at the waist, c. 1873. [source]

5) Trim on the collar, sleeves, and skirt bottom are pretty common.

Two bands of trim at the bottom of the skirt, as well as a yoke and pleats.  Also see #3.

6) Most bathing suits from the era are actually a jumpsuit-type deal with a bloomer bottom, and then a skirt is worn over the bloomers to create the "dress" look.

Buttons disappearing into the skirt! Also see the previous picture and picture #3. [source]

7) Bare feet is okay!
Well, I guess bare feet are only allowed if you're wearing full-length trousers too, but...ummm....yeah. c. 1868 [source]


So add up all of those elements, throw in a dash of 1970s, run it all through some old-timey filters, and this is what you get:


Okay, enough of the antique effects, here's what it really looks like:

It was ridiculously bright out. 
The bodice with its non-functional buttons disappearing into the sash so as to look like the inspiration garments.
It was also way too windy for my hat to stay on.

Since I wanted to work only from stash, I had to settle for the lightest-colored sheet I had, hence the totally anachronistic print. I go back and forth between thinking it looks vaguely science-y and thinking it looks like a hospital gown. At any rate, the light blue was begging for some vibrant pop of color, and hey, guess what, April is Vibrant Color Challenge month! When I first started sewing, I bought, for some unknown reason, something like ten packs of bright red bias tape. I'm really not sure why. Three years later, I've still got two packs left, so I figured I would go ultra-preppy and do the light blue and red combo. I guess I'm all set for July 4th celebrations this year?

To make the petal sleeves, I started off with this helpful picture tutorial from A Sartorial Statement, but I ended up doing lots of basting and trying on and taking off and seam ripping to get the shape and size right. I'm really pleased with the final look, though, so it was worth it!

A better look at the petal sleeve.

The insides -- you can see the yoke and the elastic across the back. Also,
I used a tan-colored bias tape for the neck binding, the better to hide dirt from
 wear. Hah! Actually, it was just because I wanted to use up that scrap.
Summary:
Fabric: 100% cotton twin flat sheet, thrifted (by Emily, then gifted to me), part of a white thrifted sheet for the collar.
Notions: Six yards of red bias tape and five buttons, both originally from Joann's. More bias tape for the sleeve and neck facings. Elastic for the back, and seam binding on all the insides.
Hours: At least twelve...all that trim took forever to apply, and those sleeves weren't helpful either!
How historically accurate is it? Kind of? I mean, minus the construction and materials, it's got all the right elements.
Will you make it again? Probably not. I've already got way too many nautical things in my wardrobe!
Total cost: less than $10? I don't know how much Emily spent on the sheet, but the notions were about $5.
First worn: To lunch with Mr. Cation on my day off, then for a walk along Venice Beach (possibly the most un-Victorian beach ever). It felt so incongruous to be taking pictures for the HSF while surfers were wandering around and hip hop music was blaring from the Muscle Beach Gym. Didn't Mr. Cation do a great job snapping photos at opportune moments so as to avoid too many obviously anachronistic elements?

Black and white, now, because that's really Victorian.
It's too bad I don't know how to photoshop those sunbathers out of the picture!  

Although my materials weren't originally included in my stashbusting fabric list, the sheet and the notions have both been in my possession for over six months, if not more, so I'm counting it as a stashbusting project!

Tuesday, April 16, 2013

The Stylish Dress Book Review

[source]
After the fiasco that was my Drape Drape experience, I'm honestly kind of surprised that Laurence King Publishing actually wanted to send me more Japanese sewing pattern books to review. They did promise, though, that this next book contained more practical patterns, even if it didn't have a fun name (my favorite suggestion from the giveaway post: a book of HP fashion called Snape Snape). Yoshiko Tsukiori's Stylish Dress Book: Simple Smocks, Dresses, and Tops promised to be a "fabulous homemade alternative to racks of identikit [sic] clothes in cheap fabrics." Flipping through the book, it's true that these clothes are more practical (read: you can actually wear them outside!), and they're certainly different from the cheap clothes you see mass produced at Forever 21 or H&M. On the other hand, they're not exactly what I think of when I think of stylish clothing. To me, these relatively shapeless smocks and boxy tops look more like maternity clothes, which is just perfect because...


...I'm totally not pregnant. Which meant that even though yes, these clothes are more wearable than the ones in Drape Drape, they still wouldn't be my first pick when it comes to trying new patterns. Still, in the interest of doing a fair review (i.e. one where I actually try out at least one pattern), I picked one of the two dresses in the book that actually looks like it has some waist definition going on: Dress R, which features several rows of elastic shirring at the waist.

Unfortunately, white on white doesn't photograph so well. 

I decided I wanted to make this dress without the sleeves, and use different fabric for the yoke for some visual interest (and also because sheer yokes are totally in right now). Tracing the pattern was pretty easy, and since the dress is actually pretty basic, I didn't really bother much with the instructions. In case you were wondering, though, the instructions are very similar to Drape Drape: concise and clearly illustrated with well-done line drawings.

It's a cute peasant-ish look, especially with the decorative blanket stitching at the neckline. 

How did it turn out? Judge for yourself.

Oh hey, that doesn't look anything like the dress in the book. 
Yeah, sorry about that, but I made lots of modifications. 
I love the white embroidered flowers on this fabric!

Maybe it was the embroidered cotton voile I was using, but the dress ended up looking very puffy around the shoulders, so I added several more rows of shirring at the shoulders in an attempt to tame some of the extra fabric. I also widened the neckline, took in the bodice side seams by about 1.5" at the underarm (tapering to nothing at the waist), recut the armholes to accommodate the new width, and shortened the hem by about five inches. I also ended up having to do huge seam allowances at the edges of the yoke in the back. For some reason, I didn't bother trimming and re-binding them, so they show through the back a little bit since the voile is so thin. Ah well, I don't have to see my own back, so I'm just going to pretend it didn't happen. And obviously I didn't do the decorative stitching at the neckline, opting instead to just bind everything with white bias tape. All in all, it was rather more fussing (and trying on and making adjustments and retrying) than I expected for a dress with such simple shapes. I wouldn't be scared off, though, as long as you like the style of dress in this book -- the pattern pieces are really very simple and the sizing is extremely generous. I cut the XS for this dress (despite the book recommending a M for my measurements) and I still had to take things in quite a bit. So if you think you can't make clothes from a Japanese sewing book because you're not standard-Japanese-person-sized (I always feel like a freakishly tall giant when I'm in Asia, and I'm not even that tall), don't be afraid!

Even though the shirring helps with the waist definition, I still like dresses best with a belt or sash, so I tried the super trendy turquoise + red combo. I quite like it! 
How's that for vibrant color, eh?
Summary:
Fabric: a little over 1.5 yards of 100% cotton embroidered cotton voile. Even though it isn't part of my official stashbusting pledge pile, it's been in the stash for a couple years and it definitely fits the April theme of vibrant color. My only gripe with it is that the embroidered sections are quite puckery and won't flatten out even with ironing. I also used a minimal amount of this dotted white net that's also been in the stash for a while.
Notions: bias tape, elastic thread
Techniques used: Shirring! I haven't shirred since this dress (where I actually had to do a similar thing to tame shoulder puffiness), and this time I shirred the front and back pieces before I sewed them together, and let me tell you, it was much easier dealing with flat pieces! Also, sometimes when I haven't used a new technique for a while, I forget that it isn't that difficult, so I avoid it because I've built it up in my head as some big task involving lots of preparation. I was actually pleasantly surprised (again) by how easy and fast shirring was; even winding the bobbins by hand didn't take much time. Incidentally, this dress only required two bobbins' worth of elastic thread.

More or less even rows of shirring. Also, seam binding on all the insides. 

Hours: Seven. What looked like a relatively simple project ended up taking a lot of time because of fussing with the fit at the top so that it didn't look so huge. Also, planning the cutting layout took not an insignificant amount of time because my yardage was so limited.
Will you make it again? No. And there's maybe only one other project in the book that I might actually make one day, but honestly, these patterns would probably be simpler for me to just improvise on my own, rather than modifying these patterns to get the look I want. I actually made a similar sheer-yoked dress last year that turned out to be much easier.
Total cost: I don't remember where I got this fabric, nor how much it was, but knowing my fabric shopping habits, it can't have been more than $5 total. [side note: The problem with fabric shopping in LA is that you start thinking that any more than $3/yd for fabric is exorbitant. I know, I know, some of you are probably all pshh, #LAsewistproblems...$10/yd for embroidered cotton voile is considered to be a good price. Don't hate, I'll be moving in a few months and then my idea of a good price for fabric will recalibrate.]
Final thoughts: I like that this is a fun summer dress that's easy to wear, and I especially love the bright colors. With the sash, it's actually fairly close to my wedding colors. All around, it's a good solid wardrobe piece, not especially groundbreaking, but nothing wrong with it either.

So, my conclusion? If you're pregnant, these are simple, relatively fast projects that would make for good belly coverage. Alternately, if you like the loose smock look, if you like uncomplicated pattern pieces with some cute details and embellishments thrown in, this is the book for you! According to the LK Publishing website, the book will be available in May. Oh, and in case you couldn't tell, this was a free copy provided to me for review purposes, although I'm not financially compensated in any way.

Last order of business: I wouldn't be me if I didn't at least try to mimic the models' poses. Whether it's holding a plate of flour while standing under a random sprig of flowers tacked to the wall, drinking from a ladle, or showing off freshly baked bread, well, let's just say that these Japanese sewing books provide me with no end of amusement.

I didn't have a sprig of flowers to tack to the wall, so I settled for Walnut's catnip mouse. 
Yes, this soup tastes about right. 
I didn't have real bread to pose with. At least my coordinating oven mitts are from a Japanese store? 

Of course, IMHO, the best photo prop (even if it totally obscures the actual dress being modeled) is a cat.

Could there ever be any doubt? 

Friday, April 12, 2013

Wedding Dress Progress Post #3

Oh hey, it's Friday, which means it's time for another update on my progress with Elaine's wedding dress! Never mind that I missed a few Fridays in a row...anyway, here's what's happened:

Not too exciting, as it looks more or less
the same as it did before. But trust me,
it's a lot better. 
1) I finished hemming the skirt after Elaine tried it, but boy was that a long ordeal! Besides my not-so-brilliant-after-all gathering ribbon issue, there was the fact that (floor-length circle skirt + train) x 2 = what seemed like endless yards of hem. Especially since baby hemming really means sewing each hem twice. The good news, though, is that after that, hemming an A-line dress for myself felt like nothing! I'd originally planned to have the lace trim applied to the skirt by now, too, but the new lace I purchased on eBay seems to have been sent to the wrong address, so now I'm waiting on a new shipment. Let's hope this package gets here soon! 

2) I think I'm done fixing the lace overskirt -- the bustle/waterfall of lace in the back has all been tacked down and is more of less symmetrical, and closures have been attached in the form of two metal snaps. I'm not super worried about how the waistband looks, though, since it will be hidden under the corset. I also trimmed the cut edges to mimic the scalloped edge, cutting carefully around the floral elements to get a prettier edge. Thank goodness the net of the lace doesn't ravel. 

3) As for the corset, I finally got up the courage to tackle covering the busk. Having done a couple of fake corsets before, I was pretty comfortable (but still a little nervous, since this is for a wedding!) with sewing the panels together, but the idea of inserting a busk scares me for some reason. Maybe it's the fact that it requires sewing so close to the metal, and the potential for eye injury...at any rate, I decided to cover the busk in muslin first for practice (and for added strength). I'm happy to say that I escaped unscathed -- no eyeballs popped, no needles broken. Phew. 

So exciting! With many thanks to this helpful tutorial. 
Oh, were you wondering what that weird background was? It's my Carol poster! Here I am posing with my safety goggles (which I actually wore while sewing...yes, I'm a dork) and the safely covered busk. 

This isn't wedding dress related, but it's sewing-for-others related: my sister sent a picture of her wearing her lobster dress!

Doesn't she look great?? And in the spirit of honesty: she said the straps need to be shortened by about an inch, but that's an easy enough fix!

Lastly, many thanks to all of you who were so encouraging regarding the state of my sewing room! I'm glad I'm not the only one, because yes, those Pinterest boards of perfect cubbies and neatly folded and shelved fabrics can get really intimidating. In the interest of increased productivity (and being able to use my ironing board), I finally hung up the hats that had been living on the end of it. It took two minutes and I really should have done it long ago! 

L-R: Fenxi painting, pirate tricorn, Regency bonnet, and generic Ren Faire straw hat.