Monday, December 30, 2019

A Dangerous Coat

I used to think the 1910s and 1920s had the worst fashions, but the VPLL 1912 Project, Downton Abbey, the new Great Gatsby movie, the Fantastic Beasts movie, and Phryne Fisher have all conspired to totally change my mind about that. I now love love love these eras, so much so that when at a loss for what to do for my CaƱada College fashion department classes, I've just sort of defaulted to the 1920s. I drew drop-waisted dresses for my fashion illustration classes, made a summery cloche for my millinery class, and for this past semester I've worked on making a 1920s-ish coat for my tailoring class.

This tweed+fur coat of Phryne's was my inspiration.

When McCall's started releasing updated vintage patterns as part of their Archive Collection, I immediately snatched up a copy of M7259, a (sadly now out of print) caped coat pattern, and filed it away for "someday when I have a good reason/the time and skills." Since I can only take classes at night, and tailoring was the only class I hadn't taken yet for this past fall's evening classes, that gave me the reason, and presumably I would learn the skills and make the time. Admittedly, it's not a very difficult coat to make (it's even rated as "easy" on the pattern); a shapeless boxy coat doesn't require a lot of fitting, there's no notched collar or vents anywhere, and not even a welt pocket! But I knew I would have a busy semester already, what with parenting in general, Halloween and cons, and costuming. Did I feel a little embarrassed about the simplicity (even though it's a McCall's pattern...haha sorrynotsorry) of my pattern choice when I saw my classmates making five or more muslins, making all sorts of alterations, drafting new collars and sleeves, and putting in eight welt pockets? Maybe a little. Was I grateful I kept it uncomplicated when, after finishing up the drama production I had a little over a week to put together all my coat pieces and do all the fussy hand-stitching? You bet! Besides, I know I would never wear a blazer, and I already have two perfectly serviceable RTW coats that I love, so I might as well get going on my dream of having a Phryne-esque wardrobe.

The pattern: I was definitely swayed by the brilliant red sample. 


My little compilation of scraps to give me
an idea of how things might look together.
First step was selecting fabric: I knew I only had a couple of pieces of yardage with the right length, drape, and fiber content (our professor preferred natural materials, especially wool because of its "pressability"), so it was basically between a dark green wool blend suiting material or a gray wool tweed suiting with little colored specks in it. We decided that the gray tweed would hide more sins, what with this being my first serious coat, and I did have a little more of it so as to allow me to make the cape as well.

Next step was to do a pinned-together paper mock-up, which to me seemed a little pointless, but I can see how it would be a cheaper, faster way to get a sense of major size or fit issues without the effort of making a real muslin. As it was, I only had a very minor swayback adjustment to make, but then I do realize that I am extremely fortunate that I usually fit Big-4 patterns with very few adjustments (usually only swayback, narrow back, and small bust adjustments). Then we made actual fabric mock-ups with cotton muslin, and again, not much to report here, other than that I decided to shorten the cape significantly so as to keep it from being visually overwhelming.

Without and with the cape, with dark threads marking the grainline on the sleeves and the center front line. 

I sewed my mock-up with the side seam pockets that the pattern called for, but decided later that I didn't like them; they made things hang weirdly, I didn't like the bulk of the pocket bag, and they were too far back to feel natural when I put my hands in them. I decided that I needed to make pockets on the front of the coat, but at that point I had a minor crisis about what kind of pockets to make, and proceeded to flood my IG with way too many stories debating various pocket types and placements and their historical accuracy vs. general aesthetic vs. ease of use. Since I was also in the thick of drama costuming, the pocket issue gave me an excuse to not work on my coat for a month. I did assemble the cape (but not hem it), but three weeks before the coat due date, and I had really only a bunch of fashion fabric pieces (that I had at least interfaced with soft fusible knit interfacing; since my fabric was so thin and loosely woven, it really needed some extra support) and lining pieces.

This was what I was primarily deciding between: a shield-shaped patch pocket, or a swoopy-looking patch pocket that would be sewn into the side seam. Although the swoop won by a small margin on IG, I realized that I really preferred the look (and historical accuracy) of the shield and went with that option. If you want to see all my ridiculous wibbling about the pockets (and other construction bits), you can check out my 1920s coat highlights on my IG here.

The antepenultimate week (and also the week leading up to the show, so lots of last minute decisions, fittings, and runs to various stores for accessories and such), I sewed together the facing, lining, and lining patch pockets. The lining patch pockets were hand-stitched so that I wouldn't have topstitching thread showing, per this extant 1920s coat (I did briefly consider smocking the tops of my pockets, but then dismissed that idea as that of a person with more time than I had), which looked lovely but took a long time.

Here's what the facing + lining looked like hanging on Cecily. You can also see the only dart in the entire thing where the shawl collar is. Ignore the stack of toddler clothes storage boxes in the background...


The penultimate week (and also the week after the show, i.e. all the tasks of costume striking to be completed by me, the one-person costume shop), I sewed together the fashion fabric fronts and back, and sewed the sleeves (but didn't set them in) and brought them in to class to have them hung by my professor (I put on the coat and she pinned them in place in the position that caused the least drag lines. Since many of us work on computers, we have forward sloping shoulders and lining up the shoulder seam notch and underarm/side seams may not actually be the best position for a lot of people; my sleeves needed to be rotated forward about 3/8"). I basted the sleeves in by hand in class, then brought them home to set in by machine. I also had decided on shield-shaped patch pockets as being the best compromise between historical accuracy (while there are some examples of welt pockets on coats of the era, the vast majority of them had large patch pockets...or no pockets at all, but that was a non-option for me), general aesthetic (a heckin' large square, while historical accurate, looked a little too boring to me, so I went with a slightly more interesting shield shape), and ease of use (I placed them low enough that it wouldn't be awkward to put my hands in them, even if the perfectly vertical placement is a little less ergonomic than a slanted one). Like the lining, these patch pockets were hand-stitched invisibly, and thanks to the busyness of the fabric, they don't break up the lines of the front as much as I was afraid they might.

That last week, I set the sleeves in, put in all the tailor-y bits (homemade shoulder pads, sleeve heads) attached the outer shell to the facing/lining, and then went about the tedious business of evening out my hems and catch-stitching everything down. For the hem of the cape, I catch-stitched the fashion fabric and the lining separately, then used French tacks to secure the two together at the side seams and center back. I had previously attempted to attach the lining entirely, but couldn't get it to sit right with a jump hem on the bias portions, so I opted to let it hang separately.

You can see the shape of the cape here, as well as the snaps that hold it onto the coat. 

For the coat, it took a couple of tries (and lots of staring at the coat on Cecily as a pinned, glared critically, repinned, glared again, etc.) before I got everything to hang right without pulling, but eventually I got it all sewn down (again, by hand) with a jump hem and everything! Oh, and I also tacked the lining to the coat at the neck seam allowance and the side seams so that the lining wouldn't billow out separately from the outer shell of the coat. I finished all the hemming with two days to spare, but the next day was full of frustration as I attempted to sew in the fabric-covered snaps and large button in exactly the right places and without any weird pulling anywhere. The morning the coat was due, I plopped SHB#2 in front of Sesame Street so that I could sew on all the snaps that attached the cape to the coat, and then I was finally done!

Without the cape, with nicely-blending-in pockets. 

Hello, 1920s-esque ulster coat!


Summary
Pattern: McCall's 7259, part of the archive pattern collection, circa 1927
Fabric: A little over 3.5 yards of a 60" wide, dark gray, tweed wool suiting with little flecks of ivory, burgundy, black, cornflower blue, and mauve; I originally purchased this from an antique furniture store in Berkeley seven years ago when I found a tiny little shelf in the back of the store that had some random yardage. The lady said she had got it for herself to make something fabulous, but had come to realize she likely never would, and she just wanted it to go to a good home. I paid all of $30 for it, which I now realize was an absolute steal for fabric of this quality. The 2ish yards of 55" wide lining fabric was mostly this dark burgundy floral damask polyester satin, which is on the thick side for a lining, but that just makes it feel extra luxurious. This was from my best friend Elaine's partner's stash, that they passed on to me when they moved (out of Arizona, ultimately back to the Bay Area!), so when I look at the lining I'm reminded of their generosity. It wasn't quite large enough for me to be able to cut all the lining pieces, even with the shortened cape, so I supplemented with some black Bemberg rayon for the sleeves since they wouldn't be seen.
Notions: 3 yards of 20" wide fusi-knit interfacing, which I used on every pattern piece except for the lining pieces and the back piece. I didn't have enough to do the large back piece (and actually had to piece together bits for the side edges of the front, and didn't want to wait to order more, so I just used black silk organza to underline the back piece. The organza was a fortuitous find from the free shelf in the back of the sewing classroom, and I still have yards left! I also purchased six 3/8" metal snaps for the cape attachment, a 1.5" covered button kit for the coat closure, and used a set of 1" metal snaps (covered with fashion fabric) from my stash for the inner closure. The facings on both the cape and coat are piped with black silk dupioni left over from my bustier project, and the hem of the cape lining is finished with burgundy-colored lace hem tape from an inherited stash.

I love that the inside is so secretly beautiful, even if nobody will ever see it!

Will you make it again? Unlikely, since I don't really need another coat like this. I do want to make another Phryne-inspired 1920s coat though, maybe a lighter duster in linen?
Total cost: $30 for the wool, lining was free, about $15 for the interfacing, and $5 worth of snaps/buttons = about $50! Of course, throw in the cost of the class tuition + toll + parking...and all the hours spent...
First worn: Just in class to show off and for pictures, but I'd like to wear it to go see the Phryne Fisher movie when it comes out next year!
Final thoughts: I'm really glad that I was able to make this coat almost primarily from stash/secondhand fabric, thereby keeping to my unofficial pledge to not purchase new in order to stay as green as possible in all my sewing endeavors. Things like interfacing or the exact size of snap are hard to come by secondhand, so I'm making an allowance for those things, though. I'm in love with the (detachable!) drama that the cape provides, and the instant Sherlock-y vibes of a caped coat. I have a little bit of wool leftover; maybe I should make another deerstalker? Actually, I would rather try to make it into a 1920s hat to match, so maybe if I find a suitable pattern one day. Without the cape, the coat is a little boring, but that's fine, because I decided to splurge a little and buy myself a fabulously fluffy, white faux-fur collar from Amazon that I can throw over the shawl collar of this coat to up the Phryne-ness of it!

This was taken by the fashion department's blogger. 


I'm really pleased with the whole tailoring class experience: I got a lovely coat out of it (even if I later realized that I had made myself yet another grey wool coat (aforementioned RTW coats in my wardrobe are also grey wool, so I guess I have a definite coat type...), and while mine didn't have more technically challenging bits like bound buttonholes, welt pockets, or a notched collar, at least I got to practice those skills when I made my samples, and best of all, I got a scheduled sewing time every week (and I even got to throw in the bonus of regular conversation with another adult, since my costuming friend @simply_mi was also in the class!). Even though the lead up to class is always stressful (get dinner ready! make sure the house is somewhat in order! spend some time with SHB#1 when he comes home from school! make sure my bags are all packed with all the sewing things I need!), in the end it's really nice to know that I'm guaranteed at least three hours every week to do something just for me.

Sometimes I feel guilty for taking so much time for myself every week -- it's not just the sewing class itself, but the commute there and back, the time it takes me to do my assignments for the class, and the time it takes to go out and acquire the materials I need to do my assignments -- but just recently I fell down the rabbit hole of Bernadette Banner's historical sewing videos, and she mentioned Cathy Hay's Worth peacock gown reconstruction project, which then led me to this very helpful video where she talks about how not to feel guilty about sewing when you have a family. She quotes Iyanla Vanzant: "My cup runneth over: what runneth over is for you, but what's in the cup is for me." At first, it seemed like just another variant of the "put on your own oxygen mask first" mantra that I blogged about before, but upon further rumination I realized the problem with that: oxygen masks are vital to life, so it makes sense to take care of your own basic needs first. But sewing costumes, or just giving in to my drive to make things: that's not *really* a basic need, is it?

I don't know if it's the child-of-immigrants, sacrifice-everything-for-your-family, just-work-harder rhetoric that was drummed into my head growing up, or leftovers of my childhood church's very conservative, Puritan-esque suspicion of anything that seems like too much fun, but it's very, very difficult to let go of the feeling of guilt that I should be spending all my free time doing something less frivolous. Like I said, I already have two fine coats, and there's always something more productive I could be doing with my time: research on developing children's emotional intelligence, integrating NGSS into my science teaching, or figuring out how to reduce waste in our family. I go ahead and pursue my hobbies anyway, because I'm a selfish Slytherin like that, it's just that I carry along a lot of guilt with it that prevents me from fully enjoying it. I'm not sure where to draw the line, since I know it's obviously not an either/or issue. Taking time for myself is healthy, but parenthood does inherently involve some sacrifice, and there must be a balance somewhere...and what if I just have a really, really big cup and "need" lots of replenishing time before I give the runoff to anyone else? See how I'm hesitant to even call time to create a need, I mean it's not one of those things that form the foundation of Maslow's bogus hierarchy of needs now, is it? If any other sewing moms out there have any brilliant insights, I would appreciate them!

Anyway, all this to say, it's so hard to know how to break out of societal constraints and expectations for women and undo the years of programming. A man cave is, if not expected, definitely not frowned upon for a stereotypically male breadwinner to be able to relax, get away from responsibilities, and putter around. How that translates in my mind for a non-breadwinner is trickier until I remember that I'm trying not to devalue traditional "women's work" like childcare and sewing, and I want to set an example for my kids of self-care and not self-martyrdom. So I suppose it's kind of perfect that my coat has four nice large pockets, perfect for carrying leaflets to spread sedition? Or, you know, fairness, kindness, and equality. Ladies, I guess I did take the advice of Irish poet Sharon Owens, and sewed myself a dangerous coat made of pockets and sedition (go read her fabulous poem if you aren't already familiar with it).

Pockets! (Photo courtesy of my professor, Ronda Chaney.)

[Apologies for the mostly terrible photos in this post. Most of the construction photos were taken at night, since that's when I sew, and I kept thinking I would take better finished garment photos in an atmospheric location, but let's be honest, that's probably not happening anytime soon and I'd rather get this blogged before I forget all about how I made it! Also, more about my lab garment, a 1920s-ish evening gown, in the next blog post!]

Friday, November 8, 2019

A Glamorous Loki-Inspired Evening Gown


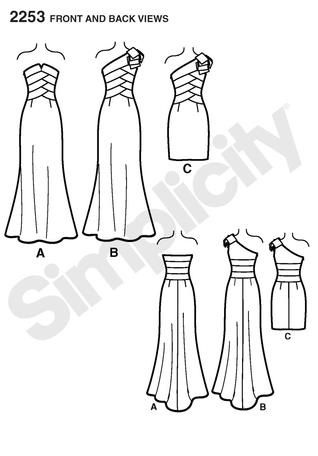
I never thought that having a second child would result in my finally making all my dream cosplays, but something about having another drain on my energy/time made me think "oh f*** it, things are never going to ease up so I might as well just do it now." Since I've had BBG, I've done my Asian-inspired Wonder Woman, victorious Mulan, and many other dream cosplays, and Glam Loki is another one! Loki is my favorite MCU character, both for his sartorial style and his snark+angst. (what can I say, I love me a well-dressed antihero...see also: Thranduil, Ballister Blackheart, BBC Sherlock, and Prince Zuko). I did an Asian-inspired version of Loki for the Thor: Dark World movie many years ago, but wanted to do another one with more of a nod to the overlapping torso pieces on his original Thor costume. I bought Simplicity 2253 many years ago with an eye toward making a glamorous genderbent version of Loki, but just never had a reason or enough courage to tackle the 30+ pieces that I would have to cut out...until this year.

I made view A.

I've been taking fashion design classes at Canada College for oh, six years now, and one of my favorite professors is Lynda Maynard: she's hilarious and so knowledgable and I just like her teaching style. I've taken all her classes (French moulage, pants drafting and construction, bustier, and copying RTW) and was kind of bummed when I had finished them all, so I was super excited when it was announced that she would teach Evening Gown Construction over the summer. I was a little less excited when I found out that we would be making a strapless gown, as my only foray into strapless gowns was not my favorite. I kind of had this idea in my head that only certain body types could pull them off, and mine was not the right kind; spoiler alert: I was wrong. Thank goodness for education and expanding ones' knowledge, right?

I have not yet, however, expanded my knowledge when it comes to doing hair for cosplays. 

Besides learning lots of tips and tricks for working with tricky fabric (velvet! chiffon! sequins! things cut on the bias!), I also learned that the key to making strapless gowns work (i.e. stay up without lots of periodic tugging) is having a well-fitted corselet underneath. A corselet differs from a corset in that the former is meant to be a close-fitting garment that conforms to the curves/shape of the wearer, but is not meant to change one's measurements or silhouette. A corset, on the other hand, is a garment that is specifically worn to change the measurements or silhouette of the wearer (think wearing an S-bend corset to get the fashionable Edwardian silhouette, or any number of literary heroines tightening their corset laces to fit into their gowns). Having worn both, I can say that they can both be comfortable if fitted and made correctly, but they definitely serve different purposes and the latter is certainly more restrictive (but not in a painful way, unlike all those corset myths about women removing ribs and fainting all over the place!). In a lot of ways, the corselet is similar to the bustier; the only real difference is that a bustier is meant to be a standalone garment, so it has an additional fashion fabric and lining layer.

Front view of the corselet on Cecily, who is close to my measurements but not quite the same. 

Back view.

Side view. 

My corselet was made from unbleached muslin, but any tightly-woven, thin, stable natural-fiber fabric can be used; other recommendations were cotton batiste or bobbinet. Essentially I made the lining pattern of my dress twice, then stitched the two layers together, sandwiching the steel boning in between. I also added a grosgrain waist stay and decorative lace and the whole thing closed with lingerie-style hook-and-eye tape.

Did it bother me slightly that the hook and eye tape was bright white and the muslin was unbleached ivory? Yes, yes it did. 

You can see the boning placement (and my humongous seam allowances) really well in this backlit picture. 

The finished corselet is then hand tacked at the top only to the neckline of the evening gown. Because the corselet is fitted perfectly to one's body and lengthened by an inch to combat the inevitable settling over time, it serves to hold up the weight of the entire garment and no awkward tugging up of the gown is required! I know this is true because I wore this gown for a whole day at Silicon Valley Comic Con and did not once fear a costume malfunction.

Don't judge my hand stitching please. 


Once I made the corselet, I had to cut out all the pieces of fashion fabric for the gown. It was both more tedious than I thought it would be (all those pieces, but x2 or x3, because I underlined the black twill with silk organza, and some of the pieces had an additional lace or gold taffeta or green velveteen layer!) and easier (the actual construction is easier than it looks; no weird pivoting around angles because of the order in which it's sewn). The back closure is a hand-picked zipper which disappeared beautifully into the green pannƩ velvet of the skirt and the black and gold lace of the bodice.

Tiny prick stitches!

I did run into a problem that turned into a happy accident when it came to piping the front upside-down V. Since I was trying to avoid buying anything new if at all possible, I used some gold lamƩ bias tape that I had leftover from a previous project. After I sewed it in, it looked too flat, so I had the (I thought) brilliant idea of plumping it up with some white pipe cleaners I had. Unfortunately, since I was inserting the pipe cleaner after sewing, I poked a hole through the fragile lamƩ, right at the center front! I tried to stitch it down with some gold thread to keep it from getting worse, but it just made the issue more obvious because there was a giant lump of messy handstitching. On the day my gown was due, I had an epiphany and realized that I could cover it up with the gold necklace I'd originally bought to wear with this gown. I found it at a thrift store and thought it perfectly echoed the little curved gold piece of Loki's first outfit, so instead of wearing it, I detached it from the chain and sewed it to my gown. The concave back fits perfectly over the ugly bit on my gown and I honestly like the look better than my original plan.

Look at the shameful bunch of hnnnghhh in the middle! You can see here that I already started trying to cover it up by hand-stitching a little piece of of green material over the mess.

Glorious. Like it was meant to be there. 


Once I finished the gown, I decided the skirt portion needed something more in order to bling up all the green, so I added gold chain "draperies" to the hips. I'm toying with the idea of making some kind of necklace that has similar gold chains draping over the shoulders to visually break up the expanse of neck and shoulder skin. When I wore it at SVCC, it felt like it was missing something and maybe that would help visually tie it all together? Or maybe it'll just look too busy?

I measured out two sets of four chains in increasing 2" increments, then attached them all to jump rings that I sewed to the center front point. 

On the back, I attached them where the lace panels end. 


To go with the dress, which was only subtly Loki-ish, I decided I needed to make his signature humongous horned headpiece. Googling and Pinteresting (I know the former is a real verb now, but the latter definitely isn't) turned up Red Shoes and Wine's Burlesque Loki, so I followed her brilliant lead and used a sawed-up floral heart to make the horns. After carving and sanding it down, I used wood filler to coat it all, sanded that down too, and painted it with a base layer of brown acrylic craft paint, several layers of gold, and finally a matte polyurethane coat to seal it. I cut out the rest of the headpiece from craft foam and painted it the same way, then hot-glued it all to a flexible headband. To make sure that the horns wouldn't detach themselves suddenly, I used two tiny nails to poke through the craft foam and into the styrofoam. The flexibility of the headband meant that I could bend it around my forehead enough to get it to stay, as long as it wasn't too windy, I didn't look too far down, or turn too suddenly. Since Loki would definitely have some blinging huge rings, I purchased the largest green and gold beads (I don't know if there's a better word for them; they're flat and have the holes situated such that they would be perfect on a bracelet or choker) I could find and strung them on black elastic cord to make matching rings. I borrowed some gold cuffs from my sister, and of course, I had to break out my Chitauri scepter from my Asian-Loki in order to complete the whole look. Thankfully, the batteries were still working and all I had to do was touch up some paint.

Accessories! The gold at the bottom is a purse that I ended up not using. 
The staff looks pretty good still, even after hanging out in a closet for several years!

Summary:
Fabric: Muslin for the corselet; black twill (Han Solo vest remnant), black silk organza (secondhand from the Canada College free shelf), black and gold lace (remnant from Dark Garden, purchased during a trunk sale), gold poly-taffeta (inherited stash), and green poly-velveteen (inherited stash) for the bodice; stretch green pannĆ© velvet (leftover from McGonagall) for the skirt
Notions: Cream-colored lace hem tape and bias tape (inherited stash), pink grosgrain ribbon (FIDM store), spiral steel boning (leftover from Elaine's wedding dress) and hook-and-eye tape for the corselet; gold chain, zipper, and nylon horsehair braid for the dress
Hours: So. Many. I made a test muslin of the corselet as well as the dress, then there was the actual construction of the whole thing. Basically it was my main project for the eight weeks of class. I'd estimate upwards of 50 hours.

My muslin fitting of the pattern. 

How accurate is it? Seeing as how it's my own imagining of the character, it's extremely accurate, hah! But in all seriousness (as serious as one can be about a cosplay outfit), despite the upside down overlapping torso pieces (the original outfit is Vs; mine are flipped the other way because that's what the pattern was), the color scheme was enough that when I wore the gown (sans headpiece and staff) for the class final showcase, people asked if I was meant to be Loki. And of course, with all the props, it was pretty obvious at SVCC, and it was gratifying to see people's eyes light up when they recognized my cosplay.
Total cost: $92 for the cost of the class, $64 in bridge tolls and parking permits for the eight sessions, about $20 worth of muslin, $10 for various notions, $6 for a floral heart, $3 for a headband, $4 for the beads for the rings, and all the rest was from stash. Did all my driving back and forth by myself negate the sustainability efforts of trying to avoid buying new fabric? Sigh, probably.

I am trying really hard to be more green in my costuming efforts and going with stash or secondhand materials whenever possible, even when it's tempting to buy something shiny and new (all those sequined fabrics and laces and burnout velvets -- Jo-Ann's has really upped their game, yo!). The unfortunate reality of living in the East Bay, though, is that all the classes I really want to take are going to require a drive somewhere, so yeah...it's not easy being green. My consolation is that I would've taken the class anyway, and at least I made a conscious effort not to unnecessarily purchase new fabrics.


At any rate, attempts at sustainability aside, I am really pleased overall with how this came together, and that I was finally able to use that pattern for its intended purpose. I loved how grand I felt swishing around at SVCC in it; it was worth the burden of wearing heels all day just for the added three inches of glorious purpose!

I found a Professor McGonagall (in a cloak of much nicer velvet than mine) so of course I had to take a picture with her:


Saturday, August 24, 2019

Mommy & Me Mulan Cosplay

When I was a very little girl, I loved Disney princesses. When I (jokingly) complain about rereading Spooky Pookie to my kids for the bazillionth time, my dad likes to remind me that when I was two or three years old, Cinderella was my favorite and I requested that he read the storybook basically every night for the longest time. The Little Mermaid was the first movie I saw in theaters, and I still remember singing "Part of Your World" in the shower for an embarrassingly long time afterwards. When Beauty and the Beast came out when I was eight, I instantly identified and fell in love with bookworm Belle. Feisty, spirited Jasmine the year after was everything I wished I could be, and who doesn't want a pet tiger? I proudly wore my Belle and Jasmine sweatshirts in fourth grade but was teased for it, and after that I eschewed all Disney princesses. They were too dependent on men, I told myself, and fairytale romances weren't real and besides, other than Jasmine, they were all so...white.

It wasn't until high school, when Mulan came out, that Disney wooed me back. My mom had told me stories of Fa Mulan the warrior heroine, but I never expected to see a Chinese story told on the big screen. Even though her story was set in ancient China, Mulan disappointing her father and wiping half her matchmaker make-up off while singing "Reflection" was *me* as a Chinese-American girl failing math, dropping out of AP Physics and piano, and taking Creative Writing and art classes instead. Every time I hear the Lea Salonga version of that song (never the Christina Aguilera one!), I'm instantly transported back to wrestling with what it means to be Chinese and American, wondering if I can honor my parents while still carving my own path. All that to say, Mulan has always meant a lot to me. #representationmatters, y'all.


Once I discovered cosplaying, I knew there were certain costumes I definitely wanted to make: Belle, Jasmine, and Maleficent, but the dream was always Mulan's outfit from when she saves the emperor from Shan Yu. I'm grateful for Disney putting a heroine who looks like me in their princess line-up, but I've always been scornful of their choice to highlight her matchmaker outfit, which is the most patently unemblematic of the character! Also, I look terrible in pink and light green (her ending outfit, which is also featured heavily), so blues and maroons near my face it is! I decided to try to make this outfit in time for my fourth Silicon Valley Comic Con, since I've always wanted to do a Disney princess cosplay at a con and I'm not comfortable wearing my Slave Jasmine at such a venue. Conveniently, I had all the necessary colors of fabric in my stash: light and dark blue sweatshirt knit remnants from my raglan sleeve sweatshirts, maroon poly-cotton leftover from Ballister Blackheart's cape, pink rayon challis stockpiled as underlining for sheers and laces, and of course I have a whole bunch of thrifted white sheets. Now obviously none of these are historically accurate for ancient China, but then Mulan's outfits in the movie are kind of all over the place too...I'd rather be economical and green instead of running out to buy more new fabric. Bonus: knit fabric on top means that this costume is super comfortable and not restrictive at all, which was very important as I ended up taking my two year old daughter with me to SVCC by myself, and wrestling toddlers requires all the mobility I can get!

This is the only full-length photo I have of the outfit, taken after I got home, and I'm sweaty and tired and didn't realize the sash got flipped to the side :(


In deciding to depart from historical and/or screen-accuracy, I felt freed to go with very costume-y construction and design choices. The base bodice was just my knit t-shirt sloper with slashed and spread sleeves to make them appropriately blouse-y and rectangular cuffs at the end. To make it look more "princess-y," and flattering, I opted to make a full-length 3/4-circle skirt out of an old sheet, which has a bonus of being very washable! Very important for a white skirt at a dirty convention center.  The waistband of the skirt is a wide piece of elastic and that closes with flat hooks and bars, and I didn't even bother with a zipper or any kind of placket on the skirt since it'll be hidden under the top. Instead of going for a tabard over the top, I decided to make things easier for myself and just a make a wrap top, rather than futzing with how far to the side it should extend and how to make things stay in place. The bottom portion of the wrap top ended up being more of a peplum than a skirt since I was running out of fabric. This ended up working out since the shorter length better accommodates the fullness of the wrap skirt.

Not the greatest picture, but it gives you an idea of the general shapes of the different pieces. The maroon waist wrap was just a 34"x6" rectangle. 
For the sash, I didn't want a big lump know where it was tied together, so I interfaced a 3" tube that was long enough to go around my waist, then attached another 50"x3" tube (un-interfeaced, to keep the flowiness) perpendicularly at the end. The whole thing was secured with hooks and bars, then the top layer of the sash could just flip down to cover up the closures. You can get a better feel for how it was put on in my first photo where my sash got accidentally flipped to the side. 


Now that I have a daughter, I've had to go back and think a lot about what I want to expose her to in terms of princess media. I read this rather concerning article from NPR about how girls around the world have been raised on such a diet of Disney princesses that they default to drawing the early white princesses. I was fortunate to grow up in a predominantly ethnically Chinese area of San Francisco, so I didn't actually feel "othered" much growing up, and somehow I managed to really notice until much later how few princesses of color there are in the Disney pantheon, but I think I'm an anomaly in the general Asian-American experience. I don't want to leave SHB#2's experience to chance, to so for now I'm opting to not show her any princess media at all. That said, I couldn't resist making her a matching outfit since I still had fabric left and toddler clothes are such a good way to use up remnants. Instead of making her two separate pieces for the top, I opted to just make her a wrap top but use the light blue knit to make long sleeves in order to give a layered look without the bulk. Her gathered rectangular skirt is just an old undershirt from Mr. Cation that's had the top half cut off, and I even used the elastic from a pair of his old boxers: how's that for the ultimate green costume?


The first thing she did upon getting to the con was bite into a cherry tomato and spray seeds and juice all over herself. And here I thought I was being such a good mama in packing healthy snacks...at least her top was dark enough that the stain weren't obvious. 

If you think finding appropriate shoes for cosplay is hard for adults, it's even more ridiculous for toddlers. They have OPINIONS about how sparkly their shoes need to be and their feet grow so fast! Hence the pink glitter jellies.

Summary
Fabric: lots of poly-cotton, in both knit (light blue and navy blue) and sheet (maroon trim and waist wrap, white circle skirt) form, some dusty rose rayon challis for the sash.
Notions: 3" white elastic for the skirt waistband, lots of hooks and bars for the skirt and sash closures. I used some pale pink piping from my stash between the maroon trip and the navy blue body; light blue would've been more screen accurate but I couldn't be bothered to make new piping when I already had yards of this other stuff. The wrap top and the waist wrap piece are both held in place with hidden safety pins. The part of the sash that goes around my waist is interfaced, and the neckline of the undershirt and the armholes of the wrap top are finished with bias tape.
Props: For the crest of the emperor, I got mine 3D-printed with this free file, and then I sanded and painted it with acrylic paints and sealed it with a matte polyurethane varnish. For SHB#2's crest, I woodburned a little wooden gift tag that I had in the stash and then painted and sealed it in the same way. The color is slightly different on hers because of the light beige of the wood versus the dark gray of the 3D-print plastic. For the hair clip, I made mine out of Crayola Model Magic (petals), cardboard (leaves), and gold head pins, all hot-glued to a plastic hair comb and judicious colored with markers. SHB#2's hair clip was a standard child's white flower hair clip that I added rhinestones and a green fabric leaf to, and again colored with markers. 

The 3D print was generously done for free for me by one of the members of the SheProp! FB community. If you're a female-identifying or nonbinary person who wants a safe, welcoming space to ask prop-making questions, this is an amazing, knowledgeable group that is such a far cry from the toxic masculinity of the RPF. 

And here are SHB#2's accessories! The sword is made from a paint stir stick and chopsticks and tape, but we ended up not bringing it with us because of the con's prop weapons policy. 

Hours: I didn't really keep track, but this was an easy costume to make, fitting wise, so both pieces took maybe a few weeks of naptimes. Knits are forgiving and the skirts are so voluminous that it's easy to just sew without having to stop for a lot of fittings. The most tedious part was all the circle skirt hemming. The knits I didn't bother to hem at all.
How accurate is it? I think it's very recognizably Mulan's outfit, even if the light blue could've been more teal and less periwinkle, plus the design differences described above.
Total cost: Literally everything was from my stash, so essentially free (in the present day)! In the past, the knits were inherited from a friend's destash and the the sheets couldn't have been more than a few dollars each, so even counting past costs, the whole thing was definitely less than $10. Pretty sure that's the most Chinese thing about this, is how cheap it was...j/k.

She's blurry because she was bouncing up and down in excitement. 

We had a good time at SVCC together, after the initial awfulness of standing in lines for over an hour. It was so fun to have people see me and be like, "Oh cool, Mulan!" and then see SHB#2 in the stroller and start squealing "AND THERE'S A BABY MULAN TOO!!!" Once she got used to the con atmosphere, SHB#2 was totally eating up all the attention and by the end of the day was proclaiming herself to be cute. She didn't want to leave, but as soon as we got into the car and onto the freeway, she totally conked out after the excitement of the morning (and early afternoon, since we didn't leave until 2:30 pm, well after her usual naptime). I still want to get some more pictures of the both of us in our costumes; one of the downsides to going without another adult was that I didn't get any full-length shots of just the two of us. I am grateful, however, for the generosity of Gloria and Mike of In the Long Run Designs for squeezing in a few photos of us in their shooting schedule!

I decided that the slightly frazzled, hair-flyaways-galore look is appropriate for having theoretically just climbed onto a roof and battled Shan Yu. 

I adore my (both literally and figuratively) cheeky little girl.

I'm so happy to have these photos to commemorate our little date, even if she doesn't look quite as thrilled! 


Friday, August 9, 2019

I Left With A Quilt, I Came Back With A Quilt (Or Four)

So ummm, last time I blogged, I was very pregnant and had just finished a quilt for SHB#2...two years later I have birthed the SHB#2, made a whole bunch of random things (plushies! a tiny hut on chicken legs! art! more than 250 nativity figurines!) and a few costumes. Due to said SHB#2, who is less inclined to play by herself than SHB#1, I've opted to do save my me-time for making things instead of blogging, relying on Instagram to quickly document most of my finished projects. I do miss the more detailed, longer form of blog entries though, and always meant to get back into it. Now that the new school year is starting and I have cosplays to finish before SVCC next weekend, this is the perfect time to procrastinate with a blog entry, y/y?

Since my sewing area is accessible to the kids, and I don't really need more clothes (more on that later), I haven't done much sewing until recently, when SHB#2 got old enough to (kind of) understand that she needs to leave Mommy's things alone. And even then, I was so brain-dead most of the time, I couldn't handle complicated things like fitting or figuring out new patterns, so I've defaulted to making quilts, which are not easy per se, but at least once I have the pieces laid out, it's more or less mindless sewing of straight(ish) lines.

I made this from florals that I inherited from the school drama teacher's mother-in-law's stash. All straight lines, and can you tell that I really didn't think too hard about the placement of my blocks?

I mean, look at how haphazard all the piecing on the backing is!


After the stashbusting quilt, I made a few quilts for important babies in my life:

Very simple, vaguely sportsball field-esque look. 

A dear friend's baby had a difficult start in life, spending time in the NICU and then working hard to recover for the first year of his life, but now he is a healthy, thriving boy who outweighs my own little girl, despite being almost a year younger! Maybe one day he will play sportsball for one of his parents' alma maters, you know, because the quilt I made him is so inspiring...j/k.

The back was fleece (no batting inside, since San Diego weather doesn't require a lot of warmth).
 I'm glad the school colors don't clash. 


Another dear friend had her third daughter, and I wanted that little girl to have something special of her own that wasn't a hand-me-down from her older sisters, so I made a Harry Potter and Star Wars mashup quilt so that she would have both of her parents' fandoms to wrap her in love. And then because those are also two of my big fandoms, I made an almost identical one for SHB#2. Like her big brother, Chewbacca is her first favorite SW character (SHB#1 has since moved on to Darth Vader, mostly because his lightsaber is red), so she enjoys pointing him out.

This was a challenge to design (even though it's all just rectangles) because so many SW fabrics are so dark, and HP fabrics are so bright, so to put them together in one quilt and have it look somewhat cohesive was tricky. I'm inordinately pleased with what I came up with!

This is the back of the one I kept. The one I gifted had a border of Hogwarts house crests instead of the spaceship blueprints shown here. All of these licensed character fabrics are from Joann's. 


And lastly, one of my college friends struggled with infertility for many, many years, so when she found out she was expecting, I knew I had to make something for her baby. She and her husband are huge LOTR nerds (they previously attended my LOTR birthday party and her husband won the trivia contest), so I wanted to incorporate that somehow into a quilt that also illustrated their story. While googling LOTR-themed quilts, I came across this amazing art quilt, but I knew I wouldn't be able to replicate something like that, nor would it really be baby-friendly. More googling of landscape quilts yielded this one, which seemed much more doable with its pieced strips (yay straight lines!). I decided to try to combine these two ideas to make my own take on an "Into the West" quilt; the more I thought about it the more I was set on it as the perfect representation of their journey. They had walked through the wasteland of Mordor in their quest for a biological child, and now after all that exhaustion, they were finally getting to sail into the west, into the rest and peace and hope of the Undying Lands. Not that having a newborn baby is at all as restful as I imagine Valinor to be, but you get the idea.


I had purchased a sizable lot of quilting cottons in various colors a year ago from somebody else's destash (some of the pieces were used to make up the rainbow blocks in the HP/SW quilts), and I tried to use those as much as possible in this quilt. I figure elves and hobbits would be all about being green and not purchasing new fabrics, right? The only new fabrics I had to buy were some browns for the cliffs and the backing fabric. Anyway, I started by laying out my fabrics in a semblance of the final image, then I got to all the tedious cutting and sewing of sky and water strips.

I initially wanted to have hobbit boles at the bottom, hence all the green bits. After doing some measuring, though, I realized it would end up being too long of a quilt for its width. 


Figuring out the cliffs and greenery was more fun and challenging. I wasn't sure how to attach them, so after more googling I treated them as appliques, folding the edges under and hand-stitching them down. The little boat was done the same way, but I interfaced the pieces since they were so tiny and fiddly to work with.


I chose a neutral gray, vine-y backing fabric; I wanted a fabric with some kind of busy pattern to disguise my inevitable quilting errors, and vines seemed appropriate for the elvish theme of the front. For the binding I went with a plain solid navy blue since I figured the edges would get dirty fastest and I didn't want to take away from the design. The quilting was all sort of haphazardly done; I didn't mark any of my lines beforehand and just sort of sewed with a vague plan in mind. I think it turned out pretty well, all things considered. One day I'll take a quilting class and figure out how to do things the real way instead of just winging everything...


This quilt took a month's worth of nighttimes and naptimes, but since AP exams were over it was mostly a relaxing way to wind down after a hard school year. We were even able to make it down to San Diego as an entire family to deliver it in person at their baby shower; it was gratifying getting to watch them unwrap it. This is why I'll probably only ever make quilts for people I love a lot -- I don't think most people would be willing to pay for the hours and hours it takes to make one, but this is the best way I know how to show how much I care. I may not be a baby person, but I'll be a sewing-for-your-baby person as long as it's my idea and not an outrageous request that belongs on @canyousewthisforme!

These last two pictures taken by the mom-to-be's sister.