Tuesday, March 30, 2021

Eowyn, Shieldmaiden of Rohan

If there were awards for "The Movie (Series) That Spawned the Most Cosplayers/Costumers," I'm pretty sure that Peter Jackson's Lord of the Rings trilogy would be a strong contender. Goodness knows, it was instrumental in getting me started on my own costume-making journey! I remember when we first heard that FotR was coming out, I made "elven" capes for my best friend and another friend to wear to the movie. Because I was a poor college student who had no idea what I was doing, I bought a couple yards each of two different colors of the wispiest acetate lining fabric, then sewed two half-circle capes with unfinished, fraying seams, the rippliest, most uneven hem in the world, and I was so proud. 

But these capes made it to NZ, to the actual filming location
of the Nazgul riding past the hobbits hiding under tree roots!

In the years since then, I've made myself a number of Middle Earth-related costumes: a green Eowyn dress (from sheets), a hobbit maiden (from sheets), a Galadriel dress (not from sheets), an Eye of Sauron/Barad-dur headdress (from a balloon), a Party King Thranduil costume (that Lee Pace then tweeted!), a Smaug fancy dress outfit, and a Denethor + Pippin look with my daughter, and that's not even counting all the costumes for other people or Middle Earth crafts I've done. But the unifying theme for all of these costumes was a lack of screen-accuracy. Don't get me wrong, most of them were certainly recognizable as their characters (except maybe Smaug), but my modus operandi is very suited to community theater costuming: get the idea across as cheaply as possible, and assume that the audience will be standing several feet back. Also, using recycled/thrifted/secondhand materials means that finding screen accurate fabrics is nigh impossible. 

But since this is the Year of the Ring, I wanted to make one of my dream cosplays, Eowyn's camp dress, as close to screen-accurate as possible, while still keeping to my not-new-fabrics pledge as much as I reasonably could. 

From the invaluable Costumer's Guide.

I started with the inner layer, her cream-colored "chemise." I reused the bodice of a toile I made for my pirate coat as my base, since the unbleached muslin worked color-wise. For the neckline that would show above the brown bodice, I used a cream-colored jacquard with swirls that I had leftover from a millinery class. I then treated that fashion fabric layer like a facing but flipped it to the outside instead of the inside, effectively finishing the neckline edge, then zigzagged the raw edge down since it won't be visible. Rather than sewing the tiny tuck lines, I opted to keep things simple and just sewed parallel lines in gold thread. I think it works fine visually while saving myself the annoyance of trying to actually make such tiny tucks and keep them even.

It fits better on me than Cecily.

How many shortcuts can you spot in this picture? ;)


The sleeves were essentially really long bell sleeves with a slit cut up the center to the elbow (see this diagram, except my slit went up higher and the overall triangle shape had a wider base) that I narrow hemmed by machine. I made them out of cream-colored crinkle cotton that I inherited from a friend's stash. For the braided ties, I ended up purchasing new trim from Jo-Ann Fabrics, but they only had bright white so I had to coffee-dye them. I accidentally left them in the coffee too long, so they're darker than I would like, but oh well. The cream-colored underskirt is a half-circle skirt made from, surprise surprise, a thrifted cream-colored sheet. The opening for this whole underlayer closes with hooks and thread loops down the front. 


Here you can see how dark the braid turned out, as well as how nicely lettucey the crinkle cotton hem is. 

For Eowyn's brown bodice and corselet, I used a thrifted dark brown cotton sateen sheet from my stash (basically if I'm at the thrift store getting kids' clothes and I see a solid colored cotton sateen sheet in good condition, I'll buy it for costuming purposes) as the fashion fabric. The bodice from Simplicity 4940 (now sadly OOP) was a good starting point, although I had to draft my own cap sleeves. For the bodice neckline and corselet trim, I toyed with the idea of custom embroidery, but ended up going the easier route of machine-sewing a line of decorative stitching and then hand-sewing gold braid to dark brown bias tape, which I then used to finish the edges of said garments. The cap sleeves had the same decorative machine stitch + gold braid combo and were self-lined, then the armhole was finished with bias tape. 
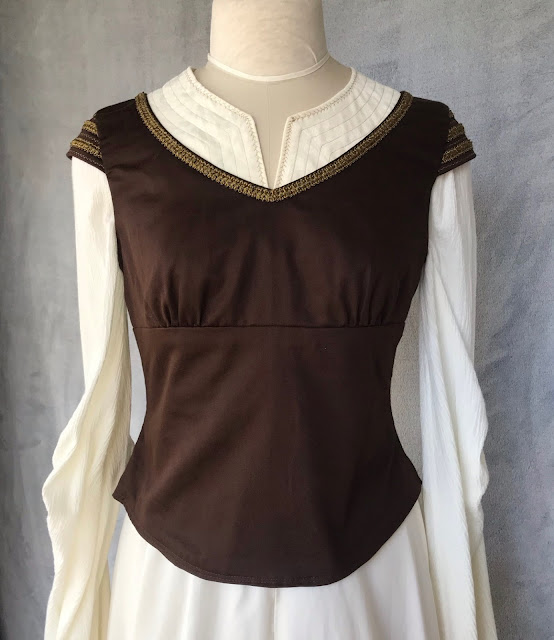
Dark brown bodice, made with Simplicity 4940. 


Close up of the trim. 

Inside: I lined it with more sheeting and used black bias tape to finish the armhole.
You can also see my hand stitches at the neckline securing the braid.  


The corselet was drafted according to the instructions on Koshkathecat's absolutely invaluable costuming page; I first used those instructions for my Bellatrix corselet and mentally bookmarked it for the day when I would actually make Eowyn, and now I have! I cut one layer from cotton canvas and boned it with zip ties, then cut two more layers: from the dark brown sateen, and from quilt batting remnants. I quilted these last two layers together to get the distinctive diamond pattern, then basted all of it together and finished it with the trim pieces. I was so glad to have borrowed a tabletop grommeter from AJ of Confused Kitty Sewing, which made the whole last step so much easier than hammering everything in by hand! I did have to purchase brown rattail cord for the lacing as well. 

I'm so pleased with how the quilting came out! 

Secret secrets revealed to you: I had to add a little bias tape patch at the top of the back opening so as to wedge in a tiny piece of (ziptie) boning since my original piece wasn't long enough, and I'd already sewed on all the trim. 

All the pieces together!

The (slightly lighter) brown outer skirt was again made from a thrifted sheet, in a half-circle using my TNT pattern, Simplicity 5006. Seriously, I use that skirt pattern for EVERYTHING, from Mulan to Ursula to Weaver Girl to theater costumes. Then it was just a matter of scouting an appropriate location; Coyote Hills Regional Park, with its eponymous hills and giant mounds of rocks, was absolutely perfect. My photographer, @captured.by.shirelle, did an absolutely fantastic job of capturing the whole mood and look of Eowyn, White Lady of Rohan, "fairest lady of a house of queens...standing straight and proud, shapely as a lily...as if wrought by elf-wrights out of steel."


Summary 

Pattern: Simplicity 4940 for the outer bodice, Simplicity 5006 for the skirts, self-drafted for the sleeves, chemise bodice, and corselet

Fabric: Two twin-sized cotton sateen sheets for the skirts, half of another one for the outer bodice and corselet. Also 2 yards of 60" crinkle cotton for the sleeves, and half a yard of muslin for the chemise bodice, remnants of rayon jacquard for the neckline of the chemise, and remnants of cotton quilt batting for the corselet.

Notions:  Seven yards of gold braid, four yards of white braid, five yards of brown rattail, three packs of dark brown bias tape, a handful of brass grommets, a separating zipper, and several hooks.

Techniques: Uhh...self-quilted fabric using a walking foot? Does that count as a technique?

Hours: Well, I started working on this last December, then took a break to finish up Weaver Girl, so all in all I'd say it was two months of my kind of work hours, which is to say an hour here or there after kids are asleep, if I don't have other work to do for school. There was also so much hand-sewing of trim that I did in five minute snatches while kids were playing-but-not-arguing-yet, so it's really hard to say. I want to say at least 35 hours based on rough estimates of how much time similar pieces took pre-kids. 

Total cost: $65, but that includes $20 worth of gold pens for the flag, and then all the new trim I had to buy was pretty costly even with coupons. The main fabrics, though, cost less than $10. 

Final thoughts: I've always loved strong female warrior characters, from Mulan to Alanna of Trebond to Aerin Firehair, so it was pretty much a given that I was going to love Eowyn the first time I came across her. It's just a nice bonus that her costumes in the movie were brilliant. Eowyn is also extra meaningful to me because of where I was in life when I first read LOTR. Growing up, it was always drilled into me that going into STEM was the only acceptable career path, and my passion for art and making things was not something to be celebrated or pursued seriously. When I got to college, for the first time I was away from home and somewhat free to make my own choices; I switched from a biology major to an art major just as The Two Towers came out, and I was struck by her fear of being caged, her desire to make her own path, one that was different from what was expected of her, and ultimately her seizing the opportunity for glory in battle as Dernhelm. I saw her act of secret rebellion as akin my decision to choose my own major, but unlike Eowyn I did not kill a foul dwimmerlaik. Instead, I saw that a huge public research university was probably not the best place to get an art degree if I wanted to actually learn skills (and not just do weird avant-garde pieces), so I switched back to biology. I did, however, decide to be a science teacher instead of a researcher, which ultimately meant that I had the opportunity to get my theater costuming feet wet via high school drama productions. Later, once I became a more seasoned teacher and didn't have to spend every waking hour thinking about lesson prep or grading, I was able to make time for actual sewing, drafting, and costuming classes at a local community college. In a not dissimilar arc, Eowyn was able to make peace with her role and place in society and chose to be a healer. Both of us found a compromise in our lives that eventually brought peace and joy, not a feeling of being caged. All this to say, making and wearing this Eowyn costume was a dream come true, and a fitting conclusion(ish beginning to a new story). 


Oh! And the flag of Rohan! That was a ridiculous process of experimentation that I documented on my IG highlight, should you care to see all the wibbling I did about making it (and the rest of Eowyn). Tl;dr if you don't want to watch the story: I did an Elmer's glue resist in the outline of the Rohirric horse on a pillowcase, then painted it with watered down acrylic paint and used various gold paint pens to outline the horse. I used vintage bias tape to secure the flag to a spear (made from foam, duct tape, and a wooden dowel) leftover from a drama production. I hadn't even really planned to make it, but when I was planning for the photo shoot I realized that I didn't have a sword and I really need some kind of prop to hold or else I don't know what to do with my hands...I'm so glad it turned out as well as it did!


Thursday, March 11, 2021

Foundations Revealed Contest 2021: The Photos

Competition entries are live! *begin hyperventilating* Now I can finally share the professional photos of the whole costume. I asked my friend Shirelle (@captured.by.shirelle on IG) to take pictures for me. She picked a regional park near us and I love what she was able to do with all the giant piles of rocks and trees! She perfectly captured the mood I was hoping for. 


In choosing the Weaver Girl as my literary inspiration I wanted to highlight a character who was non-Western, and also a mother. Being a mom is one of the hardest things I've ever done (and am still doing, obviously); my first year as a mom was incredibly lonely, but it got so much better once I was sleeping through the night and found my mom crew. It's always easier doing hard things with a community. To that end, I appreciated being able to work with Shirelle, another mom, for the shoot, and being able to support her photography business. 


I also wanted to bring in the writing talent of one of my best mom friends. She and I talk regularly about making time to be creative even when our days are overrun with dirty dishes, constant snack requests, and reading the same book over and over until we have all the words memorized and it's so nice to have someone to commiserate with. I commissioned her to write a new poem to go with my entry (which is based on a centuries-old poem by Qin Guan in the Song dynasty). 

But here's a modern poetic take to go with my modern costume interpretation of the Weaver Girl. I hope you love her lovely, evocative words as much I do. 


Rivers and Roads (The Cowherd and the Weaver Girl)

by Jeanine Terasaki

I could spend my days cursing 
The river of sky that 
Ripped and roared between us 
That sent us scattered across the ends of the heavens 


I could spend my days 
Casting diamond tears across the great expanse 
Hoping even one ripple might reach your hand 
(Could anyone fault me 
Who would dare cast a stone) 


But, draped in our warm memories 
Spy me instead, my love 
Across the impossible divide 
Breathing deeply this absence of you 


Soft hands collecting stardust shimmer 
Piecing together bits of moonshine as I go 
Finding every small way to catch the light 
To bid the magpies come 
And bring you home to me once more


Thanks for following along on this journey with me! You can see Part 1: The Inspiration, and Part 2: The Process here on the blog if you missed it, and you can see all the entries for the Foundations Revealed 2021 Competition on their website (I'm on the last page of the intermediate entries). If you're a paying member, maybe you'll be inclined to vote for my entry? :D


Tuesday, February 2, 2021

Foundations Revealed Contest 2021: The Process

Read part 1 of this series here to learn more about my inspiration for this costume.

I was constrained by the 250-word max allowed on the FR competition entry form in how much I could say about my process, but here's what I submitted: "With my limited color palette, I wanted to use different fabric textures to bring some visual depth to the costume. I also wanted to use repurposed fabrics where possible, both for sustainability and because it shouldn't cost a fortune in fancy fabrics to make a beautiful outfit. The corset is made from fabrics leftover from theater costuming jobs, and the underskirt is made from an old net curtain and a bedsheet. The bolero fabric is a thrifted velvet tablecloth, and the cape's feathers cut from the skirt and corset fabric scraps. Many of the beads and chains are from deconstructed jewelry from my coworkers' destashes, and the hairpieces made by heatforming old plastic milk jugs. The biggest challenge was fitting my corset, since I had originally patterned it when I was still breastfeeding; I ended up trying to pad out the bust to accommodate my body changes. This is only the second overbust corset I've made, so I was trying to figure out the best method of construction with the help of internet tutorials. I knew I wanted to hide the messy underside of the beading, so I ended up making a boned "lining" layer under the beaded fashion fabric. My favorite parts are the beaded bird appliques, done on silk organza; I experimented with many different types of bead, ribbon, and fabric layouts to get a recognizable magpie look. Because of all the individually hand-stitched beads and feathers, time and hand-health management were an important consideration." 

Here's a visual to go along with my blurb! This was just a quick snap of the back and front views when I was trying to explain to my photographer friend what we were working with when trying to pick a shoot location. 

I'm mostly satisfied with my summary, but for a more detailed account, let's rewind (imagine the cast of Hamilton singing "rewind...rewind!")...

I knew magpies would be a focal point on my piece, and I had just treated myself to the Game of Thrones costuming book, which featured gorgeous pictures of Michelle Carragher's beading and embroidery, so I decided to make beaded magpie appliques. Of course, I don't actually know anything about proper beading, so I just stretched some black silk organza over an embroidery hoop and started sewing. I used embroidery thread, ribbon, and random beads from my stash and just sort of kept going and hoping it would turn out well. My first bird was definitely a #birb in its delightful mishmash of materials and styles, but I think as a whole it gives the right impression. 

You can tell I was just sort of trying whatever for each of the wing feathers. 

On the second magpie, I had a better idea of what I was doing and actually planned where to put each kind of bead (I also went out and purchased some more coordinated black/white/silver/iridescent beads from a local mom-and-pop bead shop that I'm frankly shocked has still survived), resulting in a less haphazard-looking bird. I used Fabri-Tac glue all over the back to secure the threads, then cut out the silk organza so I could eventually sew each bird in place.

Much more stylistically cohesive! 

Even though I had yet to finalize the embellishment design, I knew I wanted a black corset with alternating satin and velveteen panels, so I started working on that first. The satin is more of the lining from my Loki-bounding bolero, and the velveteen is leftover from the doublet I made for The Actor's Nightmare. I underlined all the pieces with flannel from an inherited destash to provide a bit more body and cushioning for the beading to come. I then made the boned "strength" layer from two layers of muslin; I justify not using something heftier like coutil by reasoning that this corset doesn't actually provide any reduction, so it's more of a boned bodice than a true corset. 

Outer layer: poly satin and cotton velveteen panels. I had to hand baste each panel to the flannel underlining, then hand baste the panels together because of the the shiftiness of slippery satin against napped velveteen.

After sewing all the panels together, I then catchstitched all the seam allowances down. Also by hand. 

I started throwing fabrics onto Cecily and pinning on ideas for embellishment. At this point I was still thinking about feathers in different fabrics, but I didn't like how it looked. 

Once I decided on the Milky Way as my inspiration for the front of the corset, I was excited to just dive in after reading this tutorial. Beading the outer layer was exceedingly relaxing and a nice way to cope with the ongoing pandemic and inability to see friends; I could get into a groove every night where all I had to do was listen to podcasts or watch Netflix/Costube and focus on selecting and placing the next "random" bead in order to get a casual "Oh, I just sprinkled some star dust over this old thing!" sort of look. I also added some layers of batting on the inside to pad out the bust a bit, since I originally finalized this pattern back when I was still breastfeeding and had not yet deflated. Then it was just a matter of basting the outer and inner layers together and then binding the top and bottom. Since I didn't know how much the circumference would change with the addition of all the layers and boning, I finished the back edge by folding in the edges and then topstitching after I held the bodice up to my body to figure out how much space I needed. Even so, I still misjudged because the finished corset laces almost closed, when I had been planning for a two-inch lacing gap. Setting in the grommets was made easy and painless with the help of AJ's tabletop grommet setter, reminding me once again how grateful I am for the help and generosity of my costuming community. 

You can see all the stitching on the back from the beading, plus my little batting bust pads. 

At this point, the magpies were only pinned on. I don't love all the wrinkles that are especially visible on the satin, but this is what comes from only learning about roll-pinning after finishing up this piece. *facepalm*

To make the feathered bottom edge, I toyed with the idea of sewing them directly to the corset, but ultimately decided that I wanted to be able to remove them if I wanted a slightly cleaner look when wearing this corset in the future. To that end, I sewed them to a bias strip, then hand-stitched a series of snaps to the strip and the inside of the corset. 

I could even theoretically attach this to something else in the future! 

For the skirt, I knew I wanted lots of layers, but also didn't want to buy lots of extra fabric. I took the elastic waistband off of a skirt I had made for the #postapocalypticantigone production, since I liked the look of the gauzy net curtain over the white sheet skirt, plus reuse is always a plus. It already featured a long train since it was supposed to be part of a wedding outfit, so to continue the lines I decided to layer this textured polyester fabric in a high-lo circle skirt over it. The resulting cascading waves of fabric pleased me greatly, and made for really dramatic photos. 

Poorly lit shots but you get the idea. 

To make the bolero/feather cloak, I wanted more black fabrics, but they had to be both complementary and different. I still had some pieces of this embossed velvet tablecloth (already used for this justaucorps, pair of breeches, and collar), and was just able to eke out two tiny fronts and backs and a collar. Just....don't look too closely at all the directions that the nap is going... For the cape and sleeves, I caved and purchased three yards of black netting so that I could keep a visual tie-in with the underskirt and also not totally obscure the back of the corset. I draped one yard across the back until I was happy with how it hung, and then cut two full sleeves roughly following this diagram. Then it was several nights of cutting out, experimentally pinning, and hand-sewing individual fabric feathers until my hands were blistered and cramping. Worth it, though, for how cool the cape looks, like the feathers are just flowing off.

This is also one of the only times I can think of where I was close to running out of pins, as I had to do so much fussing around with the feather layout. 

Because of the sheer nature of the fabric, figuring out how to finish everything was a little tricky. I sewed the shoulder seams and side seams for both layers and attached the collar, leaving the armholes and bottom edges open. Then I basted the sleeves and netting to the lining of the bolero, folded in the seam allowances for both the lining and the velvet, and hand felled everything shut, going through the netting for each stitch. 

At this point, I put all the pieces on Cecily for the first time in the whole process, and was horrified to see that with the corset underneath, the accidental asymmetry of my bolero (thanks for nothing, stretching of the bias edge) was very evident. That led to some panicked picking and resewing, then the horrified realization that I hadn't left enough seam allowance to fix it, and finally the idea to camouflage the worst of it by attaching more bling. Thankfully, I had just picked up a dark silver necklace from my school's "free pile," where people can leave items they're trying to get rid of in case other people want them. Usually it's just a bunch of tchotchkes and old magazines, but occasionally there's costume jewelry! I strategically deconstructed and reassembled the chain and beads to cover the wonky neck seam and front opening, and, like my Loki evening gown, this ended up being a happy accident since I love the finished look and don't think I would have arrived at this design otherwise. 

I love how the dark silver chain and beads look against the embossed velvet. The front closes with a single hook and eye at the base of the collar. 

I already talked a little bit about my milk jug hair accessories, but here's an IG reel showing a bit of what the process of heating and shaping them looked like. The comb was vaguely inspired by the ATLA Fire Nation crown. The flowers are glued to an old chopstick (painted silver and varnished) and some of SHB#2's least favorite hair clips. Unfortunately, the "hair pins" ended up being too heavy to really hold in my hair, so at AJ's suggestion, I used a hair piece to help anchor it. There are actual pre-styled hanfu hair pieces you can buy, but I ended up using the hairpiece I got for my Princess Jasmine cosplay and using some careful placement of hair ties and bobby pins to fake the giant blob of hair on top that seems to be so popular among ancient Chinese women. The rest of my hair I just tied and twisted up and pinned, but there are wispy bits galore escaping. Oh well. Overall it gets the idea across, and it's not like this was ever going to be a historically accurate cosplay anyway!

See that giant blob of hair on my head? That's a fake ponytail that's had the ends looped under and sewn to the clip. Best thing is I can still clip the threads and take out the pins to return it to its ponytail state for other cosplays!

I really do love the dangly bits best.
These last two photos are from my shoot with @captured.by.shirelle.

At the last minute, I considered trying to add some iridescent beads to the skirt because it seemed a little plain, but when that occurred to me, it was about half an hour before I was supposed to start getting ready for the photoshoot. Oops. Oh well, if I ever wear this to...I'm not even sure where I would ever wear this...I'll consider adding some beads. I also thought about making some milk jug feather pauldrons, but we could not drink milk fast enough for me to amass enough raw material for that. I'm still pretty satisfied with what I have to turn in, even if the imposter syndrome struggle is real. Looking through the #foundationsrevealedcontest2021 hashtag is dangerous; on one hand it's super inspirational and exciting to see how others are interpreting the brief, but on the other hand since others may not specify the skill level they're entering at, I don't know if I'm expected to have the same level of design and fit. I know comparison is the thief of joy and all that, but another consequence of the introspection I've been doing about my childhood and upbringing is realizing that I have been ingrained with a scarcity mindset. Because of all the comparing that my parents did of my achievements with those of their friends' kids, and the general immigrant background, I get inordinately anxious when I feel like other people are doing well. I've needed to work on consciously putting aside thoughts of resentment and fear and jealousy, and replacing those with an attitude of celebration of others also creating beautiful things at different levels than me. As the contest organizers wrote, this is less of a competition and more of an exhibition that happens to have prizes. 

Next up: the professional photos of all of it together!


Monday, February 1, 2021

Foundations Revealed Contest 2021: The Inspiration

I've been lurking on Foundations Revealed/Your Wardrobe Unlock'd for years, since way before I had a sewing machine. I remember being a bone-tired, overworked teacher, looking through all the helpful articles and inspirational costumes that were posted, and thinking wow, someday I want to be able to make and wear beautiful things like that. Even after I taught myself to sew and discovered historical costuming and cosplay, I always felt like the FR/YWU yearly competition was beyond my skill level. And then when I finally felt like I could maybe enter, I had kids, a side gig doing theater costuming, and had started taking classes at Canada College, which meant I had no time to think about making something to enter. This past year, with older, more self-sufficient kids, no theater costuming work because no theater productions, and more experience in designing my own costumes, I finally felt like I could maybe do this. 


The theme this year, "Once Upon A Time...,"designing an outfit for a character from literature, was the push I needed to enter. Reading and imagining fantastic costumes for literary characters was so important to me as a child, and here was the perfect excuse to indulge myself and actually bring to life one of my imagined designs! So many classics of children's lit have evocative descriptions of outfits; how could I choose one? I have a soft spot in my heart for the Little House series, as LIW's little details probably played a huge part in my love for historical dress (come on, who doesn't remember Aunt Docia's dress with the buttons that look just like juicy blackberries, or the lovely triangular fichu that Laura's friend gives her as a wedding present? Or is that just me?). And of course Tolkien is a quintessential fantasy inspiration (I've always wanted to do Goldberry or Luthien), and if you're into villains like I am, there's always Jadis or the Lady of the Green Kirtle from the Chronicles of Narnia. Then there's my middle school comfort read, The Song of the Lioness, featuring the first canonically "Asian" character I ever encountered in a fantasy book, Thayet jian Wilima, whom I already cosplayed when I met author Tamora Pierce at a con. 


But ultimately what helped me decide was looking at the Pinterest board posted by the competition organizers: almost all of the inspirational literature they included comes from the Western literary tradition. The West does not have a monopoly on great literature, and considering the relative age of some ancient Chinese poetry, it could be considered even more historical. I understand, of course, that FR is based in England and run by Europeans, but in 2021 I would hope that there would at least be a bit more diversity in their mood board. To that end, I decided to design a costume for a character from Chinese mythology, the Weaver Girl. Because how fitting is it that I choose a heroine characterized by her association with textile creation, for a fabric-based competition? It's also perfect for this year, as we all hold off on seeing our loved ones and learn to wait for a (hopefully) joyous reunion.

The legend of the Cowherd and Weaver Girl is all about waiting for a year to see a loved one. As we come up on ten months of purposeful distancing to keep our community safe, this story seems especially apt. Image source, which also tells one version of the story.

As I wrote in my inspiration description for my entry, "The Cowherd and the Weaver Girl is an ancient Chinese story/poem of a celestial maiden who fell in love with a mortal man. The Queen of Heaven forbade their union and used her silver hairpin to carve a rift between heaven and earth: the Milky Way. Once a year, on Chinese Valentine's Day, magpies form a bridge to allow the lovers to meet again. I've always loved this version of the (literally) star-crossed lovers and wanted to capture the beautiful poignancy of the Weaver Girl, Zhinü, waiting to be reunited with her husband. The image of a flock of kind-hearted magpies bridging the Milky Way is so evocative of the importance of community support. I kept the color palette limited to mostly black and white in homage to the yin-yang concept as a reflection of duality and balance in both the patience and the passion of waiting, especially in this pandemic year as we wait to hug our loved ones again. The silver and iridescent accents echo the sparkle of the stars, and the feathers are magpie mementos that Zhinü might have saved and woven into her outfit for the next year's meeting. The shorter overskirt, trailing gown, and gauzy fabrics are modernized versions of style elements typical in Chinese paintings of celestial maidens; the traditionally styled hair accessories and the qipao-esque collar and bolero shape bring to mind both historical and more recent Chinese fashion, emphasizing the timelessness of the story."

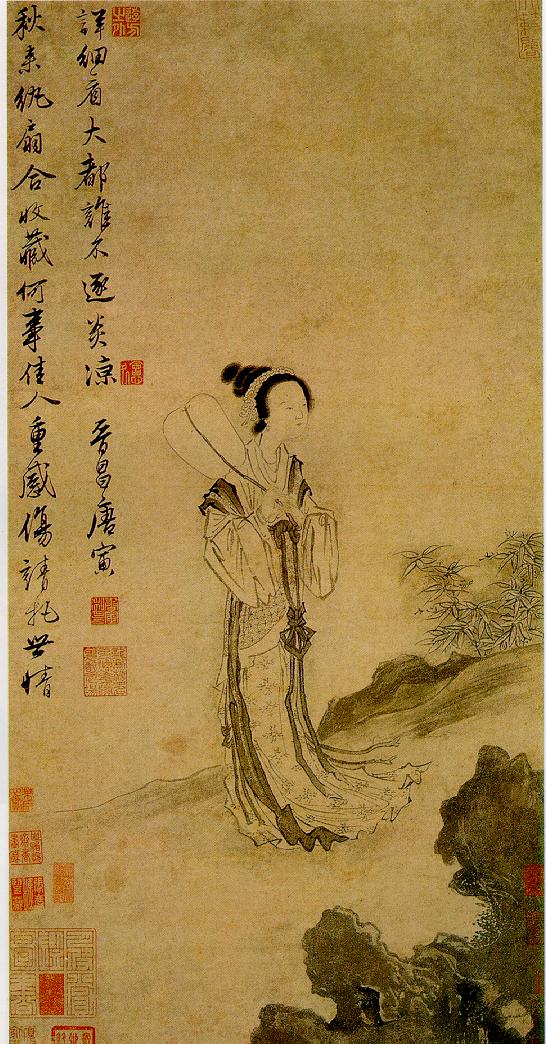
To give you an idea of what celestial maidens like Zhinü usually look like in traditional Chinese art:

Lots of wispy fabric drifting about! Image source.

So I definitely wanted to incorporate light, flowy, ethereal fabrics, and I wanted to have lots of starry sparkle, and I wanted magpies. I toyed with the idea of having a magpie leaving a trail of feathers across the dress, but it didn't feel right. One of my best friend's husband, who is a photographer, posted his photo of the Milky Way and the design inspiration just clicked: I would do a Milky-Way-esque sprinkling of beads on a bed of velvety black "night sky," and the magpies would be "holding" this bridge between their beaks. While I didn't want to make a historic Chinese hanfu, I did want some nods to Chinese fashion elements in my costume, so I decided on a little bolero with a qipao-style mandarin collar and lines that echoed the double-sided round-ba front that's seen on some qipao, especially ones worn by famous Chinese politician and fashion icon, Madam Soong Mei-ling, aka Madam Chiang Kai-shek. The qipao, while seen in many Westerner's eyes as a classic Chinese style, is actually a fairly recent fashion, relatively speaking (it originated in the 1920s, which is practically modern in light of China's thousands of years of history...I wrote a whole paper about this for my History of Fashion class), so I wanted to incorporate some more traditional historic elements in the costume. I went with a mid-length overskirt to mimic the look of a qiyao ruqun (齐腰襦裙) and full sleeves, similar to the look seen here:

Impractically full sleeves, and a shorter overskirt that even has a vague hi-lo thing going on!
Image source.

While historic Chinese clothing did not include corsets per se, there are periods where very wide belts/sashes kind of give a vague underbust corset look. I was also inspired by the feather-looking bits that can be seen sticking out of the front tabard in statues like this Tang dynasty female figurine: 

I decided to add fabric feathers to the bottom of my corset as a nod to this design.

Another aspect I wanted to incorporate was an actual feather cloak; in some versions of the story, the Weaver Girl leaves her magical feather cloak while bathing on earth and the Cowherd discovers the magical garment which allows her to fly back to heaven. I wanted to keep that aspect while not using any actual feathers, and also not totally obscuring the lacing on the back of the corset, thus netting to echo the gauzy underskirt fabric, repeated in the sleeves, and the fabric feathers were cut from the scraps leftover from making the corset and overskirt. 

Here was my initial sketch. Pretty sketchy.

And here's what I actually made! Professional photos coming...

The final touch on this costume was the hair styling. To be honest, I was the most concerned about how this would turn out, because I absolutely suck at doing my own hair. If I had an Achilles heel in cosplaying, hair would be it. I can style other people's hair just fine, but the combination of not being able to see the back of my head, plus my fine, thin, wispy hair that doesn't want to stay, means that I'm limited in what I can do. Thankfully, AJ of Confused Kitty Sewing was able to direct me to some helpful hanfu hair styling tutorials, or else I would probably have just done a mom-bun and called it a day! Even though I wasn't able to replicate any exact style, I learned how to loop my hair up and use a hairpiece to approximate the historical look. I did two practice runs of hairstyles and even then my final style was entirely different from the tests because I'm also incapable of replicating anything twice. Thankfully, my milk jug hair clips and hair stick helped to disguise a lot of that. Yup, that's right, milk jugs! I know people melt down milk jugs to reuse the plastic, and I've used candles to singe and curl poly-organza flowers before, so from there it was a short leap to using my heat gun to lightly melt and reshape flower shapes cut from old plastic gallon jugs. I love being able to repurpose trash, so this was seriously thrilling to me. The best thing about making flowers is they're meant to be organically irregular, so it works well with this method of crafting. I finished them off with bead and wire stamens/pistils and hot glued them to clips and chopsticks to approximate the look of traditional hanfu-style hair accessories. I was very, very pleased with how they turned out and they way they help visually communicate an ancient Chinese aesthetic. 

The chains and beads dangling down give +2 to perception of Chinese-ness rolls. 


In some versions of the story, the Milky-Way-creating-antagonist is the Queen of Heaven, while some say that it's Zhinü's father, the Jade Emperor, who is angry that his daughter neglects her duty of weaving brocade robes for him because of her romance with the cowherd. I feel more strongly about the latter version, since one thing I've been working through emotionally this past year is my dad's insistence on my not pursuing the arts throughout my childhood/teen years. Even though he was instrumental in teaching me creative reuse and giving me a general DIY attitude, he was very clear that he expected me to go into some kind of STEM career. While I do love teaching science and am good at it, it's still hard not to play the coulda-shoulda-woulda game and wonder what my life would be like had I not waited until my thirties to really lean into costuming. The pandemic and resulting sheltering in place has meant that I had more time for introspection; I've been having a lot of angst about how best to use my talents, feeling less-than because of my lack of perceived success according to traditional Chinese standards, and wishing that I had had more freedom to really tap into my creative side. Feeling the tension between wanting to respect my parents' wishes but also forge my own path, along with the image of waiting to see a loved one in this pandemic year, really makes Zhinü's story hit home for me. 

Entering this contest with such an intensely personal creation has been a surprisingly emotionally fraught, but ultimately healing and therapeutic process. I used to never do things unless I was assured of success, as I'm pretty risk-averse (#notagryffindoratall #selfpreservingslytherinthroughandthrough), but preparing for this competition has been a good exercise in simultaneously doing a thing anyway (even when there's no assurance of winning, which has led to lots of great conversations with SHB#1) and also believing that I'm good enough to go for it. I like how the entry form makes you check a box agreeing to the competition conditions and also certify that "I confirm that I am a creative badass, and will never again doubt myself or my talent and capability." So here goes!