Tuesday, July 19, 2016

Costuming The Actor's Nightmare

A long long time ago (nine years ago), I can still remember (because Facebook's On This Day feature reminded me) how the thought of costuming another drama production made me (do the opposite of) smile. I had just finished doing the costumes for Dragonwings, and since I didn't know how to sew at the time, it was a lot of going to thrift stores, hot gluing, and safety pinning. I found myself doing questionable crafts, like wrapping twine around Old Navy flip-flops to make "straw" sandals, and buying large quantities of long fake hair to braid into queues. Afterwards, I swore to never let myself be bewitched into costuming again. Hah! Little did I know, the costuming bug had bit me and after several years' incubation, I found myself once again caught up in the mad (totally exhilarating) sickness of costuming a play.


This time, it was under a new director and I had several years of sewing experience under my belt, so it was, in many ways, a totally different experience (in other ways, it was totally the same, i.e. scrambling in the weeks leading up the play trying to thrift all the things we still needed and the heady rush of seeing my costumes on stage). Since it was the fall production, it was a short play by Christopher Durang, The Actor's Nightmare. I wasn't responsible for all the costumes, thank goodness, because I only had a month or so to make everything.


For the main character, George, I made a black "Shakespearean" Hamlet outfit, consisting of a doublet and "pumpkin" pants. He also wore the pirate shirt that I made a few years ago.
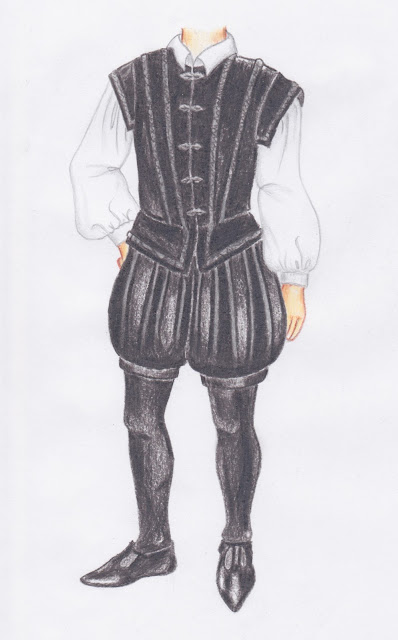
My sketch.
The doublet was made using Simplicity 4059 modified for back lacing (for future adjustability) and front closures, and the elastic-waist pants were drafted using his measurements and the directions in Elizabethan Costuming by Janet Winter. I used black cotton velveteen (from Jo-Ann's) with black gimp braid trim (from Amazon), and the pants were stuffed with tulle. Total cost: a little over $100.

How it turned out IRL, albeit more crumpled than it actually looked, since the picture on the left is after pulling it out of storage for pictures, and the one on the right is after three performances. 


The two main actresses, Sarah Siddons and Dame Ellen Terry, were meant to be grand ladies in 1930s-esque evening gowns. I originally looked at my Janet Arnold Patterns of Fashion 2, EvaDress' Dinner Gown and Cape, and McCall's 7154, but then decided that they would all be too much work to fit and sew with such a limited time frame. Instead, I stuck with *gasp* stretch fabric and made do with patterns that I either had or could buy on sale at Jo-Ann's.

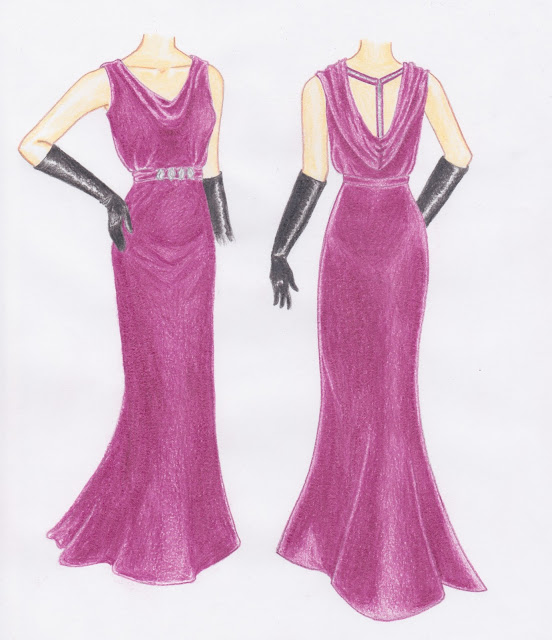
For Sarah, I went with a stretch velvet to mimic the luxury of 1930s starlets' gowns (turns out that I was right to do so, since the American Duchess came to a similar conclusion when making a luxe 1930s velvet dress). The skirt and back bodice piece came from McCall's 7047, and the front bodice piece was from McCall's 6963. To help hold the back of the bodice on the actress' shoulders, and because her costume required a zipper that could be undone without revealing anything, I took inspiration from this extant velvet gown:

Unfortunately, I can't find any information about this dress. 

Here's the sketch of my dress:

I didn't have the right color in my cheapo color pencil box, so this is more magenta than the burgundy it should be.

And here's how it turned out.

Cecily doesn't fill it out as well as the actress. 

A close up of the back zipper arrangement, which served to both hold the gown on the actress' shoulders, and provide a non-crucial zipper. I know it might not seem like a big deal, but I'm really proud of figuring out how to do that while still making it semi-1930s in flavor!


I'm pretty pleased with how the final gown turned out, especially considering how little time I had. I do wish I had had time to do an FBA on the bodice, and more fabric so that I could make a fuller bottom of the skirt by cutting it on the bias, but I think those are things that really only bother me. Total cost: about $50.

Ellen's dress needed to be equally glamorous, but I didn't want to use velvet again. I briefly considered some kind of satiny fabric but decided that the sheen under stage lights would emphasize any issues (I've seen way too many badly done polyester satin costumes!), so I decided that a glittery fabric would be a good compromise between luxury and being able to camouflage problem spots. I was inspired by this extant gold dress:

[picture source]

My sketch, which really only serves to illustrate how I have no idea how to draw lace:

Or hands, for that matter.

In the interest of saving myself time/money, I used a pattern I've already used for myself, McCall's 3252. It's a vintage 1970s dress pattern that I thought looked similar enough in shape to pass for 1930s-"ish" once I made some modifications. I cut the skirt into more of a trumpet shape to mimic the slim-at-the-hips-then-flaring-out look of 1930s bias cut dresses, put gathers under the bust, narrowed the straps, and cut the back into a V-shape.


While I was more pleased with my faux-1930s look with the wine-velvet dress, this dress definitely made more of a visual impact because of the glittery gold lace fabric I used. The actress playing Ellen is a bit of a tomboy, but when she walked out on stage she was absolutely transformed -- another student of mine said that she almost teared up because Ellen looked so beautiful -- which was a great reminder of what a costume can do for a performer. Total cost: about $50.

My phone did NOT like take a picture of the red velvet in the weird lighting onstage!

I made some other pieces for the play, like a grand cape for Sarah, and a white mob cap for Ellen, but the above three costumes took up the bulk of my time. I also modified my Mother Gothel dress by adding long swoopy sleeves in order to make it more fantasy-medieval. The rest of the costumes were rented or purchased, thank goodness! I was so short on time (during the week I could only sew when SHB was asleep, and his naps don't last that long...plus I had actual other work to do, like grading and lesson planning) that even with my husband and in-laws doing lots of babysitting on weekends, I didn't finish sewing up the last costume until two hours before opening. Talk about cutting it close!

Mob cap and Gothel dress make an appearance in the closing night cast photo.


After all of that stressful rushing (but still exciting, as I thrive on the last-minute push before a deadline), I decided that I was going to make sure that the next time I costumed a play, I would be much more methodical about organizing my time and tasks so as to reduce the stress for both me and my family. Stay tuned for a look at the costumes from the spring production: a post-apocalyptic Antigone...

Saturday, July 9, 2016

"Captain America Goes to the Gym" Shorts

I've been experiencing a serious lack of sewjo ever since I sewed up SHB's Tako Hat (which was over a month ago). I've got a pile of underwear cut out but the thought of assembly-line sewing such boring basics (that nobody will even get to see!) was too boring to stomach. So I signed up for Gillian's sewing dares, hoping for a kick in the pants (shorts?). I think it worked, because her dare for me was to sew something 1) selfish, that 2) I missed from my pre-baby wardrobe. I haven't sewn a pair of pants since before SHB was born, but I didn't want to jump right back in with a fitted pair and have to deal with a fly front. I also only have one pair of woven shorts that fits me right now, and those are white, which is pretty much a no-no if you're running after a sticky-handed toddler all day. I knew I needed something relatively fast and easy to jump start my sewing, so I settled for elastic-waist shorts in a dark color to fit the gap in my wardrobe.


I used the City Gym Shorts pattern from Purl Soho (thanks to Leah of Struggle Sews a Straight Seam for cluing me in to this free pattern's existence!) and some scrap navy fabric leftover from my Han Solo pants. Since I was sewing the night before Independence Day, I figured I would patriotize them by choosing an appropriate color trim. I was going to do either plain red or white, but serendipitously Heather posted the tutorial that Sew Tawdry did for a two-color trim application. Her instructions were the perfect inspiration that I needed to dress up my shorts.

Exposure upped to show the crotch fit, although the actual colors are more accurate in the first collage.

Summary:
Pattern: The free City Gym Shorts by Purl Soho
Fabric: 1/2 yard of navy blue cotton twill from stash
Notions: A little less than a yard of 1" elastic, purchased at a grocery store in Italy, and vintage red and white bias tape inherited from another sewist's stash. I had exactly two inches of tape left at the end, which was good, because they don't make all-cotton bias tape anymore.
Hours: Four, mostly because of fiddling with the trim, then messing up irreparably and having to cover my mistake with a piece of grosgrain ribbon so that it looked like an intentional "label." And then having to unpick the waistband to shorten the elastic because I blindly followed the directions on the pattern without thinking to check the length first on myself.

And then my topstitching went all wonky on my "label," so I had to go back and fix that after SHB went to bed. 

Will you make it again? Yes, because I love the length and ease of these shorts! Although probably not with the fussy trim. I also want to smooth out the "J" of the crotch curve a little bit more, since I still see some pulling there.
Total cost: Free, because stash. Go me!
Final thoughts: I'm pretty sure my dad had gym shorts like this in the 70s, which is a thought that's neither here nor there, but still worth mentioning; it's probably why I find this look so vaguely familiar and slightly repellant? At any rate, I know these look like sporty lounge-at-home shorts, and not going-out shorts, but let's face it, all I'm going to be doing is chasing SHB around at the zoo this summer, so these are fine for that purpose.

This is what was going on in the background while I was taking pictures:
SHB was running around throwing his toy animals on the floor.

Thanks for the #SewingDare, Gillian -- it worked!


***
Okay, so I wrote everything above when I sewed up these red-white-and-blue shorts the night before Independence Day, and then I saw all the horrifying news earlier this week. Even though I had my pictures ready to go on the evening of July 5, I couldn't bring myself to post this entry yet; this was meant to be a patriotic pair of shorts, but I was having a really difficult time with America in general and it felt disingenuous to be posting something so rah-rah. I still don't have anything coherent to say about the tragedies of this week, but then I thought about Captain America: Civil War, and Steve Rogers' faith in people and how he tried his hardest to do what was right, his genuine grief over everyone who died on his watch, and I decided I was okay with making them Captain America shorts. I'd like to think Captain America would be all about #blacklivesmatter; also how dorky is it that I was vaguely comforted by a fictional superhero?

Monday, July 4, 2016

Tako Hat!

After I went through all the trouble of painting/sewing/crafting up a marine-themed nursery for SHB, it turns out that the ungrateful (but still incredibly cute and lovable) bugger couldn't care less about ocean animals. His current loves are African savannah animals and barnyard animals; the former are just so dramatically huge and recognizable when we see them at the zoo, and the latter all make fun noises. SHB loves finding out what noises animals* make, and while I can do a credible whale imitation, there's really nothing I can do for crabs, fish, seastars, and sharks. We did decide that shrimp say "hahaha," as a play on the Cantonese word for shrimp, .

Anyway, hope must spring eternal, because when AJ of Confused Kitty Creations, who has long been one of my cosplay crushes, asked for testers for her new toddler sewing pattern, I immediately volunteered to sew, of all things, a 1) hat, for my kid who hates anything on his head, with 2) an octopus on it, because apparently I haven't yet learned my lesson. It was a fairly quick and easy project, even with the instructions in beta, and it was such a nice change to work with a pattern where all the notches and pattern pieces lined up perfectly! I've worked with too many patterns (including those of my own sloppy drafting) where I have to manhandle and ease pieces to get them to work, but this one didn't require any such fudging. The fit was also perfect for the recommended size for SHB's age, i.e. just a little bit of ease, and he's got a rather large head for his age.


I tried to play with the color on the image so that you see my less than stellar stitching on the face pieces. 


Summary:
Pattern: Tako Sun Hat
Fabric: Scrap cotton fabric in my stash, quilting weight, plus a little bit of high quality felt for the facial features
Notions: A tiny piece of Velcro for the strap, interfacing for the brim
Hours: Maybe three? I made it a while ago, so I don't really remember.
Total cost: Free, since it was all from stash.
Final thoughts: Well, I adore it, even if SHB doesn't. Because as I really should have predicted, he wouldn't have any of it. He thought it was funny to put on for about five seconds, and then he pulled it off and refused to let me put it back on.

This is pretty much the only normal photo I got. 

He pulled it off before I could do the straps.

I have about fifty more photos that are variations of the blurred-toddler-trying-to-pull-off-the-hat theme.

He did think it made a great barnyard animal toy transporter, though. 

Look at that self-satisfied smile in the last one!


Thankfully, cats make much more patient models (now there's a phrase I never thought I'd type), even if they don't really know how to wear hats.

Fenxi is not impressed.

Gummy is resigned. Or is he resentful?

Dawww. 


*SHB also wants to know what noises inanimate objects make, e.g. the ceiling, puzzle pieces, whiteboard markers, hats, etc.

[Disclaimer: I received this pattern for free in exchange for testing it for the designer, but all opinions are mine. I was not required to write about it on my blog; I just think it's really cute, and who doesn't want to see a picture of a cat in a hat?]