Saturday, July 27, 2013

Historical Sew Fortnightly: White


Can I just say that I'm so glad that the first color challenge for HSF was such an easy color? I had grand plans for a chemise, drawers, and corset ensemble, but then there was that tiny thing called moving halfway up the state that upset my plans. Nevertheless, I was still able to put together something for this challenge: a shirt for the gentleman! Alas, my top hat is packed away in a pod and en route to the Bay Area, so there will be no catching of hats here today.

Nope, no hat-catching, just sleeve-adjusting. 
A better look at how shapeless it is. Excuse the wrinkles, it was haphazardly packed up in a bag for a week. 
Back view: even less flattering.
Side slit, as dictated by the extant garment I was copying. 
Trying to undo the button at the neck...I don't know how men wear ties and button-up shirts; it's so dang uncomfortable to have all that restriction around the neck area!
Ahhh, much better. 

Since I was limited in time, I decided to stick with another shapeless historical garment made up of rectangles. While it's mostly based on the late 1700s men's shirt in Costume Close-Up, I think men's shirts stayed similar enough in style that this could still pass for anything from the early 1700s (maybe even late 1600s?) to the Regency period. 

Overall shape: pretty good, I think! 

You can see the underarm gusset in the top left of the picture. The ruffled bit at the end of the sleeves is actually just a ruffle sewn to a piece of twill tape. I basted the twill tape on to see what it looked like; it's removable should I decide to go with lacier cuffs or no embellishment at all. 
Hand-worked buttonhole! They're simultaneously not as hard as I thought they'd be, and yet way more difficult than they look. The stitch itself isn't hard to learn, but making them even and catching just the right amount of fabric is the tricky part. 
My hand-finished hem and slit...obviously I need to work on the invisible part of my invisible catch-stitching. 
Neck gusset, also done by hand. 

Thank goodness for the slow changes in men's shirt fashions, since this shirt is meant to go with my early 1700s-ish pirate coat! 


It's an all me-made outfit! Those are my Aladdin pants, which are a surprisingly good fit for the whole look. 
Going for the whole aloof 18th century painting pose, with one hand mysteriously tucked into my coat
Side view.
Back view. I really should've taken the time to put on some white knee-highs!
I am seriously in love with my own work. Those cuffs are just so ridiculously huge, it's awesome!

Looking through these pictures, I'm thinking that I might need to suck it up and just make the waistcoat at least, if not the breeches. It just doesn't look right with only the shirt and coat -- I need another layer of sumptuousness in there! I'm thinking a gold brocade...what say you?

Summary: 
The Challenge: #15, Colour Challenge: White
Fabric: 2.5 yards 100% cotton muslin, already in the stash. 
Notions: Twill tape and plastic "pearl" buttons
Pattern: The men's shirt in Linda Baumgarten's Costume Close-Up, with minor modifications for fit (narrower in the chest and arm circumferences, shorter overall, longer collar piece) and convenience (no reinforcements at the shoulder, no flat-felled seams).
Year: The 1700s
Hours to complete: Hard to say...I machine-sewed the major body seams and underarm gussets, but hand-sewed the neck gussets, collar, slits, and hem. I'm guessing about seven? 
Total cost: I got the muslin on sale with a Joann's coupon, so I'd say about $5. 
How historically accurate is it? 50%? The pattern is accurate, even if the materials and some of the construction isn't. 
First worn: Just for these quick pictures, but will eventually be part of an entire pirate costume 
Final thoughts: Looking through these pictures makes me pretty excited for when the whole thing is done! My sister thought it was awesome, Mr. Cation was unsure about the oversized men's shirt look but came around when he saw it with the coat, my mom said the whole thing was 好犀利 (very sharp), and my dad said I looked like the Duke of Edinburgh. I don't think that means what he thinks it means, but I get that the intention was a compliment about how fancy and historical it looked. 

And since this is a pirate ensemble, after all, well...what's a pirate without some treasure? 

We've got an old cardboard box instead of a treasure chest. 
Oh look, the treasure is a cat!
Could there be any better treasure? 


Wednesday, July 24, 2013

The Come to Feather Dress


Modcloth does this thing where they take common phrases, song lyrics, etc. and turn them into clever names for their dresses. For example, their various feather print dresses have names like "Forever and Feather," "Feather After," "You Feather Believe It," "Feather Channel," and "How's the Feather?" I wanted to do something similarly clever, so I came up with "Feather Off Alone," "Nobody Does It Feather," and "Feather Off Dead." None of those, of course, convey the overwhelming trendiness of things with feathers on them, quite the opposite, in fact. So I decided to go with a Beatles' song instead; I think it better communicates the popularity of feather prints, right?

I don't have shoeshine on. 
...nor is my hair down to my knee. 
What the heck is a walrus gumboot anyway?

This fabric was originally intended for a Tiramisu, but in the end, I decided that I wasn't the hugest fan of how the midriff-meets-bust-overlap area came out slightly ripply. I decided that I wanted to try another pattern that still had the gathered bust pieces, a V-neck, but didn't have the fussiness of a separate midriff piece. Enter McCall's 3252, a vintage dress pattern from 1972. I would have passed it over in my earlier sewing days, but Tanit-Isis makes 70s dresses look so good, I thought I'd give this pattern a chance. And you know what? I'm so incredibly glad I did! I think this might even be my new favorite knit dress pattern. It's easy to put together, the skirt skims over my hips nicely and is just full enough to have some swish, but is still really just an A-line so it doesn't eat fabric like hobbits eat breakfast(s). I'm also tempted to try it in a drapey woven fabric, like maybe a rayon challis. 

I love the openness of this V-neck without being too low, the little gathers under the bust (way easier than darts!), and the smooth midsection that flares into the skirt. Only problem is, I was less than careful about the print placement, so as Mr. Cation says, it looks like my boobs have eyelashes. Oops. 


I did learn from my Tira-making experience though: I changed up the order of construction such that the side seams were the last major seam to sew. This makes for easier sewing and fitting. Instead of sewing the bodice pieces together and then sewing the skirt pieces together, then trying to attach them at the awkward center point, I sewed the right and left halves separately (bodice to skirt), then just sewed them up the middle. Is that taboo somehow? It feels obviously easier, so why didn't the instructions just tell me to do that? Are the instruction writers just sadistic and want to see me struggle with the pointy part? Anyway, when I had an entire front and an entire back sewn together and connected at the shoulders, it was easy to just try the dress on inside out and pin where my side seams should be. It's a good thing I did it that way, too, since I ended up taking out 1.5" on each side! Granted, the pattern was a size too large, so I was expecting something along those lines (I also expected, and therefore preemptively made an SBA, which was also a good idea). Then it was just a simple matter of binding the neck and armholes, and final trimming of the skirt hem, and then I was done! And now I want to make all the different views, minus the weird clown ruffle neck version.

Just for fun, since it's a 70s pattern, I old-timey-ed up some of the shots to look more vintage...

Gotta love playing with those antiquing filters!


Summary: 
Fabric: 1.5 yards of mystery content knit, but there's probably a significant percentage of Lycra since it's veeeery stretchy and has excellent recovery. I got it last summer from Fabrix in San Francisco.
Notions: None!
Hours used: Four, with cutting the pattern tissue and then the fabric, and also fitting multiple times. But now that I've figured out the fit on this, I can see whipping these out much quicker! This was the last project I did before packing up my sewing machine.
Will you make it again? Considering that I'm already planning to, yes!
Total cost: $10, but actually half that amount since I didn't use all three of the yards I had of this fabric. I contemplated keeping the rest to make a top, but then realized that I don't need two garments from the same fabric. Instead, I foisted it onto Jill when we met at her house for a sew-in...my last time with the Stitch in the Ditch gals! Stashbusters, that's the real secret to stashbusting -- make other people take your stash fabric!
Final thoughts: I never thought I would wear a pink dress, but strange things happen when you sew! I'd like to think this is a teacher-appropriate dress, although I know students can get distracted by prints...those boob feathers have me worried, now! Also, what's with 70s patterns calling for zippers in knit dresses? I didn't put one in, of course.

And now, the bigger news: I've left SoCal for good! Mr. Cation and I spent the last week packing up all our worldly goods (the majority of which were my goods; can I help it that my profession and hobbies tend to lead to stockpiles?), stuffing them into a pod, and then driving up to San Francisco. I will dearly miss Langer's pastrami, Scoops ice cream (and weather warm enough to eat ice cream...it was all of 55 degrees and foggy as all get out when we got in last night...hello SF summer!), the Stitch in the Ditch ladies, the Fabric District in LA, and I'm especially sad to just miss the start of FIDM's Outstanding Art of Television Costume Design exhibit! But hey, Bay Area sewists, if you're up for hanging out or sewing, I'm totally in!

Goodbye downtown LA skyline, goodbye planes flying overhead en route to LAX, goodbye smog, and goodbye pictures on the roof of the parking structure!

Saturday, July 20, 2013

Historical Sew Fortnightly: Eastern Influence

Oh my ears and whiskers, how late my HSF projects are getting! In this particular challenge, we were supposed to make a historical garment with inspiration taken from the East; although I started planning for it months ago, I wasn't able to finish sewing until yesterday. Blame the chaos of packing. And of course, now that I go back to look at The Dreamstress' guidelines for this challenge, I only just now discover that the point was to make an Eastern-inspired Western garment! Oops. I just made a straight-up Eastern garment. Ummm, it doesn't get more Chinoiserie than an actual Chinese 漢服 (hanfu), right?

***

I re-watched Disney's Mulan earlier this year when it came out on Netflix, and since I'm participating in the HSF, I got curious about actual historical Chinese clothing. After extensive research, I discovered that the fashions in the Disney movie span oh, 5000 years of Chinese clothing.

In Mulan 2, she wears a Warring States period/early Han dynasty spiral-shaped garment, while Li Shang's garments throughout the movie are from much, much later, more like Ming and Qing dynasties.
From the book 5000 Years of Chinese Costume.
Mulan's matchmaking outfit is most similar to the Tang dynasty fashion of having the skirt pulled up to above the bust, with long trailing sleeves and flowing ribbons. 
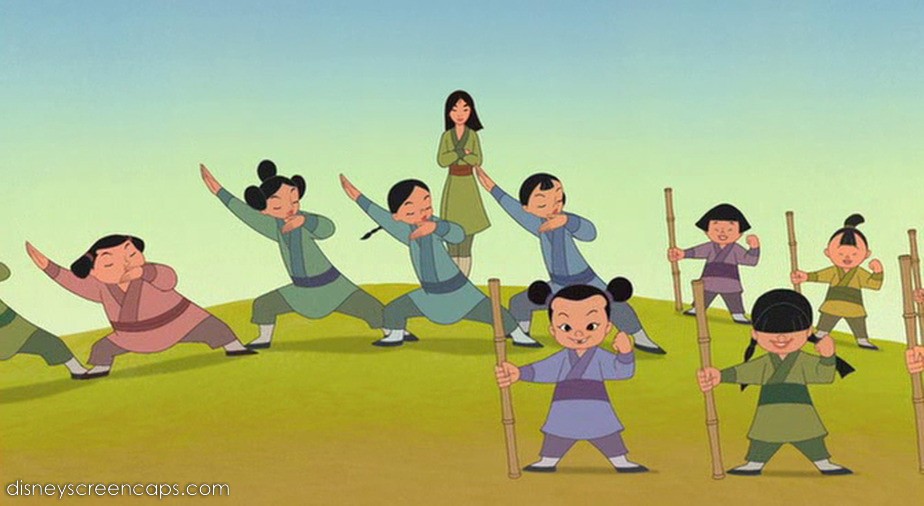
In Mulan 2, she shows a bunch of neighborhood children how to do some basic martial arts. Their clothing is kind of "generic peasant," with a basic jacket/top and short pants.  
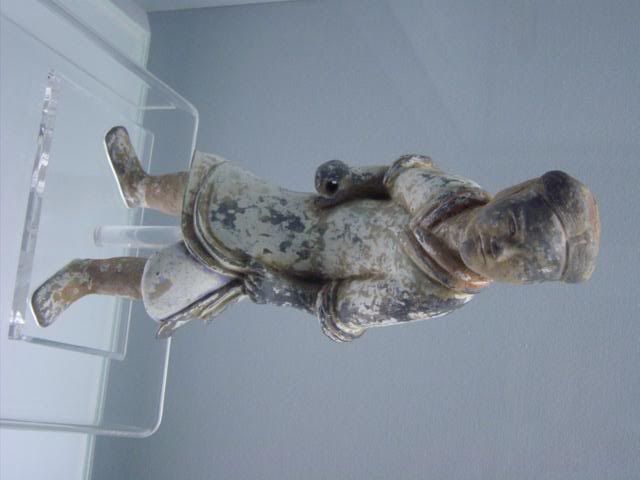
They look very similar to this Han dynasty sculpture. The 5000 Years book shows paintings of common people from the Han through Song dynasties all wearing similar outfits. 

In wanting to make my own somewhat historically accurate hanfu, I ran into a significant and unexpected roadblock: while Western historical fashion only goes back a few hundred years, and therefore it's much easier to find well-preserved extant garments, Chinese history is much, much longer.   Most of the well-documented extant garments and paintings date from the Qing dynasty, which spans all the time from before the Restoration, through the Georgian, Regency, Romantic, Victorian, and finally Edwardian periods. Unfortunately, the Qing dynasty is not even a native Han Chinese dynasty; the Qing were actually Manchurians, and therefore the costume of that time period doesn't "count" as true Chinese clothing. Even the iconic qipao/cheongsam is a more modern derivative of the Manchurian style of clothing. Anyway, I wanted to look at actual Han Chinese clothing, but I only found a few examples, none of which had all the information and photographs that I would have wanted. Between library books and teh interwebs, I was able to find a few shenyi from the Mawangdui tomb (c. 168 BC, Han dynasty), a beizi and a pleated skirt from the Song Dynasty, and another jacket and skirt set from the Ming Dynasty.

Women's jacket and pleated skirt. 


Paintings and statues, however, were slightly more plentiful/helpful. While it's more difficult to find representations of women (there are lots of of royalty, male court officials, and soldiers), thankfully there are enough empresses, concubines, musicians, and attendants to get an idea of the general fashions of the various dynasties. If I can boil down hours of research and 5000 years of costume history: when it comes to the general population (i.e. not royalty or dancers) there's a basic uniform of a top and a skirt, with just the changes in sleeve length and width, skirt height, and jacket openness to indicate the dynasty.

Han Dynasty mural: jacket with moderately huge sleeves, overskirt with a tie belt.
Wei Dynasty court attendant: jacket with huge sleeves, pleated skirt and overskirt open at the front.
Detail from the Tang Dynasty painting "Night Revels" shows lady musicians with narrow-sleeved jackets, overskirts, sash belts. 
"Dinner Party" painting from the Five Dynasties period shows outfits very similar to the Tang Dynasty one above.  The overskirt is clearly pleated. 
This Liao Dynasty painting also shows an overskirt with a voluminous jacket, with an underskirt/shirt  inside. Also, a cat!
This Song Dynasty painting shows a lady wearing a jacket+skirt+overskirt+tie belt combo again, with a cape-type thing as well. 
This Ming Dynasty painting of women playing ball shows extra long-sleeved kackets with at least two layers of skirts, and surprise! pants underneath it all!
Qing Dynasty painting showing guess what, a jacket/skirt/tie-belt ensemble again!

(All the sources for the above images are collected on my Pinterest board for this costume.)

As you can see, not much changes when it comes to this basic outfit! Rather than aiming for one specific era, I decided to make a generic jacket with moderate width sleeves and rely on the skirt placement to change the look. I'll make the skirts for the separates challenge later in the year. To make the jacket, I mostly used the diagrams put out by the various groups dedicated to the revival of the hanfu:


I started with (what else?) a twin flat sheet, took my measurements, and cut out the basic shape. From there, it was just a matter of sewing up the side seams (my fabric was wide enough to not require a center back seam), cutting the curve in the front (not historically accurate, but I like that it gives the impression of a spiral-shaped garment when it's worn over the skirt), and adding the contrast binding. When I make the wrap skirt, the inaccurate front curves will be hidden.

Walnut helped. 
It looks like a muumuu without a belt, but then a lot of the historical jackets were pretty oversized. The sleeves are much longer than my arm, as extant garments and paintings both seem to dictate. There is no shaping to speak of, unlike modern, costume-y hanfu made from chiffon and satin. 

And here's what it looked like on Cecily!

With a totally anachronistic black elastic belt and gold drapery tie, over a thrifted green silk charmeuse skirt. 
From the back: it's pretty bulky with all the excess fabric. I'm tempted to redo the skirt portion to be more flattering, historical accuracy be darned, but am loath to give up even the tiny modicum of accuracy that I can claim.
Side view...pretty boring. It was getting pretty dark when I took these pictures, so they're also not the sharpest.

Like the pirate coat, I'm waiting until I make the whole ensemble to do a proper photo shoot of it on me. I still need to make the long wrap skirt (probably in black), the shorter overskirt (hoping for gold), and the tie belt (need to find a suitable large jade pendant). And in case you couldn't tell from my Pinterest board, I'm planning to make this into a Mulan/Loki mashup (for no good reason other than that both have a green color scheme and are defying social expectations because of some father-related issue), so I'll eventually up adding a black leather over-jacket thing like these Tang Dynasty dancers and making a staff.

Summary:
Fabric: A thrifted 100% cotton twin flat sheet for the body, and 2/3 yard of floral print green and gold quilting cotton for the binding (purchased at Michael Levine Loft).
It's vaguely Asian-looking, right? Sandra helped me choose it (and find enough scraps in the Loft bins to make up the 2/3 yard that I needed). I'm really pleased with how the two greens look together. 

Notions: Anachronistic seam binding for the insides.
Year: No specific dynasty, but probably fits the Ming Dynasty best. Incidentally, that's the dynasty where the tale of Hua Mulan was turned into a full-length novel (though the original story dates back to the Wei Dynasty, and the Hun antagonists of the Disney version date back to the Han Dynasty).
Hours: 10, not counting all the research! The nice thing about early historical garments is that the basic pattern is so shapeless and easy. The binding probably took the longest, what with cutting, pressing, and sewing all the strips of fabric.
How historically accurate is it? Not very! Early Chinese garments were usually made of hemp or silk, depending on social status, and there were certain prescribed colors, and dark green was not one of the options for anyone. Cotton didn't become popular as a textile for clothing until the Ming Dynasty. Plus, I sewed this all on machine, and as I mentioned above, the shape of the hem is not accurate. Goodness knows how all of that research still managed to yield such an inaccurate final product!
Will you make it again? I want to make another strictly costume-y hanfu at some point in my life, just because they're pretty, but who knows when that will actually happen.
Total cost: $5 ($3 sheet, less than $2 for the binding)
Final thoughts: I'm not sure how I feel about it yet. I'll hold off on making concludions until I make the rest of the outfit, but for now, the excessive green reminds me of one of my favorite Chinese movies, 十面埋伏

The whole movie is beautifully colored, but I especially love the vivid, almost neon green scenes in the bamboo forest.