Thursday, August 23, 2012

Guest Post: Brooke of Custom Style!

I'm drinking tea in England, but that doesn't mean things are going to be quiet over here at Cation Designs! I've got some spectacular guest bloggers filling in for me over the next two weeks. Next up is Brooke, who has my dream job: she's actually a professional costumer! I first met her through the VPLL's 1912 project, and somehow we just hit it off! She is so encouraging, and I get warm fuzzies every time I read her comments. Seriously, people, not everyone who works in fashion professionally has to be a jerk: learn from Brooke! Anyway, she's giving us all a glimpse of her glamorous world today:

Hi, everyone! I’m Brooke. *wave* You might recognize me because I’m usually hanging out in the comments here on Cations Designs. First, I’d like to thank Cindy for giving me the honor of posting to her blog! She’s the first (and possibly the last) brave blogger to trust me with her readers. (I’ll try not to run off any of your followers, Cindy!)

Let me explain my back-story – no, there is too much. Let me sum up.

I live in the Dallas, TX area and I’m a professional costumer in the film and television industry but began my career in a theatre costume shop. My little corner of the blogosphere is called Custom Style – which started out as a free version of my previously unsuccessful website for my home business and has slowly morphed into something a little more fun as I’ve learned what people enjoy reading.

I love Cindy’s blog because I’m a sci-fi/fantasy geek who loves retro style and sewing. I’ve worked for Barney & Friends (aka “The Purple Dinosaur”), so since this is Cation Designs, I suppose you could call me “The Purple Sewasaurus Rex," hehe.

Anyway, enough about me – let’s talk about sewing and stuff! =)

In keeping with the theme of “travel” while Cindy is off enjoying a good cup of tea (so jealous – I love London!), she has suggested I explain how I pack what I need when I get a call to be a traveling seamstress.

What I take varies from job to job, but I often need to travel with my own kit of supplies, whether I’m sewing or simply working as an on-set costumer. When I get a call to work as wardrobe crew during a shoot, I always take my work apron, which I made to hold the bare essentials I always need to keep actors’ clothing looking camera ready.

My custom-sewn on-set apron. It’s been used and abused for years – I think it’s time to make a new one.

It holds a small water bottle, scissors, double-sided tape, tiny sewing kit, lint roller, various sponges, Sharpies, pencils, pens, Wet-ones, some other things, and the daily shoot schedule paperwork. If I need to carry a walkie-talkie, I clip it to the apron’s belt and use my personal ear-piece with mic. And I carry my work camera in the pouch on the belt (costumers take lots of continuity shots on set).

Apron contents: The standard size Altoids tin is my small sewing kit, and the smaller Altoids gum tin is the perfect size for my double-sided tape. There’s even a “secret” pocket for my chapstick & emergency hairband.
I also wear a lanyard around my neck, which holds a wad of safety-pins, folding scissors, and an itty-bitty flashlight.

When I’m working in an actual costume shop, I might only need to bring some good scissors.
Sometimes, I might only need to bring myself. And other times, I might need a basic sewing kit
with pins, needles, scissors, ruler, chalk, etc. 


My basic sewing kit. It’s a plastic tool box I bought years ago in the hardware section of Walmart.

Then there are the times I have to be a one-man-portable sewing shop. For those jobs, I have to take everything from my sewing machine to my iron – and hope I have everything I might need to do whatever a designer throws at me. (I don’t usually know exactly what I will be sewing and/or altering until I show up the day of.)


This is what I took to my most recent job. The brown box is the perfect size to hold my machine and I can stack my basic sewing kit and iron (in the little IKEA bag) on top, and the tabletop ironing board fits behind the stack on the rolly-cart.
(Like a smart human, I always carry a towel. *grin*)

And to wrap up my post about sewing travels, here are some of the fabrics in my stash that have a London/travel theme:


My favorite is the “Tube Map” fabric – I’m currently trying to decide on a dress or skirt style to make with it. For some crazy reason it was labeled as “Road Map” but I know the London Underground when I see it!

I hope you and your husband have a great trip, Cindy! And maybe you will catch some Star Trek reruns in German on the telly – it’s hilarious because everyone sounds like they are speaking Klingon. =)


Oh dear, I don't watch Star Trek, Brooke! I'm sorry, but I'm all about Star Wars...we can still be friends, though! Thanks for showing us what a professional sewasaurus rex arms herself with -- these are definitely not the two piddly arms that most T. rexes have! And you'll have to excuse me, but I might just have died from jealousy over that Tube Map fabric!

Wednesday, August 22, 2012

Guest Post: Neeno of Sew Me Love!

I'm drinking tea in England, but that doesn't mean things are going to be quiet over here at Cation Designs! I've got some spectacular guest bloggers filling in for me over the next two weeks. First up is Neeno, who I first "met" over our mutual love and admiration for a certain dress pattern, as you'll see. Neeno makes dresses with absolutely gorgeous insides, and I can't believe she's only been sewing for less than a year! She's already been in the newspaper, and I can only imagine where she'll go next!


Hello to Cation Designs followers!

I am so excited to be guest-posting on Cindy's blog!

I have been an obsessed follower of Cation Designs since I started reading sewing blogs around this time last year when I took up sewing. I also have my own blog: www.sewmelove.com. Warning: lots of girly floral, dresses and pink over there!!

Cindy is a big sewing inspiration to me. I love how she can take a thrifted bedsheet and turn in into a wonderful dress. We both share a mad passion for hacking the McCall's 5845 pattern, so I thought it would be fitting if I made a dress using this pattern for my guest post.

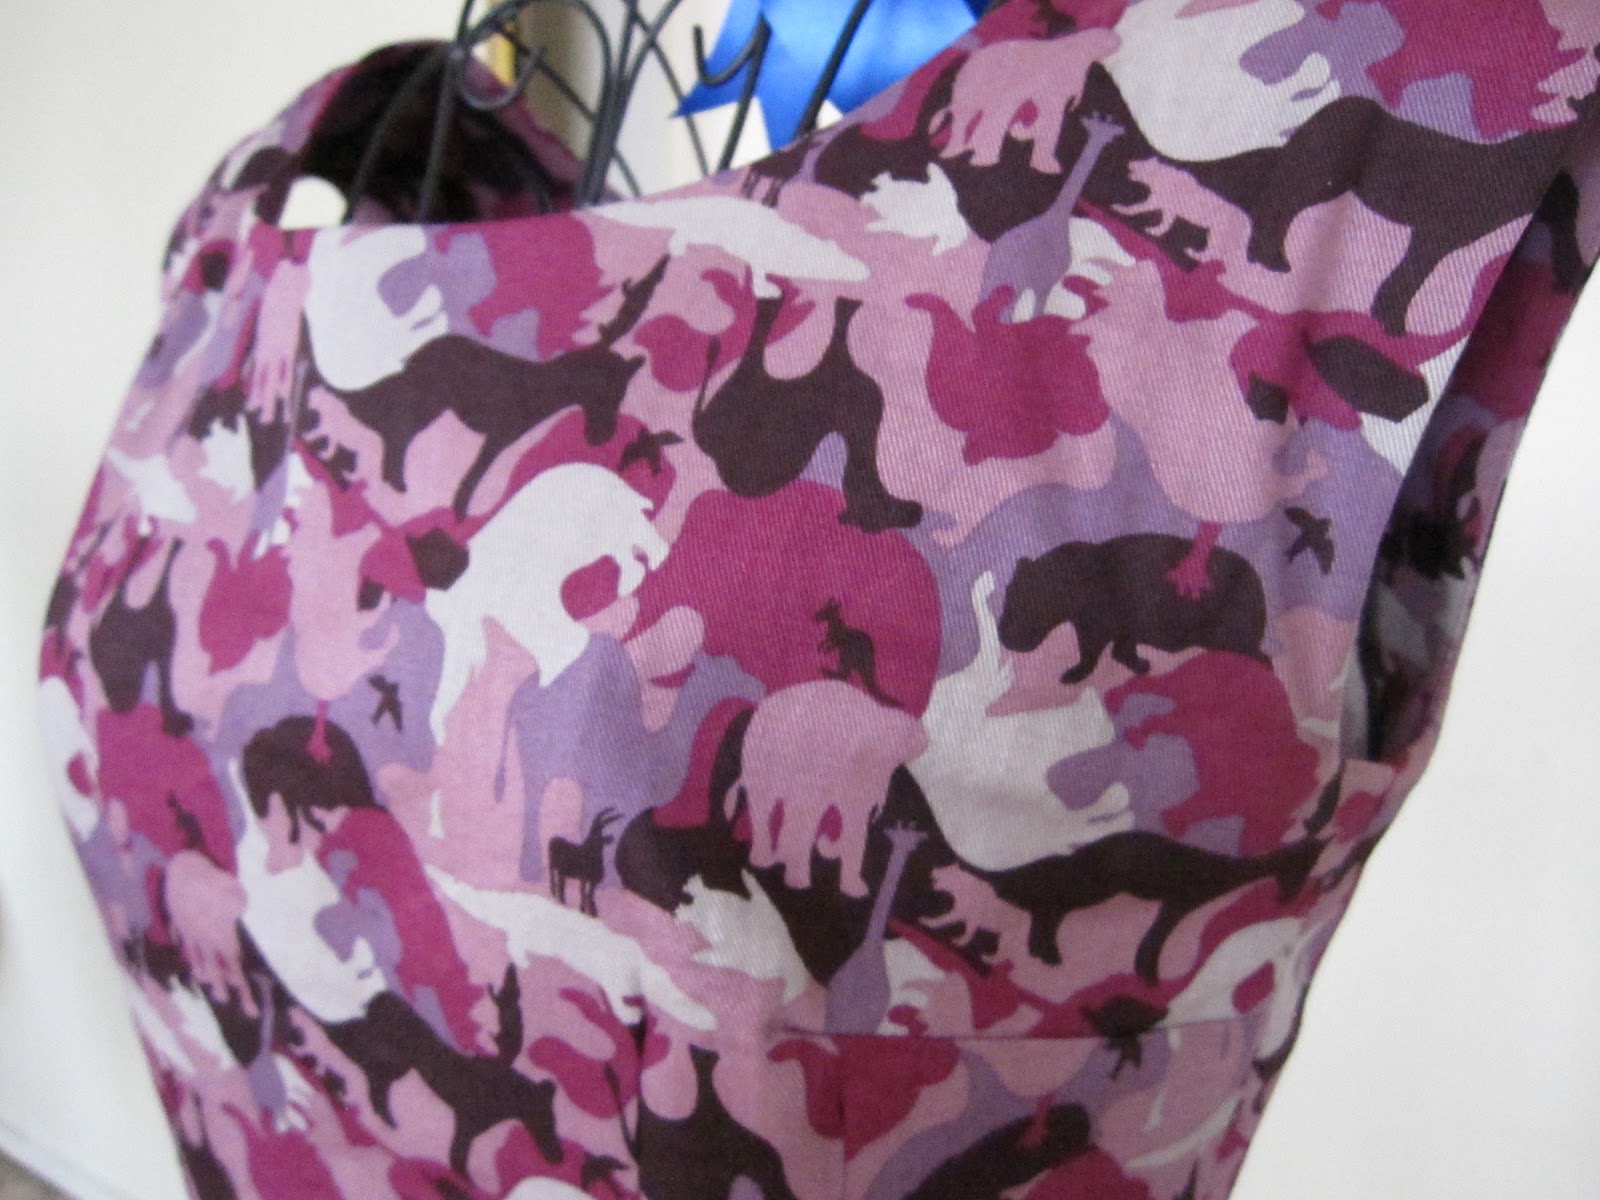
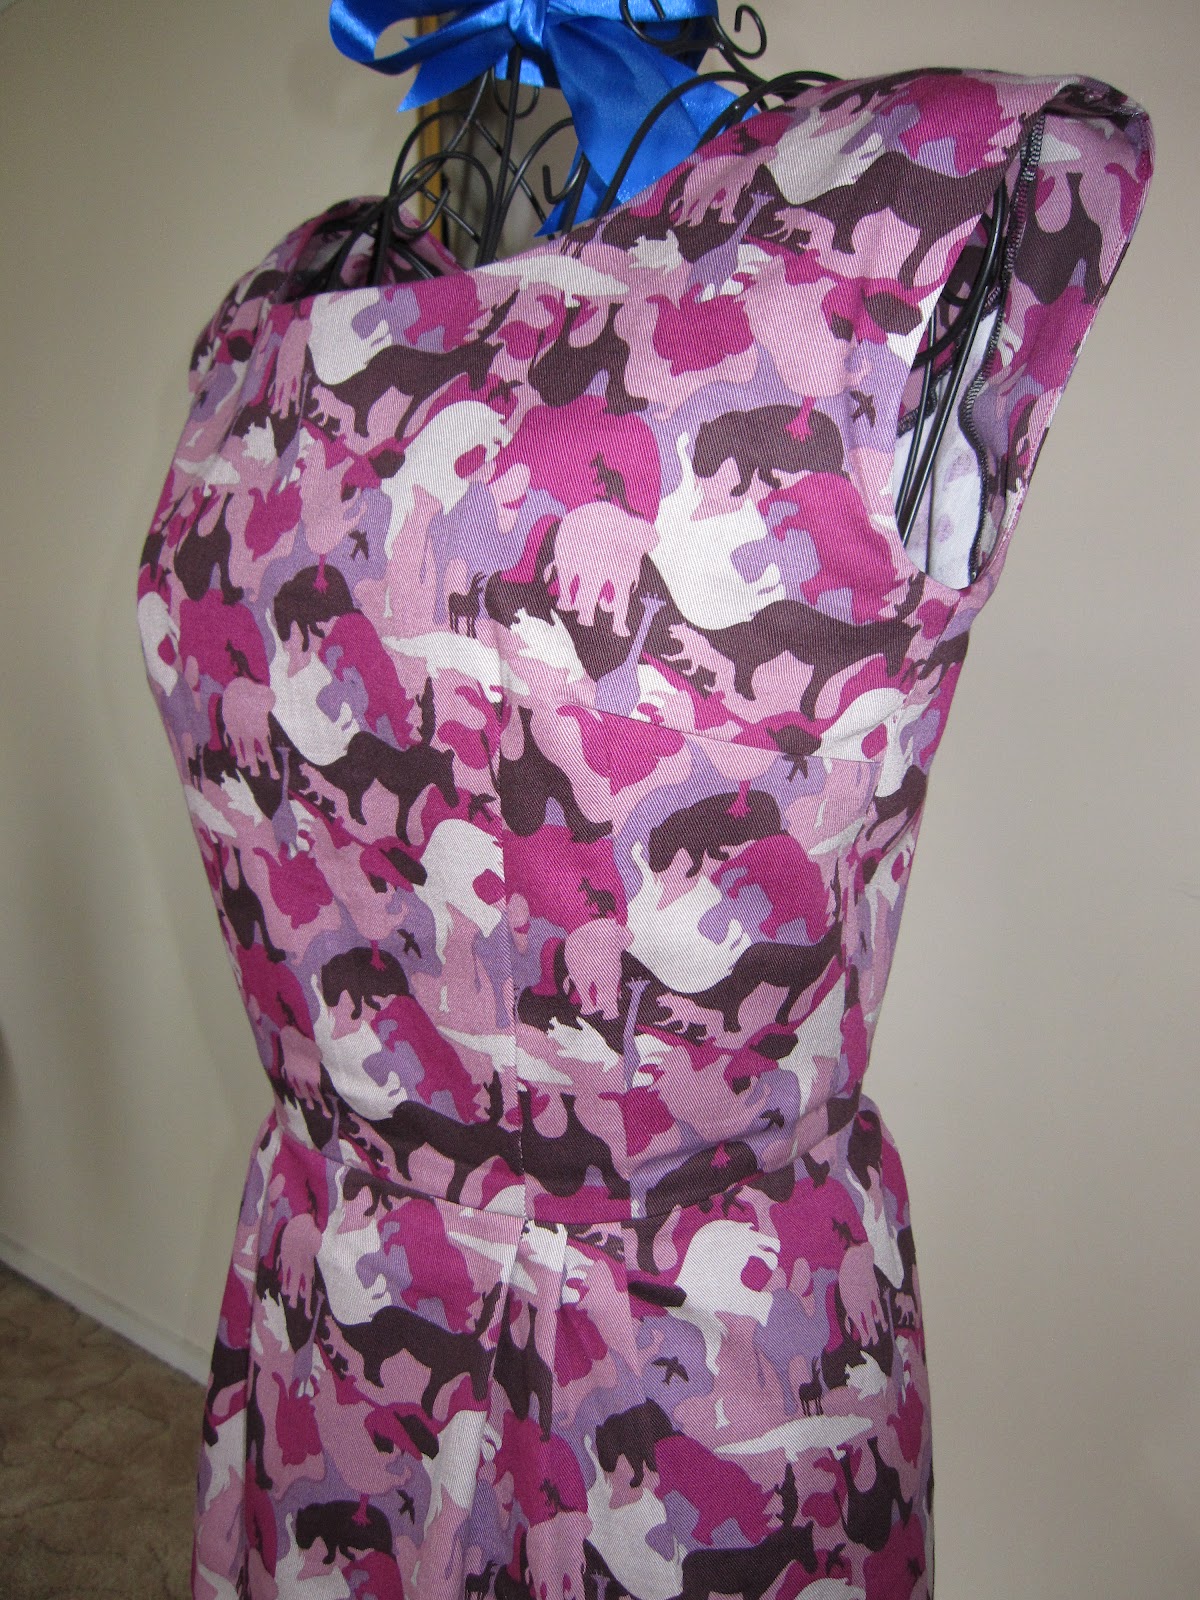
Inspired by the "Anthropologie Inspired: Hooray for Hippos Dress" post by Cindy I have made a dress using childrens animal-camo cotton drill. I bought this fabric months ago simply because it was on sale -- I had absolutely no idea what I was going to make with it or where I could wear animal-camo to!! But wear it I did, on the weekend to brunch on trendy Chapel St in Melbourne, Australia. I never felt cooler.

Hip(po) Camo Dress!

Upon closer inspection, I am not sure if there are any actual hippos on the print, but I can definitely see camels, elephants, giraffes, alligator, birds.. so I'm confident there is a hippo hiding out in there somewhere!!

Can you find the hippo??? What other animals can you see?

Let's start from the beginning...

After accepting Cindy's invite to guest-post, I thought long and hard about what to write about... I haven't been sewing that much lately at home on my own, lacking motivation, but one quick peek at Cindy's blog and I got my mojo back. I rummaged through my fabric stash and found my animal-camo and got started on the dress.

My objectives for this dress:
  • use a pattern that Cindy and I both love
  • be thrifty
  • make the dress in 5 hours or less
I set myself the goal of 5 hours because that's how long it took Cindy to finish her Hooray for Hippos dress, and because this was a TNT pattern, I knew I could do it - I've made this dress in about 6-8 hours in the past, but this time I wanted to finish it sooner and wear it the next day to brunch :D

 
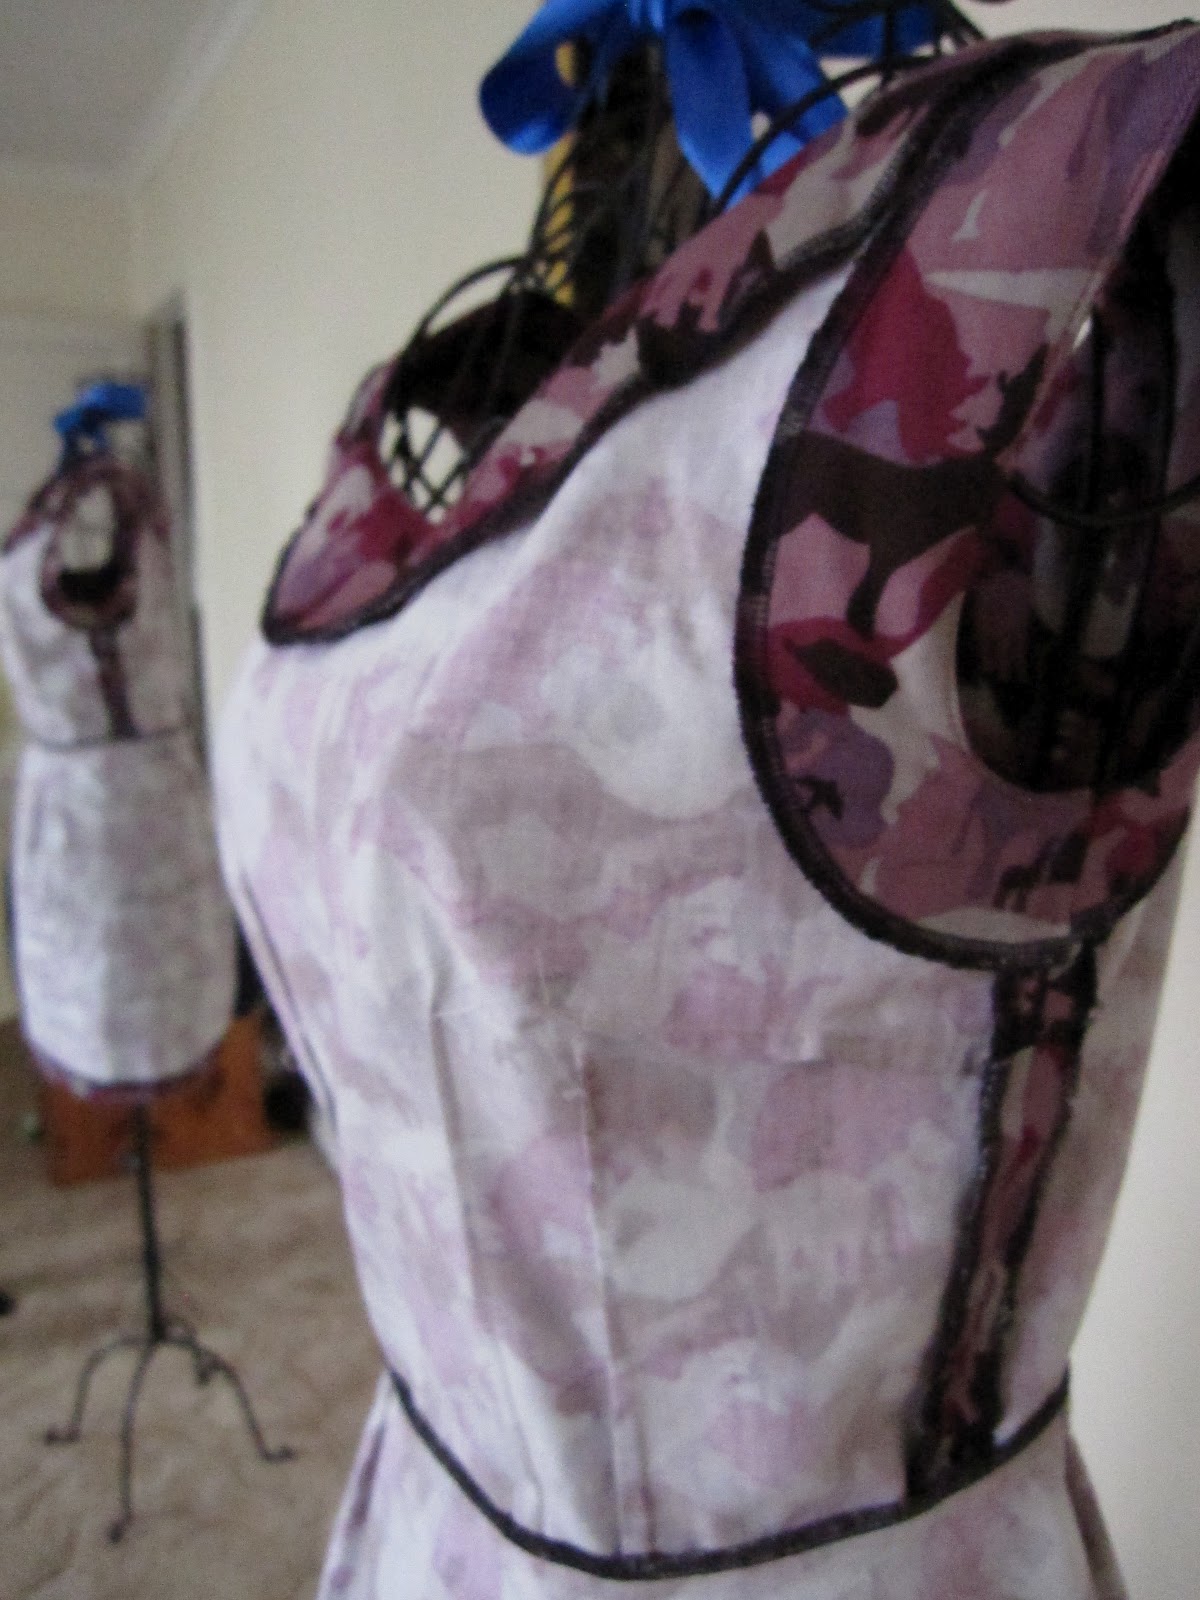
I love understitching... can't believe I used to skip this step! :/
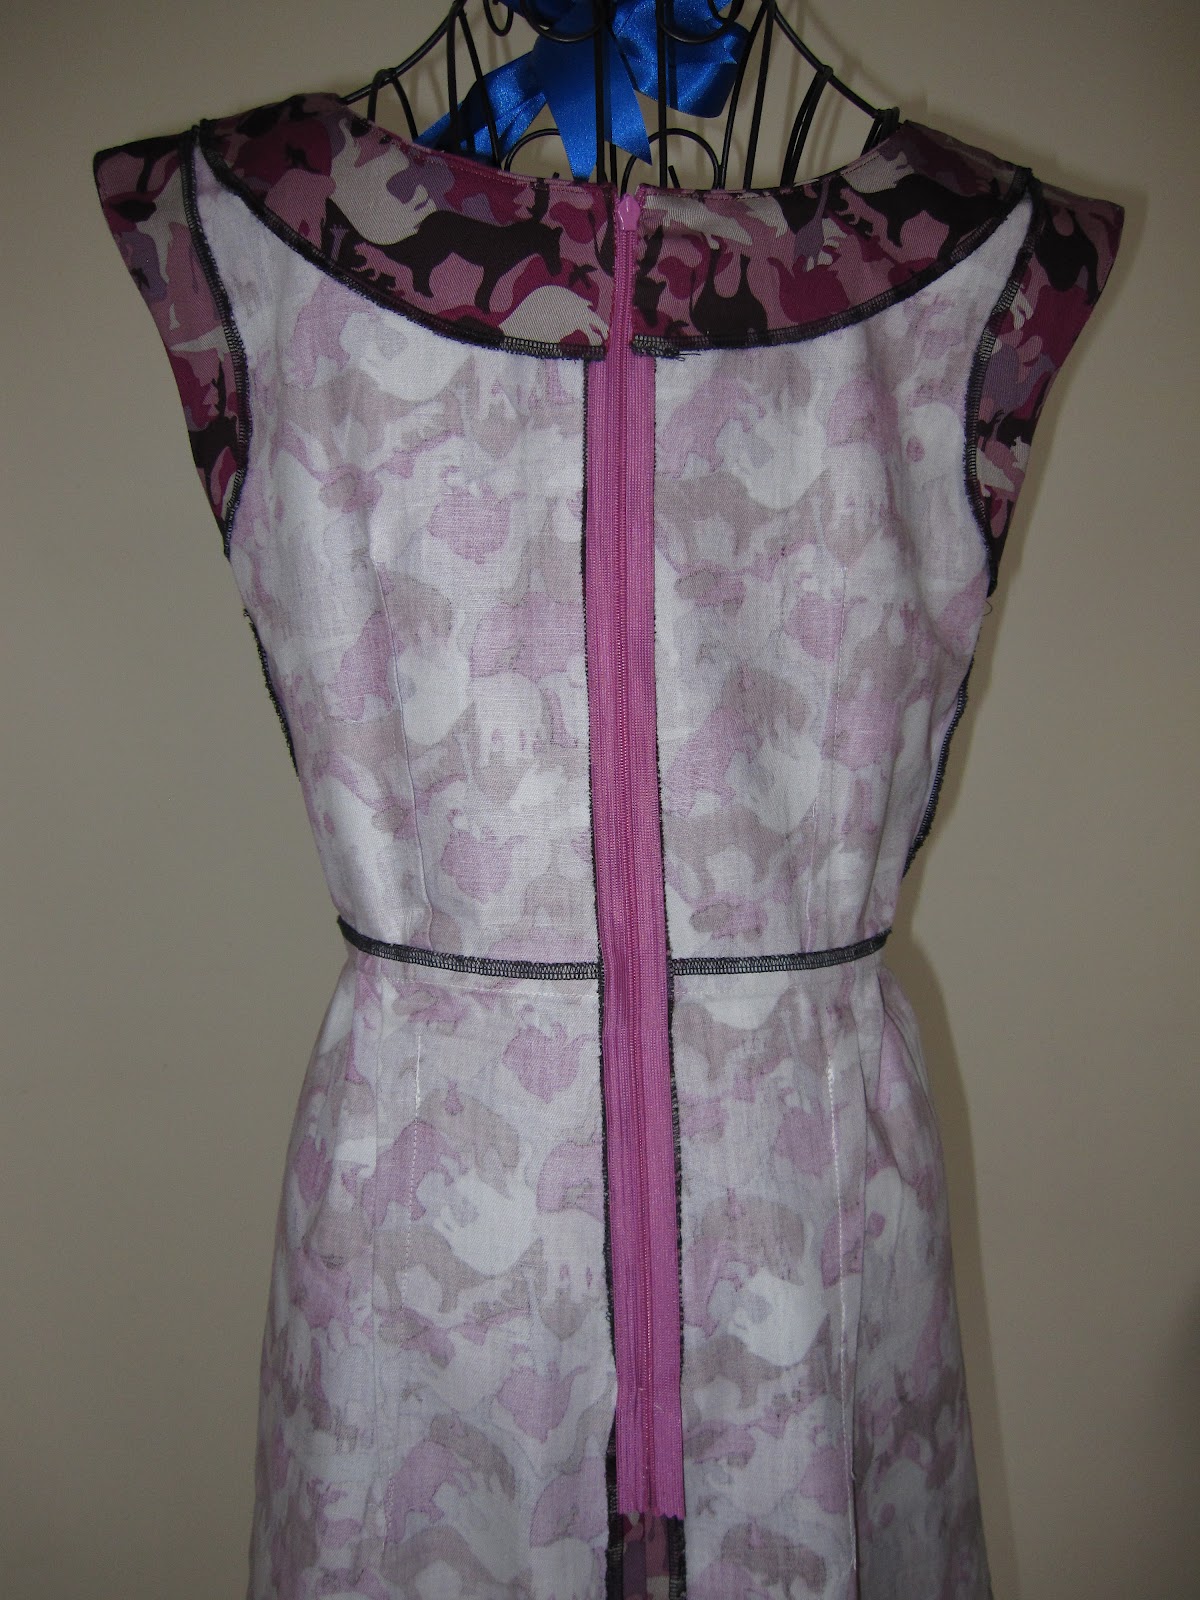
This is the second time I have drafted my own facings for neck and arms. Usually I fully line my dresses, but this cotton was thick so I felt protected in it, plus I wanted to be thrifty - lining can easily add another $10-$20 on top of the cost, damn sunsilky lining (treated, breathable polyester) the best lining to use hardly goes on sale.

I'm impressed that this cotton drill doesn't crease, I took these photos after wearing the dress all day. It is also easy to iron, which is a bonus for me cos I suck at ironing!

The pattern I have semi-used is the McCall's 5845. I have used the bodice and modified the front and back neck - lowered the front slightly and raised the back to a scoop. I should've made the back a lower scoop so it's easier for me to reach around to zip and unzip, but overall I'm happy with how the mod turned out.


The skirt is a simple panel of fabric 50cm long, cut on the fold. I put a few pleats here and there. The back of the skirt looked a bit odd and puffy with pleats so I turned two of the back pleats into a long dart.

Thrifty: Zipper was from my stash! 

It's amazing how much work you can get done when you are inspired and motivated. I couldn't wait to get started on this project. I started this cutting this dress at approx 19:45 on Friday and finished handsewing the facings and hems at 00:30 Saturday morning. I made my 5 hour deadline all thanks to Cindy's inspirational blog.

Haha, oops don't know what happened to the back facings!
Still need to improve my handstitching.

Pattern Review:

Pattern: M5845 bodice, with mods. Self drafted skirt with mini pleats and back darts.
Skirt info: Panel of fabric 50cm long, cut on the fold. Pleated to fit the waist.
Size: 6 bust, 8 waist.
Fabric: 1.5m cotton drill
Notions: Invisible zipper 18", Gutermann thread
Time: 5 hours
Cost: Practically $0 since the fabric, zipper and pattern were from my stash. From memory the fabric was on sale... lets say it was $5 plus $3 zipper... $8! Woot woot! 
Adjustments: 
    • Lowered the front neck
    • Raised the back to a scoop 


I have only worn this dress once, but I think it's already a favourite. I find I always love the dresses that take the least time and effort to whip up. Instant gratification!

I never thought I would make a dress using animal-camo fabric - let alone wear it in public! But honestly, I felt so awesome in this dress! Nice change from all the floral dresses I make. I really like it!

Big thank you and giant hug for the inspirational and absolutely fabulous Cindy of Cation Designs for inspiring me to make dresses that are not ordinary and for the opportunity to feature on your blog.

Love your work!

xoxox Neeno


Readers, I am honored to have inspired this animal explosion of a dress. My husband makes fun of me for loving prints-that-don't-look-like-animals-until-you-get-closer, and this dress definitely fits that. Seriously, if I weren't in the wrong country-that-honors-the-queen, I would steal this dress from her. Thanks, and look out if I ever visit the land of Oz, Neeno!


Tuesday, August 21, 2012

Gallivanting About the UK!

Imitating the puzzled top lion's expression during last year's trip.
By the time you read this post, I will be either on the plane to, or already in, the grand city of London. Yes, that's right, a week into the school year, and I'm on vacation already! This is our last opportunity for a big trip before my husband goes back to school, and we are revisiting the city we fell in love with on our honeymoon/one-year anniversary trip. After our good food, castle and history-heavy trip last year, our appetites for Old World travel were whetted (it was my first time in England and France, and while I've been to Greece before, it doesn't have quite the same feel as all those cathedrals and palaces), and we kept talking about going back one day. Well, Mr. Cation's dad graciously donated his unused miles to us so that we could take a nice trip before school started up again in earnest; it was just enough to get us back to London! We're also taking a train ride over to Edinburgh to see still more castles and museums, so it's going to be a packed couple of weeks for us.

While I'm off having tea and crumpets with Jane and Debi, some of my lovely sewing blogger friends will be stepping in for me here at Cation Designs! They will be sharing their insights, humor, and awesome-sauce (is that at all like clotted cream?) for your reading pleasure. I'm so thankful to have such great friends in the sewing blogiverse! Here is the amazing line-up for the next two weeks:

8/22: Neeno, of Sew Me Love
8/23: Brooke, of Custom Style
8/24: Tina, of Down the Retro Rabbit Hole
8/25: Devra, of Puu's Door of Time
8/27: Justine, of Sew Country Chick
8/28: Andrea, of Four Square Walls
8/29: Meg, of Meg the Grand
8/30: Leah, of Struggle Sews a Straight Seam

I told you it was an all-star line-up! Thank you so very much for helping me out, ladies. Readers, believe me when I tell you that you're all in for a treat. And can I just say that arranging for guest bloggers is way more fun than writing up substitute lesson plans? Also, if any of you want to meet up with me in either London or Edinburgh, let me know! I can't make any promises, since we've got a packed itinerary, but you can bet I'll be spending a day at the V&A, oohing and aahing over the pretty pretty textiles...come find me!

You'll find my puddle of drool in front of this gown.

Monday, August 20, 2012

Free Sewing Pattern: Dolman Sleeve Top


The line drawing, if you can even call it that, it's so sketchy.
Here it is, as promised: my dolman-sleeved knit top! As I mentioned before, this is part of my Remaking and Replacing the RTW series; I'm slowly going through my ready-to-wear wardrobe and trying to replace some of the most well-loved (read: falling apart, pilling, and stretched out beyond recognition) pieces with me-made versions. This top was meant to improve on a cheap orange top that I bought a couple years ago from a random Asian boutique (like Forever 21, except that I'm a size large since all the clothes are meant for tiny petite Asian girls) near my house in San Francisco.
My pattern for this top was easy to draw up; I just needed to take a few measurements and figure out how much longer I wanted the sleeves and torso. Sewing it up is easy too -- if the knit is behaving I can be done, from cutting to final wearable garment, in about 1.5 hours.

Since drawing up the pattern, I've already made three incarnations of this top, and I wear them constantly! This style is so versatile, just a little girly while still providing the range of motion and comfort and layerability that I need here in the city. I like that it's blousy enough to accommodate a cami underneath, but fitted enough that it's not too bulky under a coat. And I've made it in three different types of material, just so I can be sure it works for sweatshirt material, tissue-like knits with very little stretch/recovery, and extra-stretchy, stable knit with some spandex content. Final verdict: it works for all of them!
Aqua version in some mystery blend sweatshirt material from a discount fabric store in Oakland Chinatown, $2. Warm and vaguely sporty, but less sloppy/boring/I've-given-up-looking than a real sweatshirt.
One of those ultra-flimsy, thin cotton knits with relatively little stretch/recovery, in a cute purple/fuschia floral. Check out how real the neckband finishing looks! The dolman sleeve isn't very obvious when my arm is down, but it provides for some lovely air circulation when it's warm outside, as it was when I took these pictures in the East Bay.
Probably my favorite version, and also my last version, in a very busy blue/tan floral print knit with some spandex content, as it is very stretchy (but also very stable). From up close, the flowers look a lot like the meeples from Carcassonne.

Once I drew up my pattern and realized how easy it is, I decided I should try my hand at grading my pattern for different sizes. Thankfully, Casey of Elegant Musings just did a series on pattern grading. I looked up the size charts of several RTW companies just to get an idea of their measurements for XS-XL, then cut and expanded and redrew my pattern piece. Yes, that's right, pattern piece, singular. I hate it when printable patterns take dozens and dozens of pages to print, not to mention taping all the pages together...so I made mine fit on just eight pages, although you'll still need to follow the directions for cutting rectangles to finish the neckline, sleeves, and hem. And in the spirit of full disclosure, I should let you all know that I've only tested the small size; sew any of the other sizes at your own risk! I mean, I'm pretty sure they should work, with maybe some small adjustments for your particular body type, but hey, it's a free pattern, what do you expect? ;) Anyway, if you sew this up, please drop me an email or comment to let me know! I'd love to see how this works out for you, and if there are any issues that I can fix.

[ETA: As it turns out, apparently my arms are ultra-spindly, as several people have said that the arm bands needed to be widened significantly. Okay, point taken, I need to work out more before I draft more patterns based on my own measurements! ;) Also, apparently the neckline can be a little wide -- even a tiny bit of stretching out might make it unwearable. I always knew I had wide shoulders (it's one of the things I can reliably count on my grandmother to comment on), and the pattern is meant to just barely cover my bra straps, so it's totally understandable that this might be too much for some/most people. So take note, it might be a good idea to cut the neckline smaller and then enlarge it later if necessary. If you've had the misfortune of already cutting it too wide, might I suggest a center pleat to bring it in?]

Instructions (with a color picture tutorial, no less!)

Pattern (hand-drawn, since I don't know how to do this on computer, in XS-XL)

If you saw the colorblocking of the inspiration top, you'll obviously realize that I didn't bother with that in my remakes. I didn't have any solid-colored knits to work with, but if you want to try it, just cut the pattern piece into three separate parts, as shown below, and just add seam allowances before you cut and sew your fashion fabric.

On my inspiration top, the sleeve and hem bands, neckband, and upper right quadrant were all orange,
and the other sleeve was white and the bottom left section was gray.

I'm not going to write up my usual summary, since I've already listed the fabrics and time and skills required either in the picture captions above or in the instructions. And my final thoughts are that this pattern is quickly becoming my favorite, and that several people who are not my husband have already commented on the cuteness of this top, which I think is a positive sign. I think this is a good start to R&RtRTW, unwieldy abbreviation notwithstanding!

Showing my excitement with a jumping picture, inspired by all of Leah's.

Sunday, August 19, 2012

Remaking and Replacing the RTW


Over this past summer, I've noticed something unfortunate about my me-made wardrobe -- I don't wear bright, printed sundresses when it's cold! This wasn't a problem when I lived in SoCal; San Diego and TCOCC are practically made for a closet full of sleeveless dresses. But San Francisco, that's another story. When 55 degrees Fahrenheit and mistily gray is the norm, I am much less likely to throw on one of my multiple sheet dresses. Instead, I gravitate towards jeans and a comfy top that adapts easily to layering. And much as I might try to tell myself that tights or leggings and cardigans and sweaters can transform a sundress into a fogdress, it's just not natural for me.

So if I'm trying to land in the Bay Area long term, it might be time to rethink the direction of my sewing. I've got a year to work on NorCal-appropriate cake before we move back up here (God willing!), aka a year to wear my sundresses as much as I can before retiring them. Which brings me to my new project for the school year: remaking and replacing my RTW clothing. I've been noticing which clothing items I reach for most often, and I am now resolved to draft patterns for them and sew up my own me-made versions. I already started when I made my not-a-Renfrew, which has had the honor of ending up in the laundry every week; I wear it all the time.

My next project is my dolman sleeve knit top:
With Tonks in front of what used to be a movie set for Gone With the Wind in TCOCC.
I wear this top whenever I need something that will fit under a sweatshirt or jacket, and it's loose enough that I can layer a tank top underneath for extra warmth. I like that the sleeves are shortened, so that I don't end up with lots of bulk at my wrists. On the other hand, I would prefer them to be longer, more 3/4 sleeve, so as to prevent my forearm from getting cold. I also find that it's a tad too short for my long torso; it always rides up as I walk around. This is a problem when I'm wearing RTW bottoms, which tend to sit lower, around my hips. Lastly, I'm not a huge fan of the aggressively orange color. However, the good thing about sewing my own clothes is that I can adjust for these types of issues!

If you saw my new school year resolutions list, then you'll know that at the top of my list is to sew more practical, wearable, everyday items. That's easy to say, and it's so non-specific that I'm afraid I'll talk myself into thinking that sundresses are cake. So this is my (even more) public declaration that I'm going to systematically go through my laundry bag and see what ends up in there, and then I'm going to sew up replacements. This will stretch me, since I already know jeans, cardigans, and yoga pants end up in there regularly. Much of it I hope to be able to draw patterns for myself, but for jeans I might need to cave and actually pay more than $1.99 for a pattern, just so I can try out the ever-popular, magical Jalie 2908.

I've already drawn up a pattern for the top pictured above and sewn it not once, not twice, but THRICE...and I've worn at least one each week! Pictures and *gasp* a multi-size printable pattern coming in another post! Although to be perfectly honest, I'll let you know that I haven't tested the other sizes, but it should work in theory...

While I love the idea of a Frock Out Night, it's so nice to sew things you know you're going to wear on a regular basis because you already do. Anyone else want to join with me in this? Grab the button!


Friday, August 17, 2012

New School Year Resolutions

Walnut is not impressed with the bow he has to wear
for back-to-school pictures.
Last August, I posted my resolutions for the beginning of the new school year. Well, yesterday was the first day of school (which is why it's been relatively quiet over here), so I guess it's about time to post a new project list! I did pretty well on last year's list, all things considered...some of the projects I just lost interest in and never started, like the halter dress or bookcase quilt (although I suppose I did start a scrap quilt, just never finished it). Some projects were so long overdue that it seemed pointless to start, like scrapbooking my honeymoon. Some projects were so huge that I couldn't think about starting them, like the t-shirt quilt. A lot of my checked-off projects only made it via the letter of the law, and not the spirit -- tea-dyeing lace comes to mind, since what I really intended when I wrote it was to dye something some vibrant color. And then of course, some items on the list were overwhelming successes, like making waaaay more than three vintage dress patterns!


Well, with last year's successes and failures in mind, it's time to make a new list of projects! This school year, I would like to make:
  • More cake. I'm leaving this vague on purpose, so that I don't have to feel bad if I don't make some arbitrary number. 
  • Something with bound buttonholes. 
  • Jeans. I think this technically falls into the cake category, but jeans are so huge (in my head, at least) that I think they deserve their own item. Specifically, I want to make skinny jeans with topstitching and fancy back pockets and everything.
  • A coat or jacket of some sort; really, I just want to make some kind of outerwear. I've got some red wool, but I may save that for when I actually know something about tailoring. I've also got some coral twill that is a bit light, but would make a fantastic summer blazer. I know, I know, by the time I get around to it, it won't be summer anymore and coral will no longer be in. 
  • A set of 1912 outfits, specifically a day dress, a suit, and an evening gown. 
  • Something to wear for the Gatsby movie. It's time to conquer bias-cut chiffon and all those interesting points and seams!
  • Costumes for myself and Elaine for the OneRing.net's Hobbit party. They'll actually be LOTR costumes, but I don't think anyone will mind, right?
  • A Loki-inspired cosplay outfit for Thor 2. Something along the lines of these pins.
  • A steampunk-y leather arm bracer like this, to hold all my little sewing tools.
  • A more or less 18th century gown with panniers. Kind of The Duchess-inspired. Notice that these items are getting more and more impractical/involved/unlikely.
  • Heck, as long as I'm at it, I would like to learn to build furniture so that I can make either an AT-AT or dinosaur-shaped raised cat bed for Walnut.
Well, that list list less specific than last year, but more ambitious. I also didn't even pretend to try finishing my stash. Let's see how far I get! Does anyone else make new school year resolutions? Does anyone else even think in school years anymore?

Tuesday, August 14, 2012

Sewing Blogiverse Love

It's been a fantastic last several days! The sewing blogiverse, which, while lovely and encouraging and all, resides pretty firmly inside my laptop (for all I know, everyone except Oona, whom I've actually met IRL, was created by an exceedingly clever spambot), suddenly intersected with my "real" life in a whole bunch of ways.

Both us wearing me-mades, too!
Last Friday, I was just browsing in my somewhat-local discount fabric store, when I pulled a 60" roll of knit fabric off of a high shelf. I'm not super coordinated, so when a nearby lady started staring at me, my first panicked thought was that I had hit her in the head with the bolt. But then she said tentatively, "Cindy?" And I replied in the affirmative, equally tentatively. Well, as it turns out, this lady was none other than Aleah of No Time to Sew! We read each others' blogs, and while neither of us lives in the city usually, we managed to run into each other over by the $2.39/yd fabric table. After much mutual exclaiming and laughing and gushing, we calmed down enough to snap a quick photo as proof to the world that "this lady whose sewing blog I read" is, in fact, a real person. It was so fun to be recognized out in the wild, and I am so glad to have had a chance to meet Aleah; she is such a lovely person! 

I love getting sewing-related presents, especially when there are bonuses!
Thank you, Leah!
And then over the weekend, I was so fortunate as to receive two packages on the same day, both packed with sewing goodies! I got my giveaway package from Leah of Struggle Sews A Straight Seam, which had not only the promised patterns, but some salmon-colored silk and seam binding as well! The other package was an unsolicited box of awesome from Meg the Grand -- yes, you read that correctly, it wasn't a giveaway or my birthday or anything; she just sent it out of the goodness of her heart. Seriously, the sewing blogiverse is populated with the most lovely people!


Isn't that dinosaur patch the best thing ever? I need to figure out what would be worthy of such an adornment. I also adore the sailor outfit and the pussy bow dress! Thank you so much, Meg!
Walnut also likes it when I get packages, as it means new playthings for him.

Walnut, that box isn't big enough for you to climb into.


And just in case I wasn't inundated enough with blog/real life intersections, yesterday night I had the chance to meet up with several other Bay Area sewing bloggers at a meetup hosted by Cañada College's Fashion Deparment. I was too starstruck to take pictures of all the fantastic hats and garments on display, but go check out Shams of Communing With Fabric's recap. I was kicking myself that I didn't have enough cash on hand to purchase Lynda Maynard's book from her directly so she could sign it, too, but such is having to pay for bridge toll all the time life. And I so wish I lived in the city all the time so that I could take millinery classes! It was such an inspiring evening, seeing everyone else's lovely couture garments during the show and tell portion of the evening. And I? What did I bring to share? Hah! A wearable muslin of a simple bias-cut dress, made from leftover Spiderman sheets. Thankfully, I grabbed my 1912 blouse at the last second while running out the door, so I had something slightly less juvenile to share with all of these accomplished seamstresses.
You can't see it here, but she was wearing this gorgeous, vibrant red skirt.


Many thanks to Amy of Sew Well for letting me know about this event! She is just as thoughtful and sweet IRL as she is on her blog. If anything, I find her more inspiring than some of the more experienced professional seamstresses who were there, since she's been sewing for about as long as I have, but has a much more balanced sewing portfolio to show for it. Hmmm, I guess I should get back to cake-sewing. Prom dresses and whales don't quite fall into that category!