Showing posts with label Qipao. Show all posts

Sunday, May 12, 2013

My Mother's Qipao

I admire my mother for so many reasons, including but not limited to the fact that she supported her family as a teenager by working in a garment factory, that she taught me to use a sewing machine, and made the dress of my dreams for my elementary school graduation. She's a gorgeous, strong woman, and when I was a child I used to watch her get dressed up for banquets and hope that one day I would be old enough to wear her dresses. Unfortunately, now that I'm old enough, I've turned into a fashion snob and have no desire to wear 80s dresses. Somehow, they never seem to mention that part in those sentimental YA novels about mother-daughter relationships. Still, there are a couple dresses from before I was born (the 70s fashions are much more acceptable to me) that she's kept, and when I was home last, I came across a silk qipao that I've seen before in her old pictures.

I love how deliciously vintage that couch is. 
These were taken back in Hong Kong. 

The qipao is actually made from a very thin and delicate material and the snaps are starting to pull at the silk a bit, but is otherwise in very good condition. I'm not usually a fan of pink and purple together, but I tried it on anyway.

I tried for the whole standing near a window thing. 
Also I didn't iron it beforehand. 
And I don't have awesome silver stilettos. 
So yeah, Happy Mother's Day, Mom! I celebrated by stealing your dress for some pictures. 

I love that I'm actually old enough now to wear this dress (she also found her wedding reception dress, but it's too late for me to wear that to get married in!), but I'm still sad that my favorites of her old clothing are long gone. Which brings me to my next long-term project (and it's going to a looooong one, since I'm in no hurry, I just like the idea of it): making my own versions of my mom's wardrobe from the 70s! I've got the wide-legged trousers covered, and there are a couple of bohemian-ish dresses that I love. Good thing there's no shortage of 70s patterns in my stash...

Thursday, January 26, 2012

A Brush With An Internet Celebrity and More Qipao Construction Pictures

Link.

I'm still kind of in shock.

From here.
In case you didn't know (what, the superhero dresses weren't a dead giveaway?), I'm a huge geek. Some of the things I geek out about are dinosaurs, clever webcomics, and dystopian future literature. So when a friend alerted me that none other than Ryan North, the creator of Dinosaur Comics and the brain behind the very awesome short story anthology The Machine of Death, tweeted a link to my Superman dress, I think I fainted a little inside. Seriously, words cannot describe how flattered I am. I think the only higher level of nerd crush would be Sheldon Cooper, who's not even a real person, so yeah, this might be the epitome of a swoon-moment with a celebrity.

Besides spending a good portion of yesterday floating on clouds, I also worked on my next Sew Weekly Challenge: Make This Look. To be honest, I'm not loving my dress. I'm wondering if I should just finish it so as to avoid having a UFO hanging around, or just move on to the next project. The psychology of sunk cost makes me feel like maybe if I just worked on it a little longer, I might end up liking it. We'll see.

Frog and snaps to close up top, zipper on the side.
Anyway, I also took a few more pictures of the insides of my qipao, just in case anyone was curious. I'm always wondering what the insides of garments look like, so I love it when other sewists post those detail pics. If anyone's thinking of making their own qipao, hopefully it will help them out with visualizing the pieces. That said, I'm also putting up these photos partially to shame me into making my insides nicer.

Nicely sewn snaps, not so much with the frog.
To give you an idea of how the side closed up.
Also so you can see how I didn't finish washing out the marker.
I really like how underlining feels, but am not so keen on how it looks, since the stitching on the darts is visible. Although I guess if I used white thread it would be better, but still. I guess I could put an underlining and a lining, but I don't fancy that many layers underneath. Oh well. Maybe I should just wash out that marker; that might help make the insides more presentable!

Or I could just go back to thinking about how something I sewed made Ryan North happy.

Wednesday, January 25, 2012

Finished Qipao Pictures, In the Mood for Love Style!


I think anyone who has ever made their own qipao/cheongsam has drawn some inspiration from the movie In the Mood for Love, which has Maggie Cheung wearing several beautiful, non-traditional pieces. Adey of the Sew Convert and Juebejue of Petite Republic both spotlighted several of the costumes from the movie, and they are indeed fantastic. Unfortunately, I have never seen that movie, nor, I must confess, do I have any particular desire to. But I can still channel the look in my pictures, right? My husband and I waited until sunset to do our shoot on the top of the parking structure, and I think he captured the golden glow quite nicely!


It's almost like a heart on my back! And on my butt, but let's ignore that part.
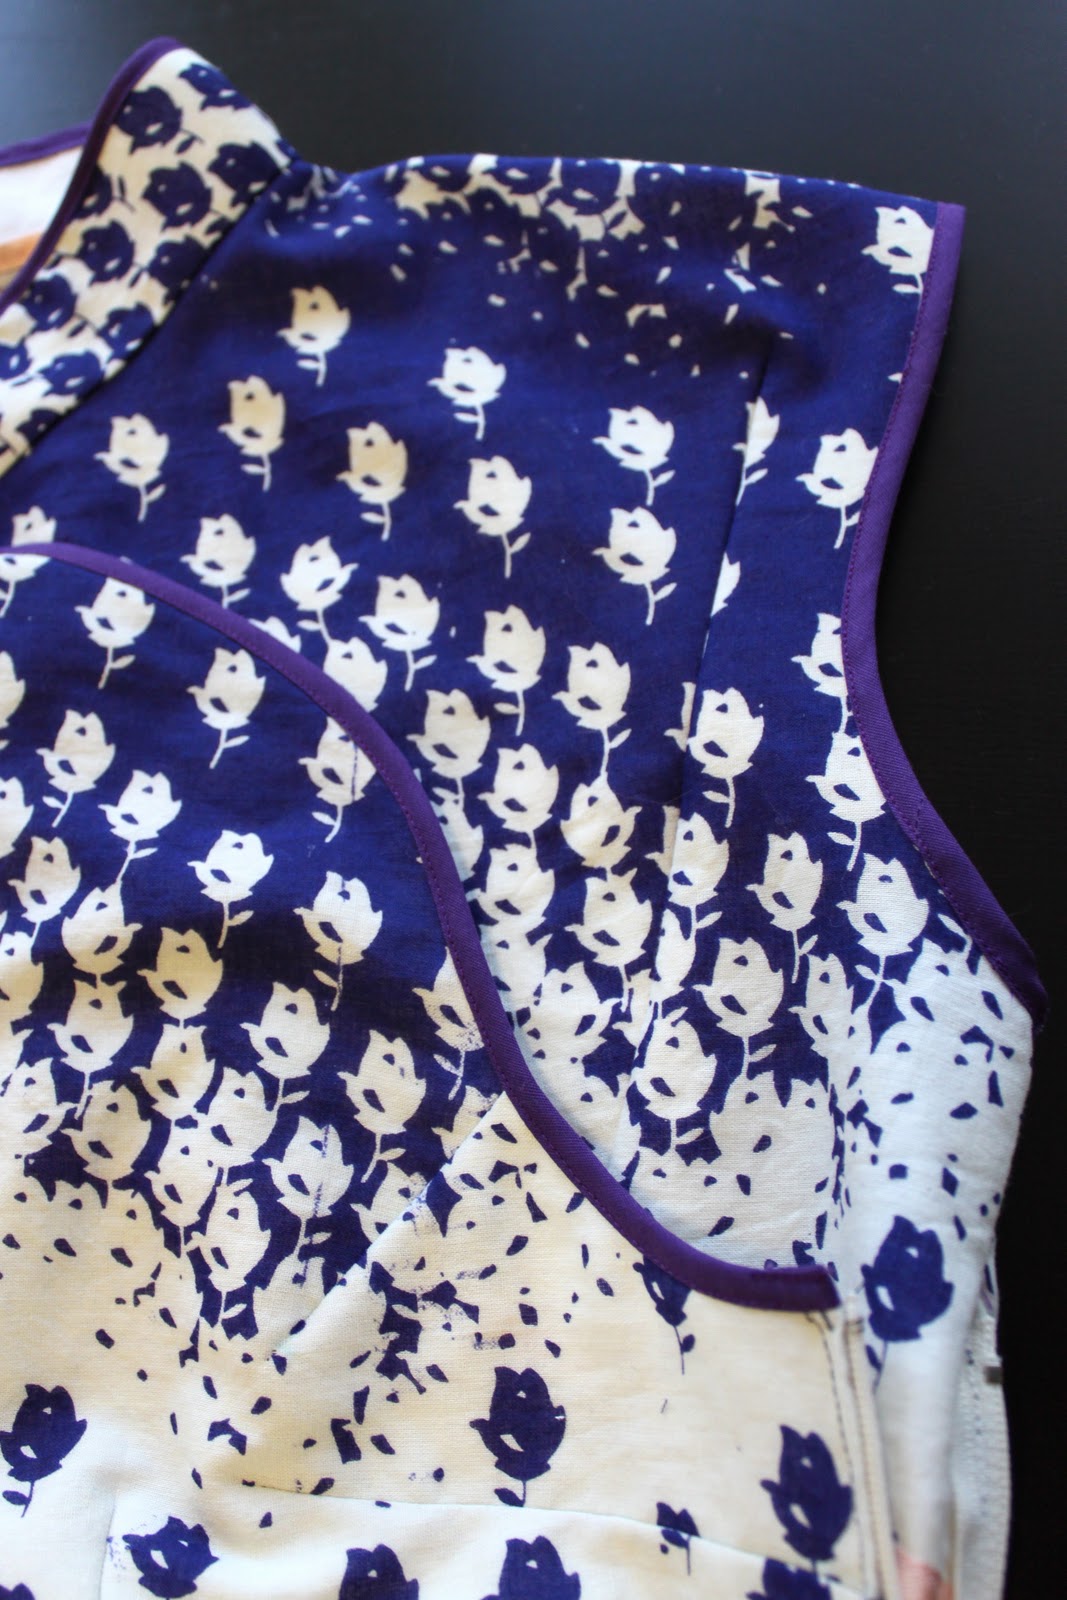
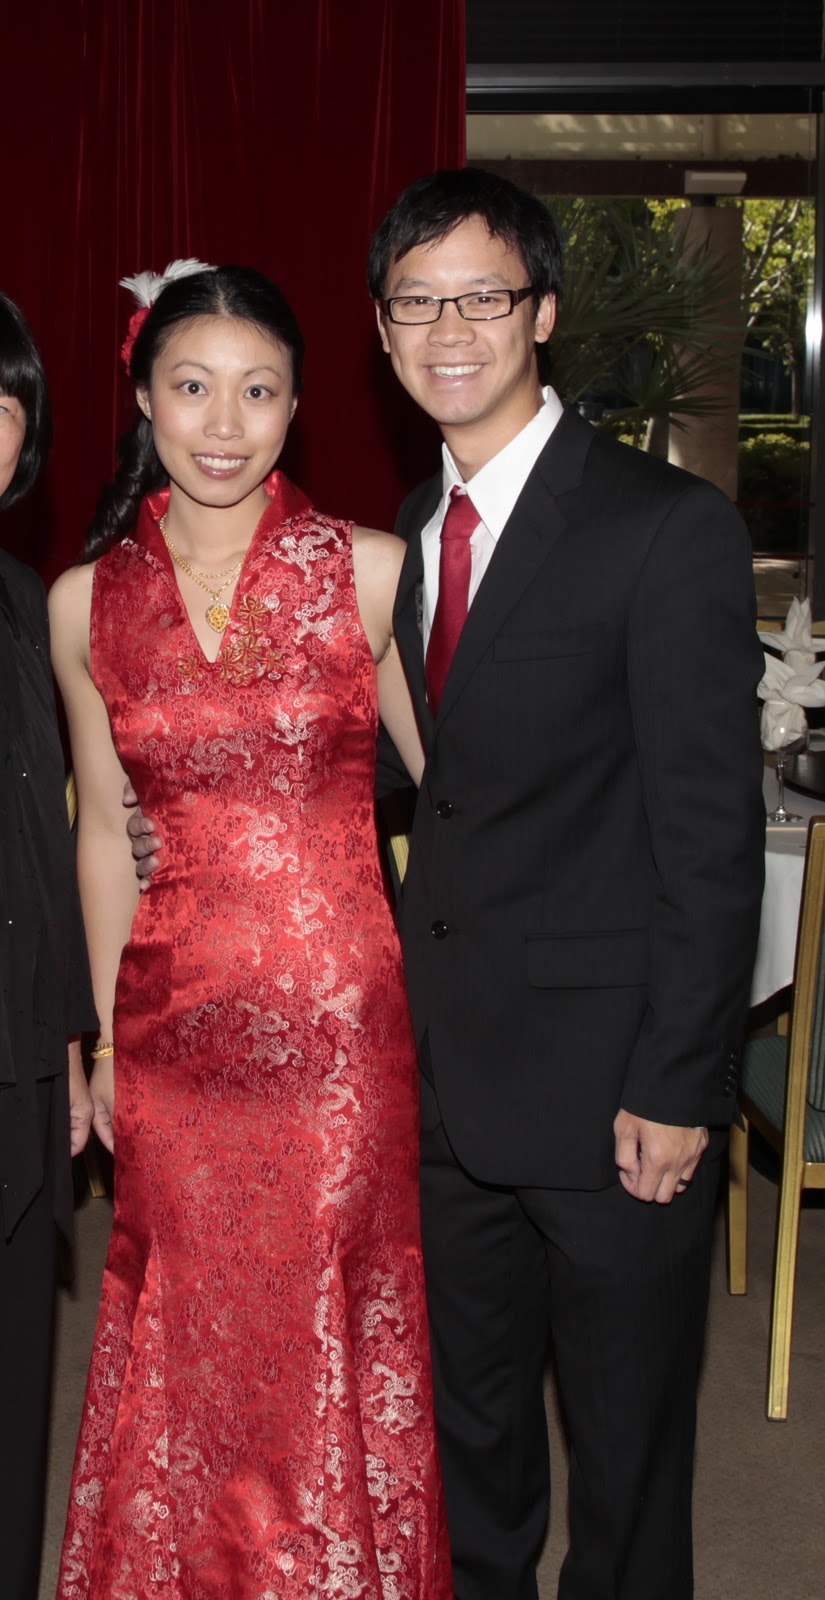
After the powder-blue brocade qipao I had in high school, and then the classic bridal red and gold brocade for my wedding banquet, I knew I wanted to make a more utilitarian, but still pretty, non-brocade version. Hence the Bangladeshi cotton from England. It's a bit hard to see the true colors in this shoot, but if you look back at my blog posts about the making of this dress, you can get a better idea of the lovely cream and indigo flowers. I was really pleased with how I placed the pattern in the front and back, so that the ups and downs of the flowers matched up nicely with the darts. I didn't have enough fabric to match it on the side seams, but oh well.

I'm not going to say too much more about the construction, since I've already blathered on about it at length, but I'll add a bit about the fit that I didn't notice before. The side zipper tends to produce an awkward bubble unless I keep tugging the dress down, but it's not too big of a deal, since, as my husband thankfully reminds me when I'm ready to relegate a less-than-perfect dress to the back of the closet, no one will notice except me. And other seamstresses, but that's beside the point. I am happy to report that I can sit down in the dress, although since it's thin cotton it does wrinkly something fierce. I tried to strike a balance between being able to walk, and being able to wear this to church, in determining the length of the side slits. None of that scary up to the underwear slittage for me, thank you.

You can see the awkward bubble under my arm. You can see the awkward face I'm making, too.

That slit's not scandalous at all, right? Although the non-matching side seams might be.

Summary:
Fabric: 2 yards of 40" 100% cotton for the shell (barely enough, with my mistakes!), pre-washed muslin for the lining
Notions: 1 package purple bias tape, several tiny snaps, a 14" cream polyester zipper
Hours: Hoo boy. I'm going to say...at least 15.
Techniques used: Making frog closures! Which was the whole point of the original Sew Weekly challenge that inspired this dress -- the challenge of buttonholes. Do azn buttonholes count? Also, I don't know that this is a technique per se, but I've never done so much darting/fitting as I sew. This dress also marks the first time I've sewn/used snaps. Ever. I love them so much; I think I'm going to try replacing the side zipper with snaps next time I come across a vintage pattern with a side closure.
Will you make this again? Not for a long time. By which point all the pattern modifications I made probably won't be relevant anymore. But really, I don't see needing a whole lot of qipao, even if they are made of non-brocade.
Total cost: $20 or so, since I don't remember the exact price of the cotton. But all the materials for this came from my stash, so I still feel pretty good about it.
Final thoughts: My husband says I look like a less scandalous version of Chun Li. Um. I guess I'll take that? Anyway, while it's still not perfect, I'm really pleased with the level of fit I was able to achieve for a self-drafted sheath dress. Also, it felt so great to be able to figure out the top/side portion by myself! After a week of wibbling, I now have a pretty decently fitting new qipao!

In the mood for...pushing down this wall.

Friday, January 20, 2012

Qipao Pattern Modifications

When you work with free patterns, or self-drafted patterns, but you don't actually have a lot of sewing or fitting experience, you're bound to end up making lots of changes as you put the garment together. These changes may or may not actually end up making it back to the pattern pieces, especially if you're me. Usually, if a garment requires that many on the fly changes, I'm totally sick of it by the end and swear that I will never make anything similar again. So those changes go unrecorded, and then when sufficient time has passed, I forget how horrible the experience was and try it again, only to end up with a headache because I know that the pattern wasn't quite right, but I don't remember what changes were required.

So to forestall all of that (because I think I actually might, in the future, make another, fancier one), and in case anyone approximately my shape is interested in the changes required for a more fitted qipao, here's a diagram showing my changes.

My notes are in red, obviously. Also, I just realized that I didn't note the armscye change in the upper front piece.

Thankfully, the busyness of the print disguises all the extra darting.
I added darts to both front pieces to help reduce bagginess/boxiness up top. Not sure if other people had issues with this, as there aren't exactly pattern reviews out there for this drawing, but I ended up putting in a tiny dart on the front flap to get it to curve over my bust area properly, and then another very long dart to take in extra fabric that kept poofing out on the top piece. As I mentioned previously, the back darts were too short, so I extended them to take in excess fabric. I omitted the sleeves, both because I didn't feel like dealing with setting them in, and because I want to be able to wear a cardigan over this without the awkward sleeve-bunching-up-underneath business. And, as I discovered later, it was good that I decided against them, as I needed the extra fabric to re-cut my upper front piece. I also ended up cutting off the bottom of the upper front piece, as it ended up being superfluous. It actually confused me for the longest time, because I thought it must have some import in the side closure. Lastly, I changed armscyes a bit to get a slight cap-sleeve look.


My modified dart. You can see the original blue washable
fabric marker lines...I should really take care of that.

If you decide to use this diagram to draft your own qipao pattern, it helps to have a form-fitting sheath dress pattern you can use as your starting point. I used my trusty McCall's 5845, but modified the four front darts to be only two. After that, it was just a matter of matching up my new darts on the bodice and skirt, then sketching a new curve connecting them.

I've finished binding the armholes and doing the side zipper, so it's just snaps and a hem, and then figuring out how I'm going to attach the frog. So close! I'll be (hopefully) debuting it at our dumpling-making party, and probably end up taking pictures covered in flour. Until then, 新年快樂, 恭喜發財, and may you or your children (or your cats) receive many red envelopes!

Our original family cat, Fenxi, makes a rare appearance on the blog. This is not his typical CNY haul, though.

Thursday, January 19, 2012

The End (and Chinese New Year) Is in Sight!

This was before I cut down the collar and added bias tape binding.

I'm getting more and more excited as this qipao starts looking more like a real garment! This is the most methodical and careful I've been about dressmaking in a long time. Or more like, ever. I've been really good about basting first to check for fit, instead of just sewing it up and then getting frustrated when I have to unpick the seam. I've been finishing my seams with seam binding, and getting better at it as I practice. Unfortunately, the insides still don't look that great, as the underlining is all marked up with washaway blue marker, and I didn't use white thread in the bobbin so the purple stitches are very, very visible. But at least it will hold up well in the wash! I've also been really thorough about fixing fit issues with extra/modified darts where necessary. 2011 me would have shrugged and left the tiny bulges and gapes, reasoning that it was good enough, but 2012 me is insisting on perfect fit! Let's hope it's not overly fitted...I've been waving my arms and such to make sure the fittedness doesn't prevent normal movement.

2011 me would have left that bagginess in the mid-back. 2012 me went back and modified the darts to take in some of the excess fabric.


Trying to figure out how the side came together was tricky. There's the upper front piece that's attached at the shoulder, but then the entire other side comes over it and buttons at the top. But how do the three pieces (back, upper front, and front) attach at the side? I was about to call my mom and ask her to find my qipao from when I was 17 and attempt to describe it to me over the phone, but then I came across this very helpful Etsy listing that shows the side snaps/zipper combo. 

I decided to bind the edges in purple bias tape, which I realize is not the same color as the deep indigo of the fabric. Reasoning behind this decision being that I have lots of unused purple bias tape leftover from this dress, and this is supposed to be stash-busting, and I don't foresee any future need for purple bias tape, and it doesn't look so bad, so I might as well. Also I couldn't think of another color that would go better.

Too blingy.
The only problem with this decision was that I couldn't find frog button closures in the same shade of purple. I went to several fabric stores, and after trying to explain to some of the more clueless employees that I meant Chinese knot, and not that-animal-you-dissect-in-bio-class buttons, failed to locate any that weren't shiny black, white, red, or gold. I toyed with the idea of gold, but decided it didn't fit with the whole made-of-cotton-everyday-wear look of my qipao. The annoying thing is that I know that the fabric store near my old place in San Diego had frogs of all different colors since it was in an Asian neighborhood. I'm pretty sure I remember seeing purple ones there. After briefly toying with the idea of making a trip to SD just to get the buttons, I decided that I should just suck it up and make my own. I mean, the whole point of this Sew Weekly challenge is to learn a new skill, right? These probably aren't quite the buttonholes that Mena meant, but oh well.

I sewed my bias tape into a tube, then proceeded to start looping it around to make the frog. I tried following these directions from the very informative blog Bridges on the Body, but the resulting loop was huge and way too overwhelming on the dress. It probably would've been better if I used thin cord instead of bias tape, but I couldn't find any cord that wasn't super shiny. I ended up just looping bits around and holding them down until they looked right, then stitching the center to make it stay. I did use BotB's directions for making the actual knot, then I continued with my loop-and-hold method to make the rest of the frog. I would like to try making real ones with cording sometime, since BotB makes it look so easy! But then again, I don't know if I would make another qipao that would require more frog buttons.

Pinned to the dress for now.

All I have left to do are bind the armholes, insert the side zipper, and hem. Barring some huge disaster, I don't see why I shouldn't have this finished in time for Monday. Although to be honest, I've been holding my breath waiting for a huge disaster, since one seems to inevitably strike in almost every garment I make.

Tuesday, January 17, 2012

Some Bumps Along the Way

Half sewn, half pinned, one whole hot mess.

Making this qipao is both easier and just as hard as I expected it to be.

Easier: I've never done fisheye darts in a woven before, and I had heard that they were tricky. Thankfully, I was pointed in the direction of a couple of excellent resources: 1) Sherry's excellent and comprehensive dart tutorial, and 2) this Threads video tutorial. And good thing, too, as I had no idea that the middle part (the fattest part of the diamond) wasn't actually supposed to be pointy. Thankfully, Sherry set me straight and I was able to make a nice smooth curve with no angular bits. Also, thanks to the Threads video, I am never tying off my darts again. I've tried the backstitching thing before and inevitably sew off the the fabric or out of the dart allowance, so I've always settled for tying them...no longer!

Weird random fading at the top.
Just as hard, but not technically the qipao's fault: I cut my upper front piece wrong side up! I only noticed after I'd underlined it that the color fades a bit; it's actually flipped. Thankfully, I had just enough fabric to cut out another piece. Also, I realized that I didn't make the neckline close enough to the neck, so I had to piece together a little triangle to my front piece. Thankfully, the print is crazy enough that it's not super-noticeable. I'll trim it down when I'm ready to actually attach the collar. Which reminds me, I should go interface that collar piece before Walnut lovingly deposits some hair onto it. One of my earlier skirt waistbands has a few of his hairs permanently sandwiched between the fabric and the fusible interfacing. At least I know where to get some of his DNA if pet cloning becomes a thing? Um. Right. 

Didn't I warn you it was a hot mess?


I've got one side seam done (it took several tries to get the curves just right), and am now trying to figure out how to do the other, more complicated side. I'm not entirely sure how the buttons/snaps/zipper all come together. I might just end up calling my mom to ask her. I've pinned the whole thing onto myself a couple times, though, and I'm getting excited! I really like the fabric, even if it's not silk brocade, and a sheath dress is just so flattering, even if I never sit down in this one. It's hard to know how much ease to leave for sitting. The last time I wore a qipao was a year and half ago, for my wedding banquet, and at the time I wasn't exactly paying attention to things like fit and ease.

Not entirely a traditional one, either, so I don't even have hazy memories of the side closure business. Also, we managed to go the entire night without any picture of only the two of us, so apologies to the auntie whose face/body I cut off.

Monday, January 16, 2012

Sewing My Own Qipao: The Saga Begins

I panicked when I realized that Chinese New Year is next Monday. I had grand plans to make a vintage 50s-styled shirtwaist dress for this week's Sew Weekly buttons challenge, but I guess frog buttons will have to do as a substitute! So here I am trying to make a nowhere-near-authentic qipao, aka a cheongsam in Cantonese. When I told my husband, he was skeptical (are you sensing a theme here?) -- where will I wear it, and you're making it out of that fabric? To be perfectly honest, I'm skeptical too. Here are the reasons why:

1) I don't have a pattern. Or even a RTW garment to work off of. All I have are these two diagrams that I found when I googled "qipao sewing pattern." There's also this free pattern, but I didn't feel like printing it out and taping all the pieces together, so I decided I would draft my own based on the aforementioned diagrams and my own measurements. Yup, this is a prime example of how, in being lazy, my "shortcut" takes more time than if I had done it properly. So I measured myself and some of my more form-fitting patterns, and drew out my pattern pieces on some wrapping paper. But hey, it's okay, because this extremely trustworthy eHow.com article promises that "Qipao dresses can be made in a variety of fabrics and look good with or without patterns." Emphasis mine, of course. Actually, now that I think about it, they probably mean fabrics-that-have-printed-motifs kind of patterns, not sewing patterns. Which is good, because...


2) The fabric I chose is not the typical silk brocade. I don't have anywhere to wear an "ethnic" silk brocade dress, nor do I have the money for silk brocade. So I contented myself with this cotton from my stash. I was hoping that the crazy florals would distract from any egregious errors...only I realized that I would have to try to match the dark and light portions. Oops. Did I also mention that it's only 38" wide and I have only two yards of it and I bought it in England so I can't get more? Yeah. Also, it's super lightweight, about as thin as cotton muslin, so I had to underline it. Thank goodness for Tasia the Sewaholic's super helpful post about it! Oh, and it's a beast to iron. That's right, Cindy, go ahead and make things as hard as possible for yourself.

All underlined in cotton muslin (pre-washed, of course!).


3) I don't know what I'm doing. I'm scared of making such a form-fitting dress. I'm really afraid of the first time I try to sit down in this. Also I'm undecided about how I'm finishing the side. Zipper? Snaps? Tape? Maybe I'll end up investing several hours into an unwearable piece of clothing. But in cases like this, I think I need to stop wibbling and just start sewing, or else I'll scare myself into having a UFO. Here goes nothing...

Unrelated: I am seriously tempted by these. Would anyone like to get me a very very early birthday present? I can't just wait for CNY anymore; since I'm married I'm technically no longer eligible for red envelopes. Boo.