Showing posts with label Historical Sew Fortnightly. Show all posts

Monday, May 9, 2016

HSM #1: Procrastination


It's only fitting that my entry for the Historical Sew Monthly's Procrastination Challenge should be almost five months late, right? I had the garment finished and pictures taken back in February, but just procrastinated in getting them edited and the blog post written (although to be fair, I did have a bazillion drama costumes to make too). At this point, I've sewn so many things in the interim, I've more or less forgotten everything about the making of. Oops.

Three years, three moves, and one baby ago, I started making a historically-inspired well-to-do lady pirate ensemble. It began with a justaucorps coat, then I made the shirt and waistcoat, and then I got pregnant (I feel like everything I've made/done recently has had this ending: "I started to do ___, then I got pregnant." That excuse is getting worn a little thin, I think). When I saw that the first challenge for this year was to finish a project that had been abandoned, I figured this was the time to get my butt in gear and finally make the breeches for my pirate outfit. I also had the added incentive of the PEERs Casanova Carnevale Ball, which was a masquerade event set in the 18th century, specifically during Casanova's lifetime. My outfit is mostly 1730s-1740s, so I barely squeaked in, not that there were an HA police at the event, thankfully! The organizers were actually pretty specific about it being a non-HA event where fantasy costumes were welcome, too.


Still, my modus operandi when it comes to these things is to research, research, research, so that when I improvise with my time and materials, I know exactly how I deviated from historical accuracy. I spent a lot of time on Pinterest looking at breeches and sketched the most noteworthy characteristics of the chronologically relevant pieces.


I decided on fall-front breeches, but instead of the smaller flap of the Regency era, I made the entire front into the flap, like this pair. Well, technically the entire front doesn't flap down; the side seams should be sewn as usual and then slits are cut very close to the side seams and then the majority of the front is faced. I went for simplicity, though, and just made mine approximate the look. I also cut corners by using the Simplicity 4923 pattern instead of drafting my own. However, comparison of the pattern pieces with the diagrams from Norah Waugh and other similar sources reveal that the designer, Andrea Schewe, did a remarkable job of keeping HA shapes in the front and back pieces. I drafted a new waistband to better match the HA ones, though, since the pattern just had a rectangular strip. Unfortunately, in the end all my efforts were for naught, as my breeches looked absolutely ridiculous when I sewed them up. Look, I know that saggy baggy butts were the norm back then, but I could seriously have stashed a small ham in back. The waistband also ended up too big in the back for the more HA grommets and lacing that I had planned, so with less than a week until ball-time, I said screw it and sewed the waistband shut in the back and put in huge horizontal darts to take up some of the excess fabric in the back. Not the prettiest fix, but I figured that it would all be hidden under my coat anyway.

Here it is, all pretty and buttoned up. I'm just glad I got the nap direction more or less right across the front!


The back looks pretty normal until you see the inside...

Here's the front flap folded down. You can see the linen facing and the pocket bags attached to the waistband. 

The pockets were made in a totally non-HA way, but they were very functional and very welcome as a place to stash my phone and keys. 

And here you can see where I tacked the waistband together and took up several inches of fabric with my fat horizontal darts.


Since historical accuracy was already thrown out, I didn't bother with making functional closures at the knees of my breeches; I just sewed it all shut and added a decorative button. Additionally, because I had to squeeze my pattern pieces onto the last remnants of my velvet tablecloth, I couldn't really get the grain right. I settled for making the velvet nap direction as acceptable as possible, but that meant that the grain was so off that the finished breeches twist in a really weird way around my knees. I had to let out the side seams until there was all of 1/4" seam allowance on both sides in order to somewhat resolve the problem. It's still not great, but at least the outer side seam isn't sitting smack in the middle of my kneecap?


Because it was a masquerade ball, I made a mask trimmed with some of the leftover gold lace from the coat and a bunch of rhinestones. I also bought shoes that approximated the look of early 1700s mens' heels and then added ribbon and buckles to shoe clips so as to disguise their Aerosole-ness. The finishing touch was white knee-high socks from Target.


And somehow, despite all my corner-cutting, somehow it all came together fabulously! Usually when I go to these kinds of events, I feel slightly embarrassed about my outfit and envious of others', but this time I was absolutely brimming with excitement at how very real I looked. Maybe not historically accurate, but fabulous all the same. I love it when a costume just comes together like that! It's like a weird costumer's high that I just can't get enough of.


Elaine was my date and she was smashing as well in the corset I made for her wedding. We had so much fun while dancing, people watching, costume ogling, and being silly together. I am so unspeakably glad that we finally live in the same area again! After spending all of high school living a block and a half apart, and then in college sharing a room, eight years was just too long to be living in totally different areas (also, has it really been that long, nay longer, since we were in college?!). I also remembered how much I enjoy dancing. I really do need to get out more.


Summary:
Pattern: Simplicity 4923, modified for historical accuracy, then modified for more flattering fit
Year: early-mid 1700s...ish.
Fabric: The last bits of a thrifted velvet tablecloth, plus scraps of black linen for the facings.
Notions: Seven "gold" buttons, with the plastic rhinestone centers Sharpied magenta to match the rest of the outfit
Hours: I really don't remember, but I'll hazard a guess that it was about 15 hours. The actual sewing was pretty easy, but I spent a long time messing around with pattern piece layout on my limited fabric, and then trying to make it look better after it was sewn up.
Will you make it again? Nope. I am not a fan of baggy butts.
How historically accurate is it? In intention, very, in practicality, not very. I'll give it maybe a 30% since the fabric and shortcuts and mods really take away from it.
Total cost: But I will pat myself on the back that it really cost nothing since everything was from stash.
Final thoughts: I seriously love this outfit, but the breeches are definitely the weakest part of the ensemble. *shrug* They're a necessary part of the outfit and I'll appreciate them for that. I'm just glad that I finally finished them and got to wear it all to a ball!

I know the ball was in February, but we only just took down our Christmas wreath a week ago...how's that for procrastination?


At some point I'd like to retrim my tricorne and take up the sleeves of the shirt (they're about half a foot too long!) and then take non-dim non-iPhone photos of the outfit with the cane I made to go with it. In the meantime, though, here's the one "real" photo I have, with the coat off because it was too warm for a polyester velvet coat while dancing!

[source]


Thursday, September 24, 2015

Historical Sew Monthly #9: Brown Aviator Cap

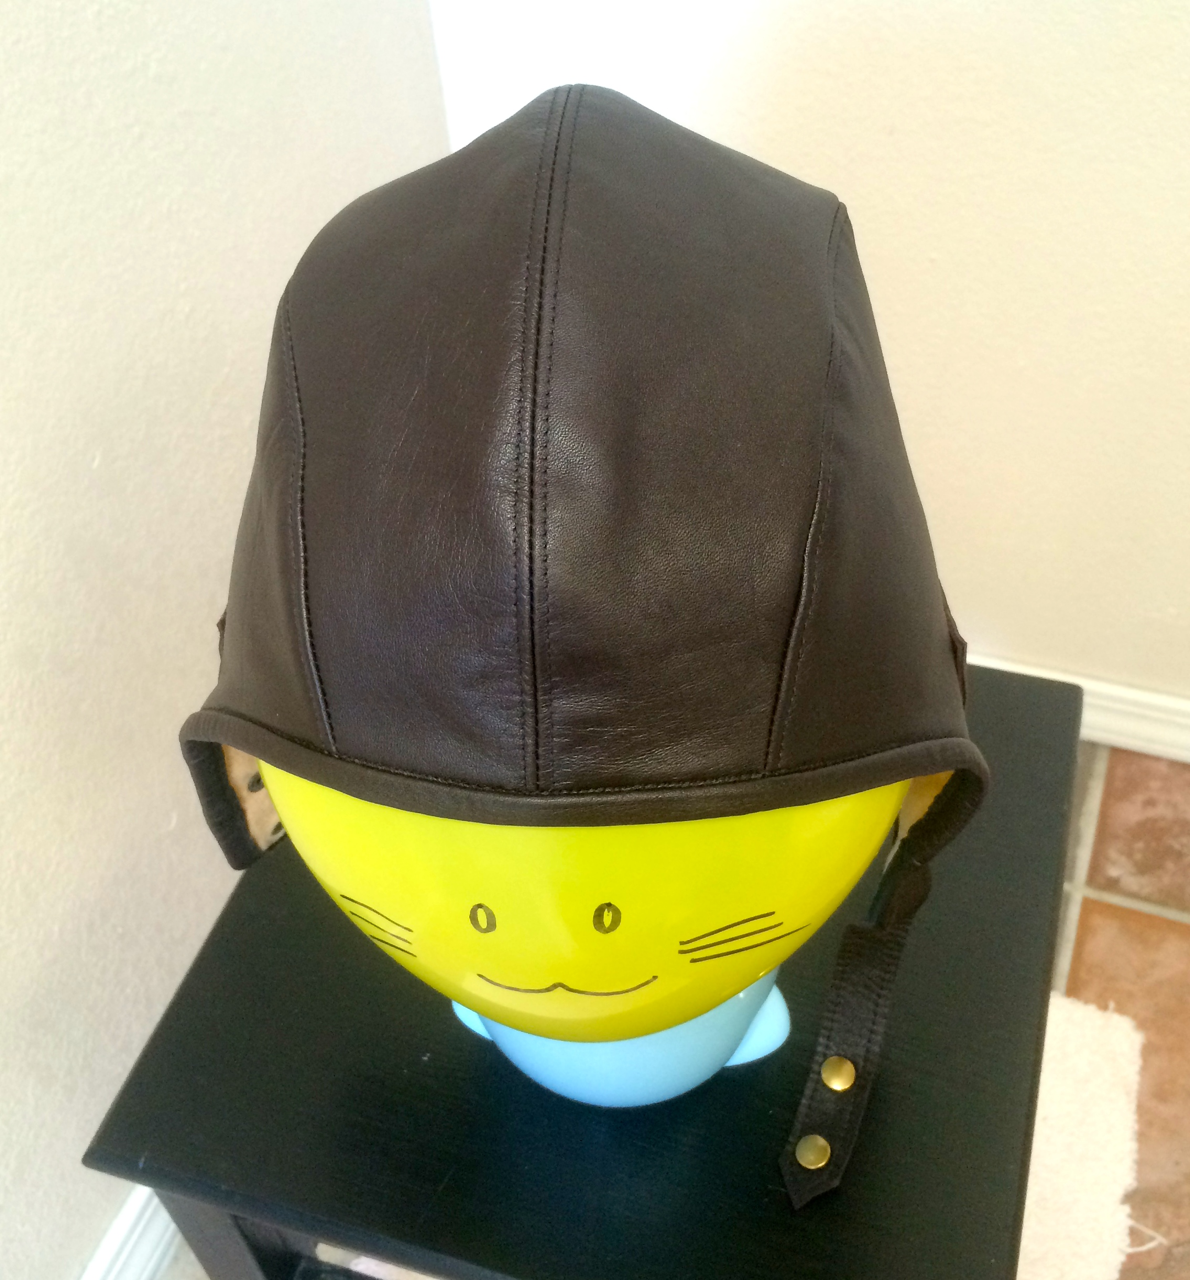
After my whole rant about Asian-American history, I figured I pretty much had to make the rest of the components for my aviatrix costume. Since the current challenge for the HSM is to make something brown, I went ahead and made a leather aviator cap/helmet. And then I realized that to complete the outfit, I really need goggles, but that will have to happen at a later date. In the meantime, let's welcome a familiar friend, the Yellow Balloon Head Stand-In!

I only have yellow balloons because they make such good Eyes of Sauron. Much as I would've liked to see the Eye of Sauron wearing an aviator cap, though, I didn't have time for such a detailed Sharpie job, so have a cat face instead. 
Back view. The tabs are for holding the goggle strap in place, like in this cap.
About two thirds of the extant caps I found had their chin strap on the left side, so I went with that.
 Snaps on the other side, like this cap and this cap. 
Top view. I went so slowly while topstitching and was petrified of making a mistake the whole time. Worth it, though, because look how neat and professional it looks!

I didn't feel like modeling a leather cap lined in flannel while wearing a leather jacket lined in faux fur when it was 95 degrees outside, so forgive the lack of pictures of me wearing it. I'll do proper pictures once I make goggles to go with it!

If I were more patient/had more forethought, I would've gotten leather adhesive to stick the pieces together for the tabs and straps. Unfortunately, I'm not, so I left the edges raw and just stitched them together. Many extant caps have raw edges/edges that are coming apart though, so I feel okay about this. 

As always, I did lots of research via Etsy listings for vintage caps, then decided what parts I wanted to ignore and what aspects had to be kept to get the look. This being a 40s-look, it's probably the most historically accurate item I've sewn, since the materials are all pretty much the same (leather is leather, flannel is flannel, snaps are snaps, etc.) now as back then. After figuring out the pattern, the fun/tedious part was making all the little fiddly bits that make it look like a "real" aviator cap: little tabs to hold the goggle strap in place, ear flaps, and the chin strap. Since I'm not an actual aviatrix, I don't know how my version would stand up to cold winds at some-thousand feet in the air, but it certainly feels pretty warm and gives off the right impression!

Aside from the new-ness of my leather, doesn't this look like it could be an Etsy listing for a vintage WWII aviator cap?

A peek at the insides: The tabs are sewn through both the leather and the flannel lining because I wanted the lining to be held in place somewhat. The second little hole is for the eyelet under the ear flap, presumably for hearing, like in this extant cap. 


Summary:
Pattern: I started with this pattern and shrank and modified it to fit my head.
Year: Meant to be late 1930s-WWII
Fabric: Half a leather pencil skirt, originally thrifted back in 2012 for making a leather steampunk corset, but I never got around to it. I lined it with tan-colored cotton flannel, per this description of a similar cap.
Notions: The leather binding I cut myself from the waistband of the skirt, and the snaps and grommets were just from Jo-Ann's.
How historically accurate is it? I'd say 90%...my highest score ever! All the materials are pretty spot on, the pattern is comparable, and it would definitely be recognizable by people at the time. The only thing I'll fault myself on is that the leather looks too pretty. If it were a real aviatrix's cap, it'd probably be more scuffed up.
Hours to complete: Twelve? The muslining took a while, and I sewed very, very slowly and carefully since there's no seam ripping with leather! Trying to get the tabs more or less identical took a while too, as did learning to use the snap setter properly.
First worn: Not yet. I still need to make goggles.
Total cost: The skirt originally cost $8, but I only used half, and then the flannel was $2 and the snaps $6, for a total of $12.

When I said that it hadn't been worn yet, I guess technically that's not true, as SHB, Walnut, and Frodo, a lobster, and an octopus all tried it on.

The lobster looks rather dashing, don't you think?

The octopus was the only model that was able to wear it with the chin strap buttoned. It looks pretty pissed, though, probably because it doesn't actually have a chin and it's just buttoned over its tentacles. 

Tuesday, September 1, 2015

Take That, Jeb Bush!

It's not Asian Pacific American Heritage Month until May, but indulge me here and allow me to get on my soapbox for a spell.

Right before we moved away from TCOCC, I was on a roll with Historical Sew Fortnightly challenges. I was only working part time, I lived near the LA Fabric District and FIDM and its inspirational garments, and I had plenty of creative energy. I was actually in the middle of making my rich lady pirate ensemble (completed the coat, waistcoat, and shirt, still need to make pants and a cravat) when we moved, but then I started working full time again and then we were house-hunting and then I got pregnant and then I had SHB...and now here I am two years later, finally getting back into things. The HSF has turned into the Historical Sew Monthly, which is definitely an easier time frame, and I've been stewing this idea in my mind for almost a year -- plenty of time to do research and more research and then some thinking and wait, better do a little more research just in case!

What made me decide to finally take the plunge and get to sewing? Well, I'd already been thinking about sinking my teeth into a non-knit project, but then Jeb Bush went and lit a fire under my tail with his comments about "anchor babies" and Asian-Americans. While I have been fortunate to grow up in San Francisco and attend public schools with large APA populations (unlike many APAs, I have never had to be "the Asian kid"), I have definitely experienced my share of othering statements like "No, where are you really from?" and "Wow, your English is so good!" I've sat through more stories of that-one-time-I-went-to-an-Asian-country-you-look-Asian-so-you-probably-want-to-hear-about-it than I care to remember, and when it's time to play the what-celebrity-do-you-look-like-most game, most people would probably just default to Lucy Liu because she's the only really well-known Asian-American actress (although there was also Anna May Wong in the 1930s!).

Just yesterday Mr. Cation and I tried to think if there were any Asian-American superheroes (and not just the one-dimensional Asian Sexy Dragon Lady/Ninja/Bruce Lee Type tropes), and all we came up with were B-list heroes like Jubilee, Wind Dragon, and Dana Tan (who is not even a superhero, just a superhero's girlfriend). Granted, we're only semi-into superheroes, but that's still pretty sad. While I love that there are more APAs in diverse fields now (instead of the stereotypical STEM fields, we've got Margaret Cho, Elaine Chao, and Jeremy Lin!), there aren't many APAs who are just cool. Okay, I guess Jeremy Lin is cool if you're a teenage boy, but I mean cool like "full of thrilling heroics," not "I can put a ball through a hoop."

Source

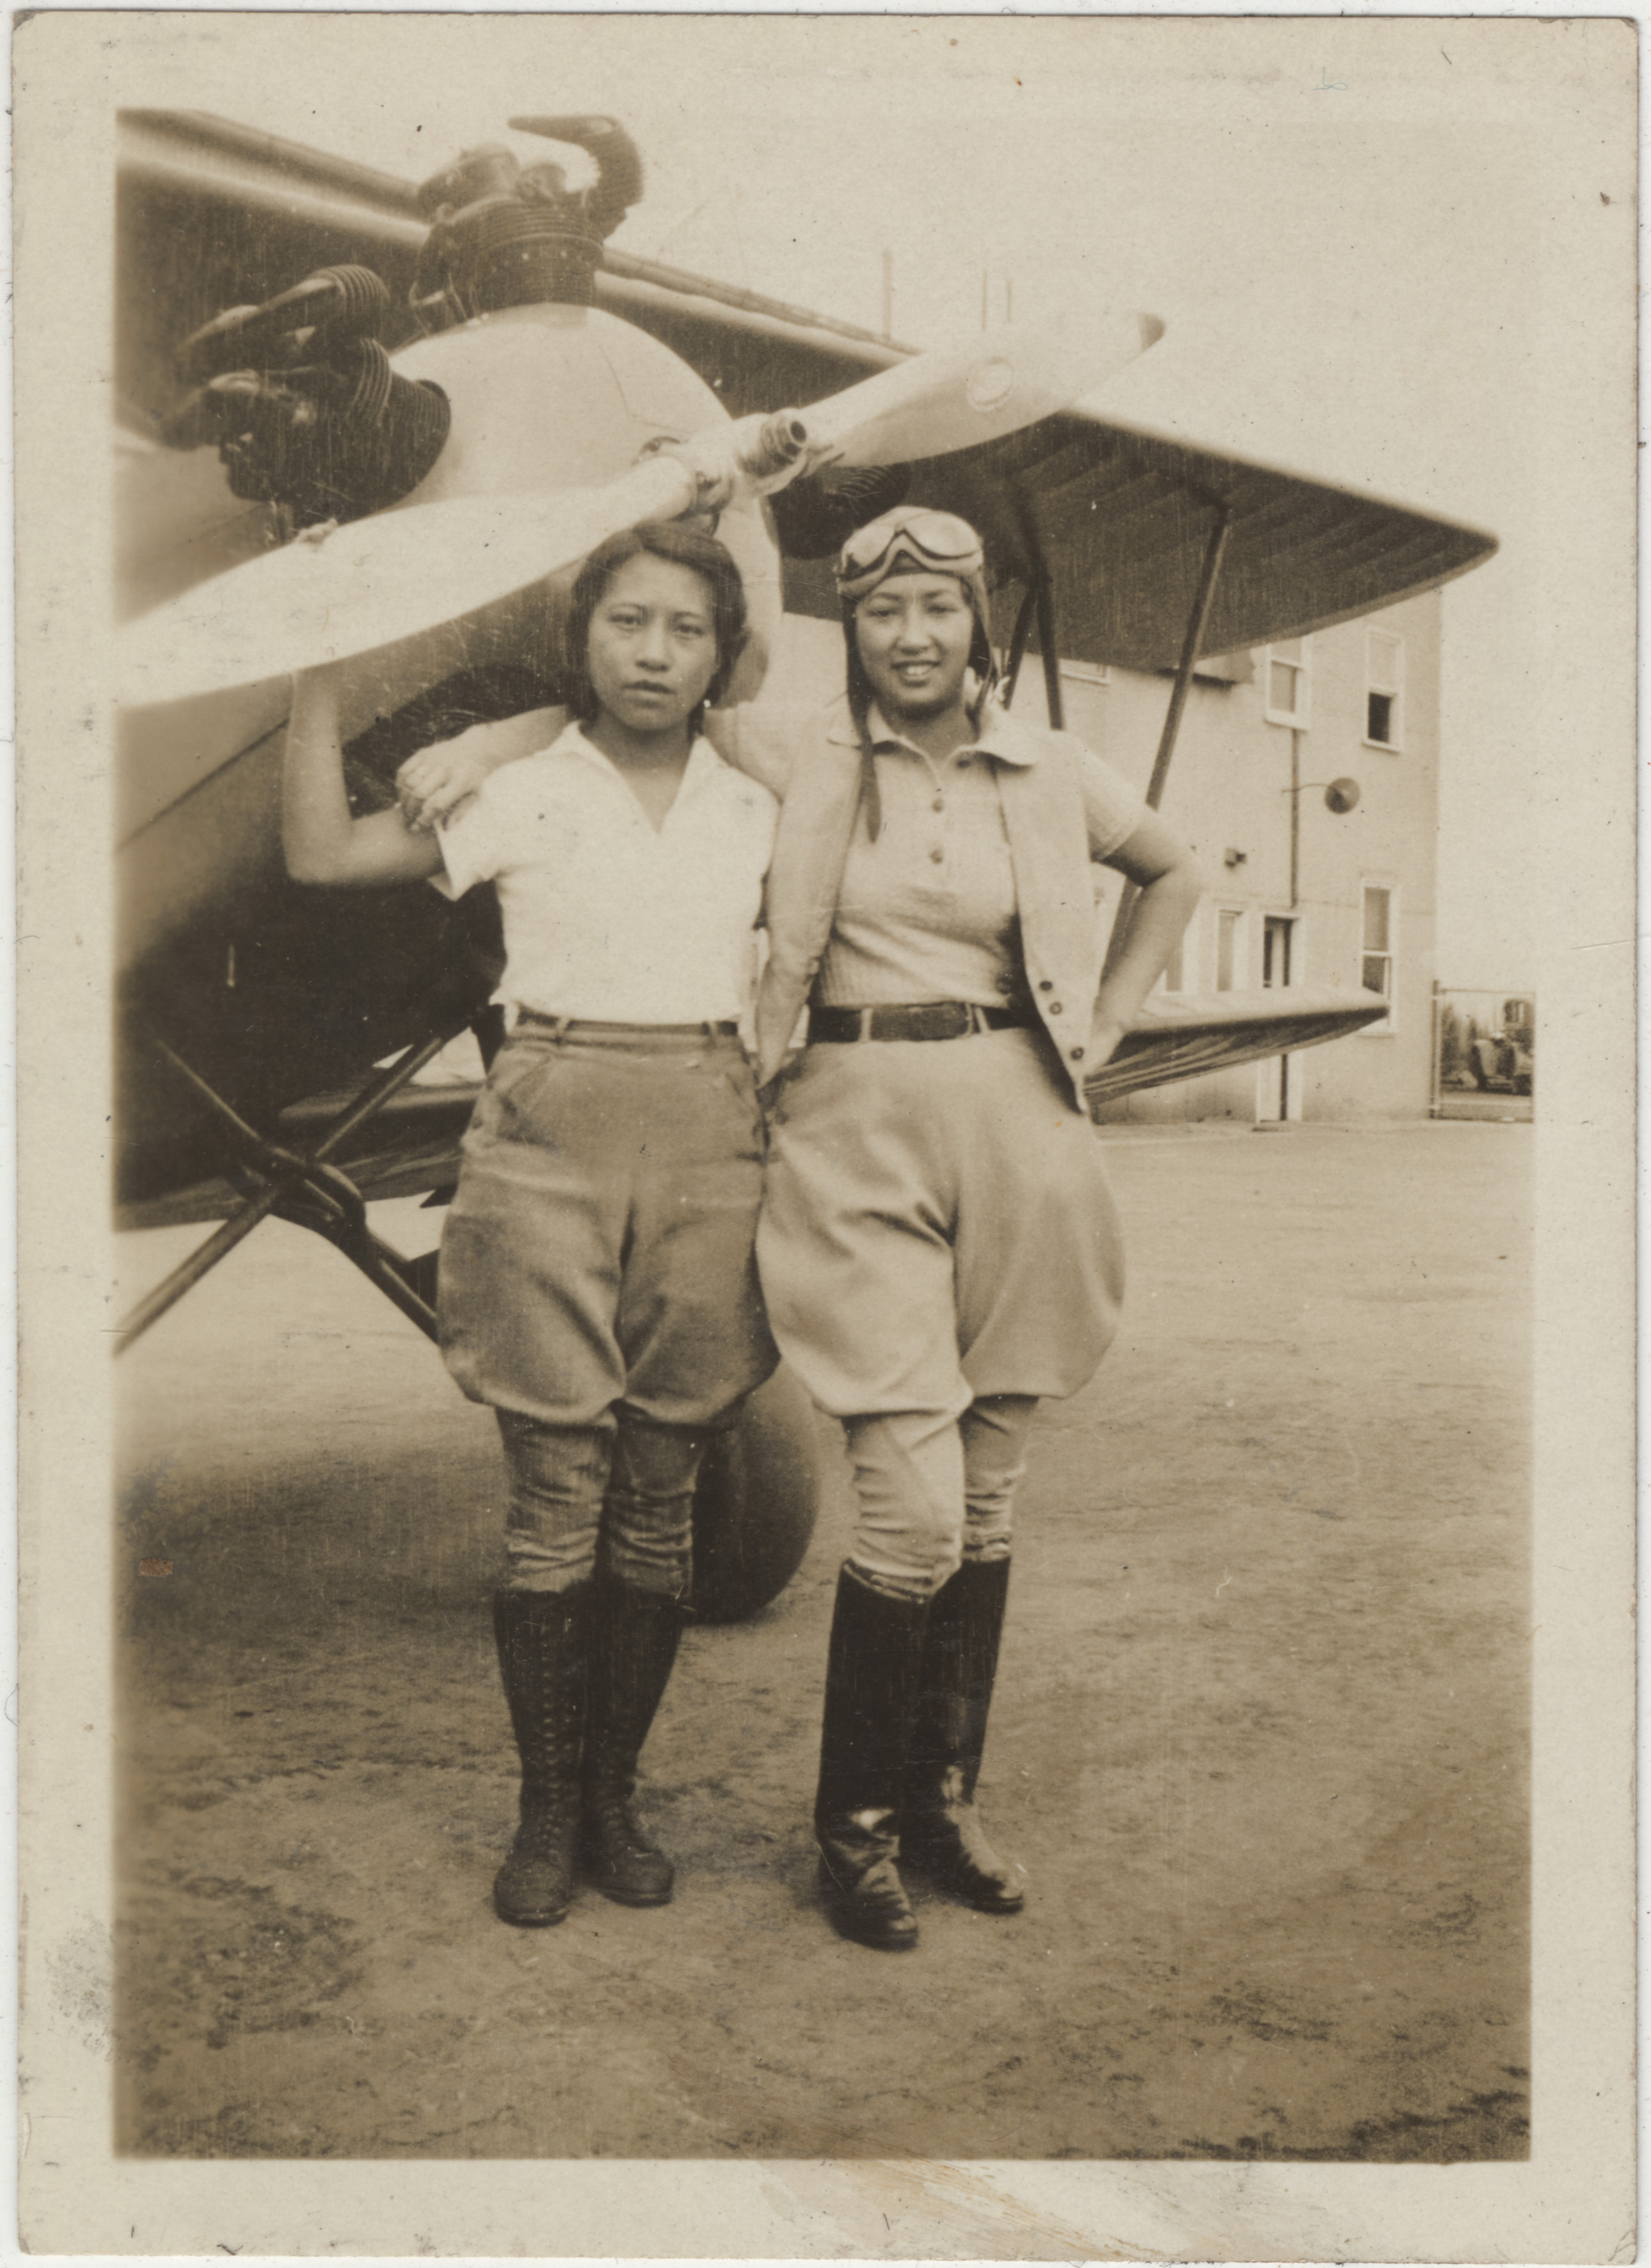
So when I came across the mention of Hazel Ying Lee in this random HuffPo article about famous Chinese-Americans, I was intrigued. An APA aviatrix? Who served as a WASP in WWII?! How have I never heard of her before? Especially when she has the same name as my mom! Okay, that doesn't make us related or anything, but I'm still going to claim her and others who served our country (heeeeey look, this other aviatrix has the same name as my aunt!) as part of my Chinese-American heritage.  All this to say, I made some old-timey aviatrix jodhpurs.


And now, without the belt and boots so that you can see the waist and lacings better. In bare feet, I felt like some kind of weird hobbit-pilot. 
A close-up of the waist. I'm really pleased at how neatly it all came together!

This might be the nicest facing job I've ever done. 

And a look at the lacing on the outseam. 

The inside. I didn't finish my seam allowances, but that was somewhat common at the time so I feel okay about it. 

I looked at many, many extant garments from the 1920s-1940s, and since I've never felt tied to strict historical accuracy, I boiled it all down to just a few must-haves to really get the idea across: military color (either tan, brown, olive, or dark green), side openings with buttons, buttons or laces at the outside of the knee, and that patched-on reinforcement on the inside of the leg. I didn't have a pattern and didn't want to just use this cheater method, so I went uber-historical and drafted my own pattern following these original 1912 instructions, with additional help from this 1908 drafting book for clarification. That's a couple decades earlier than my aimed-for 1930s look, but I was hoping that maybe jodhpurs were one of those garments that hadn't changed too much. Here's what my original draft looked like:

Yes, I do my drafts on the back of wrapping paper.
It's cheap and large, and it's already got those handy 1" grids printed on the back! 

And after multiple fittings and modifications, here's what my final pattern looked like:

Except without the darts. 
A comparison of the original center back seam and my new center back seam. 


I ended up eliminating the darts and taking the difference out at the center front and back seams instead, because the darts just looked poofy and hideous on the stiff twill I used, and many extant garments (including Hazel Ying Lee's) don't feature any darts at all. Even so, the final garment is pretty unflattering to my modern eye. And if you're thinking that the above pictures looked fine, that's because you didn't see the back and side view...

Um. What. Can we say hello, excess fabric?

It's like I've got room below my butt for an extra butt. 

I realize that it's supposed to be baggier and roomier than modern pants, but looking at how some 1940s jodhpurs fit, I'm inclined to think that they did get at least a little sleeker between the two world wars. I desperately want to take out some of the extra fabric at the inseam, but it's faux flat-felled and there's that huge applique over it, so I'm just going to say this is a wearable muslin. Besides, if I keep it this way I can use it as the base for a wartime Lady Edith costume. I did end up purchasing this Folkwear costume pattern, based on a 1920s outfit from the Met, so maybe I'll give the slightly-more-modern jodhpurs a try in the future. Despite the unflattering bagginess, I'm actually pretty pleased with myself for actually making these. My brain definitely got a workout, what with the research and drafting and alterations! And of course, I couldn't resist pulling out my circa 2001 leather jacket for an even sillier non-HA aviatrix look.

Old-timey filter!

Anachronistic jacket and boots ftw! 

Summary:
The Challenge: Heirlooms and Heritage
Fabric: 2 yards of 54" wide poly-cotton forest green twill, fairly stiff and inclined to resist pressing, inherited from a friend's stash
Pattern: self-drafted, following original 1912 instructions, with modifications
Year: 1912, fudged into 1930s
Notions: Eight black 7/8" plastic buttons, 1" wide black petersham ribbon for the binding, black ribbon for the lacing
How historically accurate is it? I'm going to put it at 60%, since it's a real historical pattern, but from slightly earlier, and not strictly historical materials. I got as close as I could while sticking to stash, as I'm going for the look, since I'm trying not to spend money on this. Real jodhpurs from the 1930s seem to be mostly linen or wool, although there are a couple of cotton ones and this one is even a forest green twill! Four buttons for the waist seems to be standard, as is no yoke + facing + belt loops, but the button facings tend to be invisibly attached. The petersham binding should be replaced with twill tape, and the ribbon with actual lacing cord, per this very helpful examination of an extant pair.
Hours to complete: 12, but that's not including the research.
First worn: Just for pictures, and probably not for a long time, if ever. This was more a brain exercise project than anything, but maybe if they have a history day of sorts at school I could give it an outing? Although I'd have to make an aviator cap to go with it.
Total cost: $4 for the buttons, everything else was free from other people's stashes.
Netflix queue: Suitably enough, I watched Ken Burns' epic documentary The West while sewing this, which I heartily recommend not only for the sheer amount of information, but also because it touched on a little known part of Chinese-American history, the Chinese Exclusion Act. I know it can't compare to the long list of crimes committed against Native Americans, nor is it as awful as being enslaved for hundreds of years, but it's definitely one of those things that doesn't get covered enough in US History.
Final thoughts: While I didn't use any heirlooms, and these jodhpurs are only loosely part of my heritage, I think it's still fitting for this challenge. It inspired me to do a lot of research on a less well-known part of history and gave me a sense of pride in my APA identity. While I don't know that these costume jodhpurs will be passed on as an heirloom, I certainly hope that I can pass on that sense of pride in being Asian-American to SHB. I don't want him to grow up in a world that is suspicious of him because he might be an Other who's somehow "taking advantage" of the birthright citizenship amendment. Okay, I'm done politicizing!

And then I had a patriotism fail: I was trying to do one of those saluting poses like you see in the pin-up girl pictures from WWII, but I couldn't figure out why it looked so wrong. After some Googling, I realized I had actually done a "I'm shading my eyes while looking for someone" pose instead of a salute. *facepalm*

Wednesday, October 9, 2013

Historical Sew Fortnightly: A Very Late Separate

A good two months after the deadline for HSF #16, I finally finished my separate: a waistcoat to go along with my pirate outfit. In my defense, I was busy packing and moving my life across the state and then starting a school year. I did start working on it a month after the due date, going so far as to cut out and sew together the front and back pieces, but then I got stalled by 1) finding the right lining, 2) finding the right buttons 3) hand-sewing the eyelets for the back lacing, 4) figuring out what to do for trim, and 5) hand-sewing all the buttons on. While I'm no longer afraid of say, hand-sewing hems and lining and such, something about little round things (eyelets and buttons!) makes me want to procrastinate forever. It took me a month to get around to eyelets, and another month to find, color, and sew on the buttons. Even though it took way longer than it should have, I'm still pretty pleased with the result!

Cecily is much bustier than I am, so it doesn't hang on her quite the same way. 
After much hemming and hawing, I finally settled on using the last of my bright fuschia cotton sateen to line the front of the waistcoat. I had just barely enough! The back is plain black linen, unlined.

Oops, it needs ironing...but you can see the oversized pocket flap and twill tape trim. 

And now, buttoned up...

Originally the buttons had cheap-looking clear plastic rhinestone centers, but I used a Sharpie to color them in to match the lining and the red bits of the brocade. I settled for using a very close zigzag stitch as my only "trim" since the brocade was busy enough. 

Back view. Note how the front pieces extend over the top of the shoulder, as they should in this time period.
A close-up of my eyelets. Yes, I know, I went to all the trouble of making hand-worked eyelets in silk thread, then used polyester ribbon to lace it. 

Side view.
Summary:
The Challenge: Make a separate that can be used to mix and match with existing wardrobe pieces to make different outfits...yeah, so this waistcoat really only goes with one outfit, but considering that Leimomi was the one to suggest making the waistcoat for the separates challenge, I'll give myself a pass there. 
Fabric: One and a third yards of 100% polyester brocade from Joann's for the front, one yard of 100% linen for the back, one and a third yards of cotton sateen with some lycra in it for the lining. As I said above, I had only barely enough to make the pattern fit! I've never used up a fabric so thoroughly before!
Notions: Black twill tape for the pocket trim, black bias tape to finish the armholes, black ribbon for the back lacing, and lots of plastic "gold" buttons. While I would have loved metal buttons, I couldn't find any I liked in my price range and the appropriate size. I finally settled on these buttons with the rhinestone center, but the lightness was too stark a contrast with the dark brocade, so I ended up Sharpie-ing them red to match the lining. 
Pattern: Simplicity 4923 again, which is surprisingly accurate in terms of shapes of pattern pieces...I did modify it a bit to make the back pieces smaller and to make it lace in the back. I mostly used this pattern made from an extant piece to inform my changes. When I was cutting and sewing the pocket flaps, I totally goofed and cut them the same size as the coat's pocket flaps; they were way too big, but I didn't feel like redoing them. Go big or go home, right? 
Year: Early 1700s...ish.
How historically accurate is it? Ummm...maybe 10% at best? It's more historically inspired, but I did do a lot of research on early 1700s waistcoats to get a similar shape and look. 
Hours to complete: I'd guess twenty hours spread out over a couple months. 
First worn: Not yet...still getting all my things together for a (hopefully) epic photoshoot!
Total cost: $25 or thereabouts. I broke my stashbusting pledge to get the brocade, but at least I used up the rest of the fuschia sateen!

I'm pleased as punch seeing how nicely it goes with the pirate coat (which does need a bit of ironing after being packed away in a box, though)!

Saturday, July 27, 2013

Historical Sew Fortnightly: White


Can I just say that I'm so glad that the first color challenge for HSF was such an easy color? I had grand plans for a chemise, drawers, and corset ensemble, but then there was that tiny thing called moving halfway up the state that upset my plans. Nevertheless, I was still able to put together something for this challenge: a shirt for the gentleman! Alas, my top hat is packed away in a pod and en route to the Bay Area, so there will be no catching of hats here today.

Nope, no hat-catching, just sleeve-adjusting. 
A better look at how shapeless it is. Excuse the wrinkles, it was haphazardly packed up in a bag for a week. 
Back view: even less flattering.
Side slit, as dictated by the extant garment I was copying. 
Trying to undo the button at the neck...I don't know how men wear ties and button-up shirts; it's so dang uncomfortable to have all that restriction around the neck area!
Ahhh, much better. 

Since I was limited in time, I decided to stick with another shapeless historical garment made up of rectangles. While it's mostly based on the late 1700s men's shirt in Costume Close-Up, I think men's shirts stayed similar enough in style that this could still pass for anything from the early 1700s (maybe even late 1600s?) to the Regency period. 

Overall shape: pretty good, I think! 

You can see the underarm gusset in the top left of the picture. The ruffled bit at the end of the sleeves is actually just a ruffle sewn to a piece of twill tape. I basted the twill tape on to see what it looked like; it's removable should I decide to go with lacier cuffs or no embellishment at all. 
Hand-worked buttonhole! They're simultaneously not as hard as I thought they'd be, and yet way more difficult than they look. The stitch itself isn't hard to learn, but making them even and catching just the right amount of fabric is the tricky part. 
My hand-finished hem and slit...obviously I need to work on the invisible part of my invisible catch-stitching. 
Neck gusset, also done by hand. 

Thank goodness for the slow changes in men's shirt fashions, since this shirt is meant to go with my early 1700s-ish pirate coat! 


It's an all me-made outfit! Those are my Aladdin pants, which are a surprisingly good fit for the whole look. 
Going for the whole aloof 18th century painting pose, with one hand mysteriously tucked into my coat. 
Side view.
Back view. I really should've taken the time to put on some white knee-highs!
I am seriously in love with my own work. Those cuffs are just so ridiculously huge, it's awesome!

Looking through these pictures, I'm thinking that I might need to suck it up and just make the waistcoat at least, if not the breeches. It just doesn't look right with only the shirt and coat -- I need another layer of sumptuousness in there! I'm thinking a gold brocade...what say you?

Summary: 
The Challenge: #15, Colour Challenge: White
Fabric: 2.5 yards 100% cotton muslin, already in the stash. 
Notions: Twill tape and plastic "pearl" buttons
Pattern: The men's shirt in Linda Baumgarten's Costume Close-Up, with minor modifications for fit (narrower in the chest and arm circumferences, shorter overall, longer collar piece) and convenience (no reinforcements at the shoulder, no flat-felled seams).
Year: The 1700s
Hours to complete: Hard to say...I machine-sewed the major body seams and underarm gussets, but hand-sewed the neck gussets, collar, slits, and hem. I'm guessing about seven? 
Total cost: I got the muslin on sale with a Joann's coupon, so I'd say about $5. 
How historically accurate is it? 50%? The pattern is accurate, even if the materials and some of the construction isn't. 
First worn: Just for these quick pictures, but will eventually be part of an entire pirate costume 
Final thoughts: Looking through these pictures makes me pretty excited for when the whole thing is done! My sister thought it was awesome, Mr. Cation was unsure about the oversized men's shirt look but came around when he saw it with the coat, my mom said the whole thing was 好犀利 (very sharp), and my dad said I looked like the Duke of Edinburgh. I don't think that means what he thinks it means, but I get that the intention was a compliment about how fancy and historical it looked. 

And since this is a pirate ensemble, after all, well...what's a pirate without some treasure? 

We've got an old cardboard box instead of a treasure chest. 
Oh look, the treasure is a cat!
Could there be any better treasure?