Showing posts with label Vintage Dress Pattern. Show all posts

Sunday, April 12, 2015

The Geekiest Baby: My Little Hobbit

It is the curse of younger siblings that they always get the older sibling's hand-me-downs. Not that I would know what that's like, being an eldest child myself. And not that my sister would know what that's like either, being so much younger than me; in the seven years between my birth and hers, my mom had plenty of time to discard and donate my old things. Although the same number of years separates Walnut and SHB, he has no such luck. When Walnut decided that he wasn't a fan of the cat house that my sister painstakingly crafted for him two Christmases ago, we put it in the garage and saved it for SHB to play with once he got old enough to enjoy it. And by "enjoy", I mean "forced to take pictures in front of it to satisfy mom's geeky fancies."


In the spirit of the SHB Sew-Along, I decided to finally get back behind my sewing machine and make something, anything really. While I know what SHB really needs is more pants and pajamas, I also knew that the thought of such utilitarian sewing wasn't going to be enough to get the sewjo going after a month-long sewing standstill. So I did what I always do to get the creative juices flowing: I made a costume. And because I'm just a huge dork, I went for -- big surprise -- a Middle Earth-related costume. This outfit is based on Bilbo Baggins' first costume, when he has his ridiculous good morning exchange with Gandalf.


I realize, of course, that he should really have a pipe instead of the One Ring, but I don't want to encourage smoking. Also I don't have a wooden pipe.

I'm pretty pleased that I had a fabric in the stash that was vaguely similar to his waistcoat pattern! 


I actually started sewing the vest while I was still on maternity leave, but got stalled by a combination of the four month sleep regression and being undecided on how to finish the vest. The thought of doing bias binding around those tiny little armholes was just too much at the time. Well, the sleep regression never went away, but somewhere in those dark watches of the night my sleep-deprived brain hit upon a solution: if I had to make a long-sleeve onesie to go underneath the vest anyway, why not just combine the two and put the long sleeves on the vest? Then I wouldn't have to worry about an ugly armhole binding showing and it would be one less piece to make (and subsequently wrangle onto my little wannabe-nudist). So it's not really a vest anymore, which is fine. It does show, though, that the costume was conceived and cut when SHB was half his current age, because look at how short it is on his torso!


Good thing you can't really tell when he's sitting.


Confession: the dark green leggings are standard RTW baby clothes, which means there's a dinosaur appliqued onto the butt. Very unhobbit-like. Good thing you can't see it when he's sitting. Moral of the story: make sure your baby hobbit is sitting. Fortunately, he just started being able to sit independently in the last two weeks!

Testing the One Ring's composition by biting it...nope, not gold. 

Summary:
Pattern: Traced a bodice+sleeve "sloper" from his RTW clothes and heavily modified to get the vest and poofy sleeves.
Fabric: A fat quarter for the vest, and old t-shirts for the sleeves and scarf
Notions: Two gold plastic buttons, velcro, a tiny piece of bias tape
Hours: 2.5-3? Spread out over last November and this past week
Will you make it again? No, but I will definitely keep using his "sloper" for more garments, I'm sure!
Total cost: Everything was stash and/or given to me, so basically free!
Final thoughts: Um, I might love this the best of any costume I've made. Actually no, who am I kidding, that title is reserved for Thranduil. Or Eowyn. Or my pirate coat. But this is a close fourth!

Really, Mommy? Just fourth?

I'm pretty sure I took over a hundred pictures on my phone because SHB is so cute (and so wiggly), so indulge me as I spam you with more.

Hmm, what's this? A ring? 
You say it's a magic ring? Hahahahahaha you're so funny. That's nonsense! Great joke, but April Fool's Day was last week. 
You say mysterious writing appears on it? A secret that only saliva can tell?
Well that's easy enough to disprove. Here, I'll saliva it up right now.
Nothing's happening, right? 
Great Bullroarer Took, there ARE runes appearing on it!!!
My Black Speech is rusty, but it looks like it says "One Ring to rule them all, One Ring to find them..." 
Sigh...I guess it has to be destroyed now, huh? Phooey. 

He has to love Tolkien now, right?

(Also, extra geek points to me for finishing this in time to post on April 12, the actual day that Gandalf arrives in Hobbiton to tell Frodo the truth about the One Ring!)

Wednesday, July 24, 2013

The Come to Feather Dress


Modcloth does this thing where they take common phrases, song lyrics, etc. and turn them into clever names for their dresses. For example, their various feather print dresses have names like "Forever and Feather," "Feather After," "You Feather Believe It," "Feather Channel," and "How's the Feather?" I wanted to do something similarly clever, so I came up with "Feather Off Alone," "Nobody Does It Feather," and "Feather Off Dead." None of those, of course, convey the overwhelming trendiness of things with feathers on them, quite the opposite, in fact. So I decided to go with a Beatles' song instead; I think it better communicates the popularity of feather prints, right?

I don't have shoeshine on. 
...nor is my hair down to my knee. 
What the heck is a walrus gumboot anyway?

This fabric was originally intended for a Tiramisu, but in the end, I decided that I wasn't the hugest fan of how the midriff-meets-bust-overlap area came out slightly ripply. I decided that I wanted to try another pattern that still had the gathered bust pieces, a V-neck, but didn't have the fussiness of a separate midriff piece. Enter McCall's 3252, a vintage dress pattern from 1972. I would have passed it over in my earlier sewing days, but Tanit-Isis makes 70s dresses look so good, I thought I'd give this pattern a chance. And you know what? I'm so incredibly glad I did! I think this might even be my new favorite knit dress pattern. It's easy to put together, the skirt skims over my hips nicely and is just full enough to have some swish, but is still really just an A-line so it doesn't eat fabric like hobbits eat breakfast(s). I'm also tempted to try it in a drapey woven fabric, like maybe a rayon challis. 

I love the openness of this V-neck without being too low, the little gathers under the bust (way easier than darts!), and the smooth midsection that flares into the skirt. Only problem is, I was less than careful about the print placement, so as Mr. Cation says, it looks like my boobs have eyelashes. Oops. 


I did learn from my Tira-making experience though: I changed up the order of construction such that the side seams were the last major seam to sew. This makes for easier sewing and fitting. Instead of sewing the bodice pieces together and then sewing the skirt pieces together, then trying to attach them at the awkward center point, I sewed the right and left halves separately (bodice to skirt), then just sewed them up the middle. Is that taboo somehow? It feels obviously easier, so why didn't the instructions just tell me to do that? Are the instruction writers just sadistic and want to see me struggle with the pointy part? Anyway, when I had an entire front and an entire back sewn together and connected at the shoulders, it was easy to just try the dress on inside out and pin where my side seams should be. It's a good thing I did it that way, too, since I ended up taking out 1.5" on each side! Granted, the pattern was a size too large, so I was expecting something along those lines (I also expected, and therefore preemptively made an SBA, which was also a good idea). Then it was just a simple matter of binding the neck and armholes, and final trimming of the skirt hem, and then I was done! And now I want to make all the different views, minus the weird clown ruffle neck version.

Just for fun, since it's a 70s pattern, I old-timey-ed up some of the shots to look more vintage...

Gotta love playing with those antiquing filters!


Summary: 
Fabric: 1.5 yards of mystery content knit, but there's probably a significant percentage of Lycra since it's veeeery stretchy and has excellent recovery. I got it last summer from Fabrix in San Francisco.
Notions: None!
Hours used: Four, with cutting the pattern tissue and then the fabric, and also fitting multiple times. But now that I've figured out the fit on this, I can see whipping these out much quicker! This was the last project I did before packing up my sewing machine.
Will you make it again? Considering that I'm already planning to, yes!
Total cost: $10, but actually half that amount since I didn't use all three of the yards I had of this fabric. I contemplated keeping the rest to make a top, but then realized that I don't need two garments from the same fabric. Instead, I foisted it onto Jill when we met at her house for a sew-in...my last time with the Stitch in the Ditch gals! Stashbusters, that's the real secret to stashbusting -- make other people take your stash fabric!
Final thoughts: I never thought I would wear a pink dress, but strange things happen when you sew! I'd like to think this is a teacher-appropriate dress, although I know students can get distracted by prints...those boob feathers have me worried, now! Also, what's with 70s patterns calling for zippers in knit dresses? I didn't put one in, of course.

And now, the bigger news: I've left SoCal for good! Mr. Cation and I spent the last week packing up all our worldly goods (the majority of which were my goods; can I help it that my profession and hobbies tend to lead to stockpiles?), stuffing them into a pod, and then driving up to San Francisco. I will dearly miss Langer's pastrami, Scoops ice cream (and weather warm enough to eat ice cream...it was all of 55 degrees and foggy as all get out when we got in last night...hello SF summer!), the Stitch in the Ditch ladies, the Fabric District in LA, and I'm especially sad to just miss the start of FIDM's Outstanding Art of Television Costume Design exhibit! But hey, Bay Area sewists, if you're up for hanging out or sewing, I'm totally in!

Goodbye downtown LA skyline, goodbye planes flying overhead en route to LAX, goodbye smog, and goodbye pictures on the roof of the parking structure!

Monday, May 6, 2013

Historical Sew Fortnightly: Flora and Fauna


While I like my feminine dresses as much as the next lady, never before have I sewn a frock that deserves so much to be called a confection. Between the chiffon overlay, the beading, the embroidery, and the lacy pink satin slip, this is definitely more frou-frou than anything I've ever sewn before!

I tried to follow American Duchess' 1920s makeup tutorial, but I don't think it worked so well...mostly because the idea of wearing that much eyeliner freaked me out. I don't usually wear any makeup, so when I came out of the bathroom, I think Mr. Cation was kind of shocked. 
Extremely anachronistic Nine West silver stilettos, because I don't own any other light-colored shoes. These are actually from my wedding, and this is the first time I've worn them since then! The feather clip on my head sash is also from my wedding, originally purchased at Claire's, and then my necklace is from Forever 21. Hello, "flapper" look from the mall!
I love the way the bottom hem turned out, even if I accidentally broke three needles on beads while doing it. I was not wearing eye protection because it didn't occur to me, since, you know, I wasn't actually working with steel boning, and one needle tip actually flew up and hit my cheek. Yikes!

I used to think that 1920s fashions were the most unflattering styles ever, what with the straight bodices with little to no shaping and the dropped waists. But just like 19-teens era fashion, Downton Abbey has won me over and I just had to make an evening dress that would be appropriate for a party in West Egg. Besides, the Great Gatsby movie's coming out this week!

To get the shapeless gamine look, I wore a sports bra underneath the slip. 

I actually used to hate The Great Gatsby as a novel, too, but a second reading, a decade after high school English class, really helps me to appreciate it a lot better. Something about not having to finish it, along with homework for other AP classes, and write an essay at the end...

It was so bright outside that the embroidery and beading got kind of lost. Here's a better picture of what it looks like in person. Much pinker than the outdoor photos!

I originally wanted to make an 1840s-ish gown for this HSF challenge, but decided that between Elaine's wedding preparations and the AP Exams, I should probably hold off on such a complicated project. I turned instead to this embroidered and beaded crinkle chiffon, which was originally purchased with the intention of making a Titanic evening dress when I was still in the middle of Season 1 of Downton Abbey. That never happened, but thanks to the progression of time in the Downton world, this is still appropriate for an evening dinner party there!

I decided that the sash tied at the side was totally a thing. For example, these extant gowns. 

To start with, and to ease myself into slippery fraytastic fabric sewing, I made a pink satin slip to go under the very sheer chiffon. Thanks to Lauren, the American Duchess, for the very easy tutorial!

1920s slips are not flattering, but I did my best to pretty it up. I was inspired by these two extant slips, which are much more elaborate, of course. I figured that it was okay since the slip would be mostly hidden.

To make the overdress, I started by looking at the 1923-25 evening dress in Janet Arnold's Patterns of Fashion. It's got no shaping (side seams go straight down, no darts) and is essentially a giant tank-top. I went with that general shape (but graded down for my size) for the bodice, but I was afraid that a straight-down side seam for the entire dress would be more unflattering than necessary. Fortunately, there are plenty of examples (from both sewing patterns and extant gowns) of straight bodices with fuller skirts, either through the use of godets or gathered rectangles. I didn't want to deal with either of those options because of the fussiness of my fabric, so I opted for a fraction of a circle-ish skirt, like these sewing patterns or this dress. I put together the front and back bodice and skirt pieces, then sewed them together at the shoulder and sides by machine, and finally hand-overcast the seam allowances to make them as unobtrusive as possible. The worst part by far, though, was trying to finish the armscyes and neckline with self-fabric bias binding; crinkle chiffon is the worst fabric ever, and yet I persist in using it for some reason. Even with all of Andrea's tips, I couldn't get it to behave! Between the crinkles, the general chiffon shiftiness, and the beads on the fabric, I ended up with the wiggliest bindings ever. To camouflage some of the worst of it on the neckline, I added a couple rows of extremely ugly beading. Yeah, I don't know what I was thinking.

You can see how crinkly the chiffon is here. Also my hand finished seam allowance, which almost turned into a rolled hem due to the lightness of the chiffon.
It's like I was drunk when I sewed on the beads, except I totally wasn't. 

Summary:
HSF Challenge #9: Flora and Fauna...I've got the flora thing going on in the embroidery, and I guess the feather clip can be the fauna? I didn't make the clip, though.


Fabric: For the slip and sash, 2 yards of dusty-rose polyester satin; for the overdress, 3.5 yards of 45" wide polyester crinkle chiffon in cream, embroidered and beaded with a floral pattern. I didn't include these in my stashbusting pledge pile, but both have been in the stash since Oonaballoona and I ripped off the FIDM scholarship store, so I'm pretty pleased to have used it.
Notions: Cream-colored 1/2" polyester ribbon for the slip straps, cream-colored lace from last year's Vintage Fashion Expo,  almost 300 silver bugle beads for the overdress neckline (which I've saved for six years...thereby rewarding my penchant for never throwing away any craft supply ever)
Techniques used: French seams on the slip, hand-overcast stitch on the overdress
Hours: About thirty? I don't even know anymore, I've been working on it so long. I managed to watch a good chunk of Earth's Mightiest Heroes, all of North and South, and listen to a whole bunch of Radiolab podcasts.
Will you make it again? Extremely unlikely. I'm pleased with the overall experience and dress, but I'm not in need of more 1920s evening dresses!
Total cost: Thanks to the FIDM's mistake and the LA Fabric District's prices, less than $15!
First worn: Just for pictures, but hopefully to see the movie when it comes out
Final thoughts: When I was walking out of the apartment to take pictures, I felt super glamorous, and as a bonus the whole thing is remarkably comfortable. I am incredibly pleased with this dress and how successfully I was able to get the general look of the era, despite the anachronistic materials and accessories! As for those who might turn up their noses at the polyester and less-than-stellar beading, well, all I can say is, "Whenever you feel like criticizing anyone...just remember that all the people in this world haven't had the advantages that you've had." In this case, that would be the advantage of beading lessons and a large enough pocketbook for authentic materials?

And because B&W automatically equals old-timey...I did my best to channel my inner Anna May Wong, despite the failings of my make-up application:


Tuesday, April 30, 2013

The Antisocial Behavior Dress

If you could do anything humanly possible with complete assurance that you would not be detected or held responsible, what would you do? We were talking about social influence and deindividuation last week in my AP Psych class, and when presented with the above question, 36% of college students responded with some kind of antisocial activity (e.g. criminal or spying behaviors, with most people actually saying "rob a bank"), 19% cited some other non-normative behavior, 36% neutral, and only 9% of the respondents named a prosocial behavior (Dodd, 1985). I'm pretty sure that of all the responses, 0% of them said "enter a sewing contest without using the official contest pattern."


Unless you've been hiding under a rock, you've probably heard that Colette Patterns recently released a new sewing pattern, the Laurel shift dress, and not only that, but they sponsored a huge contest with absolutely fabulous prizes. Who wouldn't love all that free money to buy fabric and notions with?! Unfortunately, I'm a cheapskate when it comes to buying sewing patterns. I love the sales at Joann's, but even those are a bit pricey when you can buy vintage patterns for $0.25 each at thrift stores. Which means that when it comes to having to pay over $10 for a pattern...well, I just couldn't bring myself to do it. Especially for such a simple shift that I could probably make up on my own. I bid a sad goodbye to thoughts of free Spoonflower fabric of my own ($18/yd, even for my own design, is something I can't justify right now. I'll have to settle for drawing or printing my own), but somehow the idea of a simple shift wouldn't leave me alone! Even though I was pretty underwhelmed when I first saw the Laurel pattern announcement, Debi was right -- contests really do inspire me to rethink my initial assessments of a pattern (or in this case, a look) that I'd previously dismissed as unsuitable for my body type/personal style.

So...what did I finally make for my if-I-could-I-would contest entry? Well, let's just say that velociraptors, especially as depicted in Jurassic Park, are the ultimate in antisocial behavior:

Okay, I know, this isn't a velociraptor*, but it's still pretty awesome to find metal dinosaurs outside a random car wash in TCOCC. 
A wash and wax for $9.95! They actually do a pretty good job, as Mr. Cation car can attest. 
There was a Sewasaurus Tyrannosaurus Rex too!

I could also wear this on days that I'm feeling particularly introverted, because there's nothing more antisocial than a dress printed all over with ominous words/phrases like "Keep Out! Danger! Caution! Warning!"Also, Mr. Cation swears he will not walk next to me when I wear this in public, so that's even less social interaction...

You mean you don't want to be associated with me? At least Amanda will join me in making dinosaur poses!

When I first received this Jurassic Park sheet in the mail, I was so excited, but I couldn't figure out what to do with such an awesome (and large-scale, and multi-colored) print! Thanks to Brooke, who suggested that I make it into a shift dress with as few interrupting style lines as possible, I decided to make this not-a-Laurel. While I can't exactly enter it into the contest, I still think it would've been a pretty fabulous entry for the showing-off-a-print category.


I started with Simplicity 8722, which I've used in the past, but only with knits. In order to get the more fitted look that I wanted, I ended up making a whole bunch of modifications, taking in the side seams and back (at both the CB seam and by making larger back darts), almost totally redrafting the sleeve, and of course, axing the facings and replacing them with bias strips. Now that I've finally done the work of modifying the pattern, I'm surprised by how much I like the shift dress look! It's simple and classy (as long as you're not using dinosaur sheets from the 90s) and not nearly as awful on my body as I was expecting.


Summary:
Fabric: Just half of a 70/30 poly-cotton twin sheet. I love that shift dresses use so little fabric! This means I still have enough fabric left over to do something else, although I don't know what yet.
Notions: Bias tape for the neckline, seam binding on all the inside bits (there are no raw edges anywhere, because this fabric frayed like fraying was its only goal in life), a 20" zipper, and a hook and eye
Hours: Eight, for all the fiddly fitting and seam binding everything within an inch of its life.
Will you make it again? Now that I've figured out how to wear a shift dress well, you bet I'll be making more! Colette, I'm sorry for ever doubting the brilliance of the Laurel. However, I'm still not paying you $14 for it.
Total cost: Thanks to the generous NYC sewing bloggers, this was a free project! All the notions were in my stash already, but I guess if you had to count how much they originally cost me, I'll say it was $1.
Final thoughts: This might be one of the more ridiculous things I've made. And that's saying a lot, since I've made quite a few ridiculous things in the last couple of years! Unlike the other geeky dresses I've made, which were all a sort of uniform blue with a slightly more subtle print (you wouldn't think they'd be subtle, but I've hung out with people and had them not notice until several hours in that I've got Jedis or superheroes all over my dress), this dress boasts all the primary colors in a huge, blocky print. Dinosaurs just don't do subtle. Still, I think the colors and pattern actually add to the mod 60s look. Hah! Obviously I don't actually know anything about the mod 60s look. At any rate, the nicest thing Mr. Cation could think to say about it (actually, I'm not sure he was trying to be nice...he might have just been confused) was that it looked like a pediatric nurse's scrubs. You know, the kind with teddy bears all over to keep children calm. Well, watch out, children, these terrible lizards aren't even pretending that the shot won't hurt! They're all like caution danger warning this shot is going to hurt like a dinosaur bite. Still, despite all that, this dress makes me really happy because it's just SO WEIRD.

Even better, though? I'm not alone in my weirdness! Gingermakes, of Mood Sewing Network fame, and one of the NYC bloggers who was in on sending me this sheet, kept a JP sheet for herself...and she also made it into a shift dress (but she used the real Laurel...I guess I'm just the Chinese knock-off)! I'm pretty sure that when Andrea announced the S.O.S. challenge, she never thought it would be applied to such fabric. But there you have it, sister fabrics...go check out her make!

At this point, Mr. Cation was like, are we done yet? 

*A true-to-life statue of a velociraptor wouldn't be very fun to take pictures with, though, since they're not nearly as scary as the Jurassic Park movie portrayal. As expressed so delightfully in one of my favorite nerdy songs, Hollywood Raptor, velociraptors should be feathered and more or less turkey-sized. Incidentally, The Doubleclicks are an absolutely brilliant pair of sisters who write awesome stuff -- if you're into D&D at all, you'll love This Fantasy World.

Thursday, April 18, 2013

Historical Sew Fortnightly: By the Sea

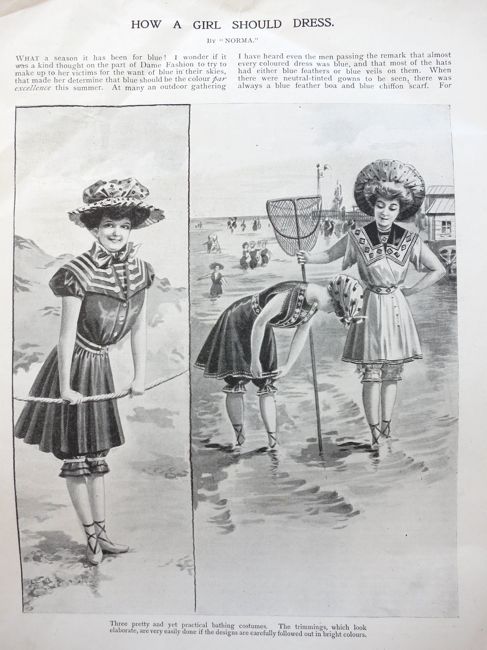
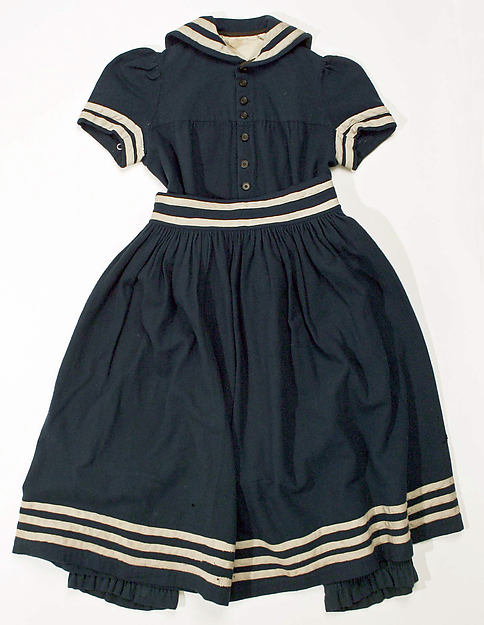
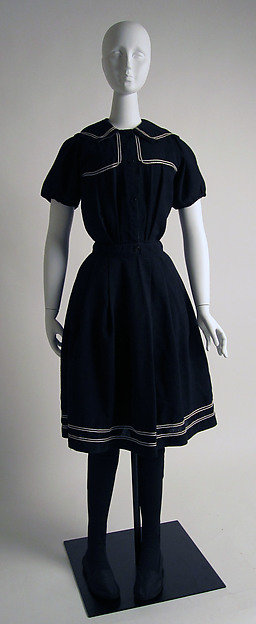
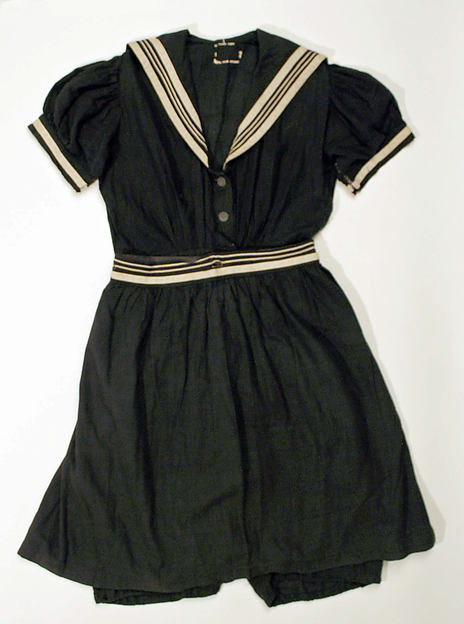
As soon as I saw the "By the Sea" challenge, I knew that I wanted to make a Victorian/Edwardian bathing suit, i.e., the ubiquitous be-sailor-collared dress with the lines of trim all over the place. When I first started sewing "for real," I actually made a similarly-inspired nautical dress (coincidentally, also for a Sew Weekly challenge!) which is one of my favorite early makes, but it's quite dark and, being a 50/50 poly-cotton blend, is quite warm on sunny days. I knew it was time to give the sailor collar another chance, and this was the perfect opportunity.

Now, me being me, you already know my garment is going to fail the historical accuracy test on a couple of counts: 1) machine stitching instead of hand stitching, and 2) made from bedsheets. This dress is no exception, as it's actually made from a 1970s dress pattern, Simplicity 7439, which was gifted to me by Meg the Grand last summer. Still, the differences between the authentic historical look and this modern adaptation are pretty minimal, at least in my mind; the same elements get used over and over again in nautical-inspired dresses, which is probably why people can sell generic versions.

After looking through loads of extant garments on Pinterest and museum sites, as well as fashion plates from the era, I came away with:

1) Light colored bathing suits are rare, but still possible. They don't all have to be dark blue!
"Women on the beach," by Maud Stumm, 1904. [source]
Thanks to The Dreamstress for sharing these images from this 1906 Girl's Own Paper! Check out the girl on the right.

2) They were not afraid of red.
Edwardian bathing suit, c. 1910 [source]
3) The sailor collar can start higher up; it doesn't have to dominate the front bodice.

[source]
4) Yokes, tucks, petal sleeves, and a waist sash are all design options.
Petal sleeves galore! Also yokes and tucks/pleats. Lastly, note that they don't all have to be super-puffy in the bodice. c. 1883. [source]
On the very left: petal sleeves with trim, and a sash at the waist, c. 1873. [source]

5) Trim on the collar, sleeves, and skirt bottom are pretty common.

Two bands of trim at the bottom of the skirt, as well as a yoke and pleats.  Also see #3.

6) Most bathing suits from the era are actually a jumpsuit-type deal with a bloomer bottom, and then a skirt is worn over the bloomers to create the "dress" look.

Buttons disappearing into the skirt! Also see the previous picture and picture #3. [source]

7) Bare feet is okay!
Well, I guess bare feet are only allowed if you're wearing full-length trousers too, but...ummm....yeah. c. 1868 [source]


So add up all of those elements, throw in a dash of 1970s, run it all through some old-timey filters, and this is what you get:


Okay, enough of the antique effects, here's what it really looks like:

It was ridiculously bright out. 
The bodice with its non-functional buttons disappearing into the sash so as to look like the inspiration garments.
It was also way too windy for my hat to stay on.

Since I wanted to work only from stash, I had to settle for the lightest-colored sheet I had, hence the totally anachronistic print. I go back and forth between thinking it looks vaguely science-y and thinking it looks like a hospital gown. At any rate, the light blue was begging for some vibrant pop of color, and hey, guess what, April is Vibrant Color Challenge month! When I first started sewing, I bought, for some unknown reason, something like ten packs of bright red bias tape. I'm really not sure why. Three years later, I've still got two packs left, so I figured I would go ultra-preppy and do the light blue and red combo. I guess I'm all set for July 4th celebrations this year?

To make the petal sleeves, I started off with this helpful picture tutorial from A Sartorial Statement, but I ended up doing lots of basting and trying on and taking off and seam ripping to get the shape and size right. I'm really pleased with the final look, though, so it was worth it!

A better look at the petal sleeve.

The insides -- you can see the yoke and the elastic across the back. Also,
I used a tan-colored bias tape for the neck binding, the better to hide dirt from
 wear. Hah! Actually, it was just because I wanted to use up that scrap.
Summary:
Fabric: 100% cotton twin flat sheet, thrifted (by Emily, then gifted to me), part of a white thrifted sheet for the collar.
Notions: Six yards of red bias tape and five buttons, both originally from Joann's. More bias tape for the sleeve and neck facings. Elastic for the back, and seam binding on all the insides.
Hours: At least twelve...all that trim took forever to apply, and those sleeves weren't helpful either!
How historically accurate is it? Kind of? I mean, minus the construction and materials, it's got all the right elements.
Will you make it again? Probably not. I've already got way too many nautical things in my wardrobe!
Total cost: less than $10? I don't know how much Emily spent on the sheet, but the notions were about $5.
First worn: To lunch with Mr. Cation on my day off, then for a walk along Venice Beach (possibly the most un-Victorian beach ever). It felt so incongruous to be taking pictures for the HSF while surfers were wandering around and hip hop music was blaring from the Muscle Beach Gym. Didn't Mr. Cation do a great job snapping photos at opportune moments so as to avoid too many obviously anachronistic elements?

Black and white, now, because that's really Victorian.
It's too bad I don't know how to photoshop those sunbathers out of the picture!  

Although my materials weren't originally included in my stashbusting fabric list, the sheet and the notions have both been in my possession for over six months, if not more, so I'm counting it as a stashbusting project!