Showing posts with label Steampunk. Show all posts

Sunday, June 30, 2013

Yerking A Deceased Equine

When I was younger, I used to love playing thesaurus -- i.e. coming up with unnecessarily big words to say something simple -- and this game got better when I discovered the TV show Pinky and the Brain. At the end of the credits, they always had a random vocab word, and one of the few that stuck with me is yerk, which is when you beat something vigorously. Groaking also stuck with me, because I do that quite a bit to Mr. Cation. Anyway, all this to say, teh interwebs really doesn't need another steampunked Nerf gun. It may be beating a dead horse, but there's something therapeutic about turning this dollar store water gun:


into this:


Okay, I know, just because it's got brown "wood" bits and brass-colored bits doesn't make it steampunk anymore than sticking gears on clothes does, but work with me here, okay?

I just really needed a fun project that didn't involve sewing, and getting my hands dirty with paint fit the bill. I also learned that painting plastic with nail polish is difficult...possibly because nail polish is meant to, you know, go on nails, not cheap plastic, so I did something like ten coats to get it to look normal. Then again, that might just be because I never paint my nails, so I have no idea if there are any special techniques to minimize obvious brush strokes. 

There's not much to say about this project that I didn't already say about my previous steampunk gun, other than that I might have gotten a bit overeager in my weathering process. The black paint is quite a bit heavier...I guess this gun's just seen more action? And like my previous project, I glued on some stash buttons to pretty it up.

Button leftover from Elaine's elven gown.


So that's yet another painted plastic gun floating around the blogosphere now, and now I'm going to beat a different dead horse and join the list of bloggers who are like, hey, in case you didn't know, Google Reader is just like that dead horse, and if you want to continue reading blogs you need to take Drastic Steps! Subscribing via email, switching over to Bloglovin' or Feedly, etc. etc. etc. I'll also say that, thanks to summer vacation, I've been able to set up three additional forms of social media in case you need more Walnut Cation Designs in your life:
  • Twitter: Honestly, I'm still not sure what to do with this. I tweet random things when I remember to check it.)
  • Instagram: Mostly just Walnut pictures, so if you've ever wanted to see more of him, now you know where to find him!)
  • Facebook: Brand new page! Like it if you're so inclined. I'll post updates when I've got new blog posts, and it's an easy way to look at pictures of my finished projects all at once, without having to scroll to pages and pages of archives here on the blog.

What kind of projects do you do when you need to take a break from sewing? Or do you just never need to take a break from such an awesome hobby? 

Tuesday, September 11, 2012

Steampunk-Flavored Vest


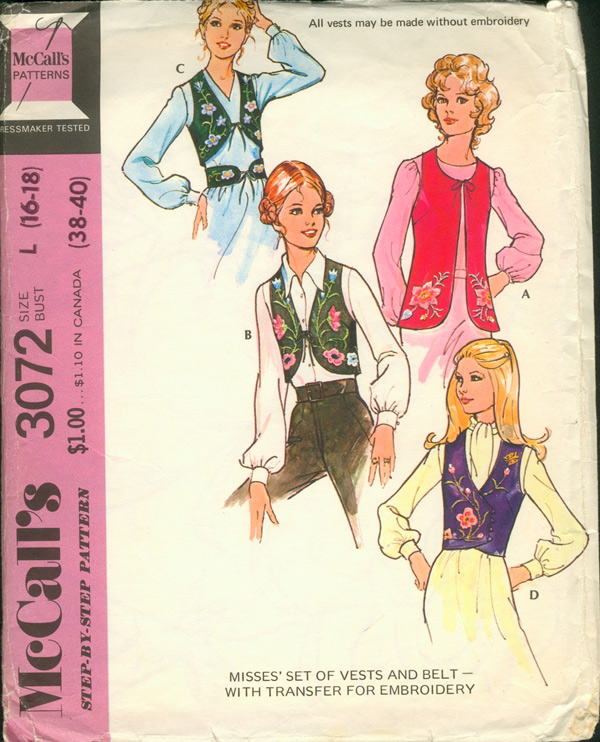
I guess I couldn't count on my streak of practicality lasting; after making something like five normal tops, I couldn't resist jumping back into costumes for a bit. After getting back to TCOCC, I surveyed the state of my sewing room (bad) and decided that I needed to get rid of some of the stash. I still had about a third of a curtain left after making my steampunk skirt, and I had thrifted a 70's vest pattern (McCall's 3072), so obviously the right thing to do was make a vest to go with my whole ensemble.

Vintage Pattern Wiki's copy is a large, mine was a
medium (bust 34-36). I used View D.
This pattern was not the best place to start for making a very fitted vest. It's already meant to be a loose-ish vest, and my copy was too big to boot. I ended up cutting my lining first and using that as a muslin, then transferring all my changes and cutting out the shell and sewing them together. In the end, it was only a matter of taking in the side seams by about an inch and a half (meaning there were six extra inches of ease!) under the arm, tapering to about 3/4" at the waist, bringing in the center back seam by about an inch at the top to get rid of the gaping, and taking in about 3/4" at the back shoulder, tapering in to 1/2" at the neck.  To make things extra fun, I also cut the back on the bias so as to get the chevron effect. I really like how it turned out, though, so it was worth the effort of pinning and fussy cutting. I also decided to go with regular buttonholes instead of the corded loops that the pattern called for, mostly because I couldn't be bothered to make corded loops.


See, it's a real working pocket!
This vest also marks my dubious entrée into the world of tailoring, and gosh what a botched debut it was! Kind of like Kaylee and her layer cake dress, only I didn't even have an extensive knowledge of machines to enchant the old men with. So yeah, I have a lot of practice ahead of me before I can make a beautiful welt pocket like Poppykettle. Maybe it would help if I were an engineer. Or, you know, I could just be more meticulous in my marking and stuff. At any rate, I'm still pleased as punch that I've got a place to put my pocketwatch now! I'm also exceedingly pleased with my (useless) epaulets and the buttons I used; they echo the buttons I used on my steampunked Nerf gun.
Seriously, that welt pocket is so ugly. That's why I made the buttons waaaay larger, so you can be entranced by the prism...

I think it's official...I am in love with chevrons!
Summary:
Fabric: Less than a yard of 60" wide 70/30 viscose-poly blend curtain fabric for the shell, 100% cotton lawn for the lining
Notions: Three large buttons, two smaller buttons for the epaulets, a snap to keep the vest from gaping
Techniques: Double welt pocket
Hours used: Eight, what with the muslin-ing and welt pocket and all
Will you make this again? I don't think so, unless I decide I need another fitted vest in a slightly more wearable fabric?
Total cost: about $2 for the buttons and lining; the curtain fabric was free
Final thoughts: I'm pretty happy with the vest, and willing to overlook the ugly pocket welts and the slightly pointy darts, mostly because it's just a costume piece. I do think it really helps tie the whole costume together, and should I decide to go to a winter event, the vest will help with the warmth thing. As it is, it was pretty ridiculously warm to wear, even just briefly for pictures in our air-conditioned apartment. Oh, and when I asked my husband what he thought, he (wisely) asked first, "What look are you going for?" When I said it was for my steampunk outfit, then he said it was just fine and worked well for that purpose. I mean, did he think I was going to wear a vest with a pocketwatch out in public for real life?! Actually, knowing me, that's not entirely out of the question.

Next costume piece to finish: something hobbit-y for Second Breakfast on September 21st...anyone in the LA area want to join me next Saturday to celebrate Bilbo's and Frodo's birthday?

Monday, July 2, 2012

Steampunk High Tea


I've mentioned before that Elaine is my dress-up buddy, but I don't know that I've ever mentioned that we are also long-time best friends. We met on the first day of high school, and after a rocky start (we were forced to work together for a group project), we discovered that we lived a block away from each other and quickly became friends. High school was all about passing notes in class (I still have an envelope of these notes, and 90% of them are about boys), running up and down the block to each others' houses to "do homework," and talking about the day we would have significant others and no longer be under our parents' roofs (and therefore rules).

Well, fast forward fifteen years (goodness gracious, has it really been that long?), and here we are, spending the summer in our childhood homes (albeit in the in-law apartments downstairs), still running back and forth to each others' houses, but this time with men-folk in tow, and no longer subject to 9 pm curfews. It's so nice to be in the same city again and not angst about boys! Even better, we can go to costumed events together! Neither of our men are into this whole steampunk thing, so we made a date out of attending a late-night tea at Rue du The together. Since I'm not going to be able to make it to  SDCC or SteamCon this year, this will be my steampunk costume event for the year. It's really just as well, considering there's still so much more I want to make for it.
1912 project blouse #0219, curtain skirt, goggles, gun (on a hasty holster), new pocketwatch from Whimsic Alley, spyglass, magnifying glass, and gaming dice tube. And a belt from Ross.

The event description said to dress in one's best quasi-Victorian/Edwardian steampunk costume, so of course I took advantage of the opportunity to break in my steampunk detective costume. It's still not finished, but I put on all the pieces I had with me (yes, I dragged a shoebox of all my pieces from TCOCC with me to the city) and was sufficiently feted by other costume enthusiast attendees to gratify my ego. Unfortunately, I couldn't get very good pictures because of the lighting, but you get the idea.

I antiqued the heck out of these pictures in an attempt to make their graininess somewhat acceptable.

I love any excuse to get all dressed up, so if it had only been a be-costumed meet-and-greet I would've been happy enough, but we got to have lovely tea, mediocre sandwiches, stellar shortbread, and tasty cake (it was not a lie) to boot. And best of all, there was live music by Unwoman, a fantastic cellist/vocalist who sings post-apocalyptic love songs and other steampunk-flavored things. There was even some attempt at waltzing inside the tiny tea shop; unfortunately neither Elaine nor I really remembered how to lead properly (although Elaine was still much better than I), and I kept tripping on my train. Note to self: if I intend to dance, I need to figure out how to bustle my skirt, or just wear one that doesn't drag along the floor. Dance hampering aside, though, I really enjoyed the swooshing of the full skirt and train the rest of the evening.

Unwoman plays in the background while Mr. and Mrs. PEERS (and others) waltz and watch.

My favorite part of the evening was probably all the mutual admiration of costumes. I love it when other people can appreciate chevrons and trims and clever material sourcing, and I in turn can appreciate their thrift store finds, beautiful piping, and hidden-bustle-pocket design features. Since this was my first foray into costume events with other amateur costumers, I was really pleased and surprised by their warm welcome...none of that you-used-non-period-textiles-and-the-shoulder-seam-should-really-be-an-inch-further-back-and-good-heavens-is-that-elastic-I-see? that I was afraid of. I look forward to more events like this in the future!

Fraulein Michelle design this gorgeous blue and brown number herself!

And can I just say that these types of events work so much better in chilly and foggy Bay Area than swelteringly hot Tucson? I was actually glad for all my layers of petticoats and stockings!

Thanks for being my dress-up buddy, Elaine!

Thursday, June 7, 2012

It's Curtains for Me!

I am in love with PicMonkey's new collage feature. No more ghetto photo-stitching in Powerpoint!

Pink seam binding on the inside, practically invisible on the outside!
I finally got my American Duchess Astorias, which meant that I could finally hem up the skirt from my newest steampunk outfit. I ended up not using horsehair braid, mostly because of how many yards the skirt hem is, and how many yards of horsehair I had left. Instead, I sewed on a strip of seam binding, then stitched a blind hem by hand.

It's been a while since I sewed up this skirt from a pair of donated curtains, but I never wrote my final notes about that skirt, as it technically wasn't finished, so if you were curious (not you, I know, Shayna!), here it is!


I am in love with this waistband.
Summary:
Fabric: About 4 yards of 60" wide (or 1.6 curtains' worth) 70/30 viscose-polyester blend striped fabric. It's impossible to get it to hold a crease, but that also means that it doesn't wrinkle. And the relatively large amount of viscose means that it still breathes fairly well.
Notions: Seam binding, interfacing, hook and eye, snaps, 7" metal jeans zipper
Hours: For the main skirt construction, about five (but that includes drafting and fiddling with the waistband), but then there was an additional few hours of hand-stitching the yards of hem. It was fine, though, because I discovered that Tom Hiddleston/Loki recorded a YA audiobook, The Red Necklace, by Sally Gardner. He has the most amazing reading voice; I could seriously listen to it all day*. As it was, I sat through Disks 1-3 while hemming.
Very non-period closures. But the zipper is lapped,
so at least it's more or less hidden?
Will you make this again? I only need so many long skirts, so probably not. Also these trained, full skirts eat fabric like nobody's business.
Total cost: The fabric was free, so I'm going to say less than $2 once you throw in all the notions.
Final thoughts: I have yet to wear this skirt out, as steampunk-appropriate outings have been scarce, but I love swooshing about the apartment in it! Walnut approves, too, as the skirt is full enough that he can hide inside it comfortably. I love the train, the chevrons, the colors, and the relative luxuriousness of the fabric, considering that I didn't have to pay for it and the curtain material is pretty substantial. I've been wearing it with a long, ruffled bohemian skirt underneath as a petticoat; considering that nobody's going to see it, and that it does just fine fluffing out the skirt, I really don't see the need to gather yards and yards of white fabric to make a "real" petticoat. Incidentally, Cecily is not wearing a petticoat in the top picture, so the skirt looks more columnar.

For those of you who were wondering (which might very well be none of you), the pattern was supposed to be the OOP Simplicity 8375, but I ended up modifying it so much that I don't think I can really say it was that pattern anymore. And besides, it's not even available anymore except from a few scattered online sellers, so I thought I'd share my "pattern" with you all. I've included the actual pattern for the waistband with the higher back (meant to accommodate both the weight of the pleats and the short backs of 1910s blouses) and chevron front, and instructions for drafting the skirt panels to fit your waist. My actual sewing directions are more on the skimpy side, as the construction is just like any modern skirt with a center back zipper and waistband. So if you've ever wanted an easy, vaguely Victorian/Edwardian, long, full skirt with a train, here the pattern download link: 

Chevron Waistband "Bustle" Skirt Pattern and Instructions

It will take about four yards of striped fabric (curtains are a good option) and the extra length in the back will accommodate a small bustle pad. It's a good option for costumes where you don't need to be historically accurate, but still want to give off a vaguely historical air. But lest my assertions seem totally unfounded, here is proof that I wasn't just being fanciful; I did have these gowns as inspiration for the smooth front with a pleated train in the back:

From this book, Harper's Bazaar, 1898.

Back view. My pleats don't fall quite as nicely, but I'm going to file this away as "Ehhh, good enough."

*Why is it that fantasy movie villains always have the best recitation voices? I am, of course, basing this observation off of my very excellent sample size of two, that being Alan Rickman/Snape/Judge Turpin (reciting a poem here) and Tom Hiddleston (sample of his reading here). Does anyone know of any other villains reading literature that I should be listening to?

Monday, May 14, 2012

Steampunk-Flavored Blouse: Done!

Please don't ask me what was going on with my hair. It looks like my head is on fire, except that the fire is...hair.

I am so in love with chevrons now.
Huzzah for me, for I have finished my first blouse! Complete with a front placket and cuffs and a collar and everything! And you know what? It wasn't nearly as bad as I was afraid it was going to be! And I'm also almost done with my vaguely steampunk Edwardian walking skirt as well! Isn't this amazing? Not a floral-patterned bed sheet dress in sight! Although to be fair, the skirt is made from donated curtains.

I already wrote about the construction of the main part of the blouse, complete with tricky sleeve construction. Finishing the cuffs and collar was fiddly and time-consuming, but not actually that difficult. I think I know, now, why my mom made so many blouses when she was a young seamstress. I'm claiming this blouse as my Sew Weekly inspired-by-a-family photo challenge, even though I don't have a specific photo of my mom in a home-made blouse like this; she has plenty of pictures in blouses she made herself. I will post a full write-up of the construction of those pieces as soon as I can, but in the meantime I'm just so thrilled with how this outfit is coming together.

How perfect is it that a lady at church would be getting rid of old, huge curtains in such a wonderfully steampunk color palette, and they weren't even polyester monstrosities to boot! They're actually 70/30 viscose-poly, and they say in huge letters to DRY CLEAN ONLY; I ignored this directive, of course (I'm not going to pay good money to dry clean free curtains), and washed them in my bathtub in cold water and mild detergent (to be perfectly forthcoming, Method hand soap, in pink grapefruit, in case that matters) and hung them up to dry. Walnut was concerned to see these giant dripping things in his bathtub, but he got over it. Which is good, because let me tell you, these curtains badly needed washing -- not because they were dirty, but because they smelled like a candle store had wandered into them, gotten tangled up, and then died inside. Seriously, when I opened up the bag I felt like I was being physically assaulted by potpourri. Anyway, now my skirt is pleasantly, faintly sweet-smelling.

You can see here the weird shape of the waistband.
The skirt is a simple four-gored skirt, originally based on the OOP Simplicity 8375. I made up a size 10, my usual for Simplicity patterns, only to find the waist grossly oversized. Rather than take in all the seams, I settled for pleating the back to make a vague bustle-ish thing, which looks quite nice with all the stripes, in my opinion. The pattern calls for a simple long rectangle for the waistband, but between the shortness of the blouse back and the weight of the bustle/train, I knew I needed to have a waistband that would be much higher in the back. I ended up drafting this chevron thing, which looks nice in the front but needs some help in the back. I still need to figure out how to fix the closure so that it looks better, but at least it's high enough to cover the bottom of the blouse. I am also still waiting for my American Duchess Astorias to come in so that I know where to hem the skirt; it just hits the ground in front right now when I tippy-toe. I'm considering adding horsehair braid to help the hem stand out, but I'm not sure how that would work in the back with the dragging train.

I still want to make a shoulder-strappy-holster-vest-type-thing to round out this outfit, and then once I throw on all my various dangly things I'll be well on my way to a full-on steampunk detective outfit! The only reason why I chose detective, by the way, is because of my birthday magnifying glass from Anthropologie.

I'm technically not finished with the skirt, so I won't write up a summary just yet, and I'll put the summary for the blouse in the construction post. You're welcome, Shayna.

The awesome thing about the weird sleeve construction is what a wide range of motion I have, all without ever having to set in sleeves or make gussets! I seriously want to put this sleeve construction into everything now. And again, please ignore my hair.

Wednesday, May 9, 2012

Steampunk-Flavored Blouse In Progress

This week's project: my next VPLL 1912 Project pattern, the strangely constructed #0219 blouse. At first glance, it didn't look too difficult, which is why I selected it. See, I've never made a non-stretchy top before (cat pajama Sorbetto doesn't really count), much less a button-down blouse. So, in the spirit of go-big-or-go-home, I decided that my first blouse pattern needed to not only be a multi-piece pattern, it also needed to be so vintage that it doesn't come with instructions. I thought that not having to do set-in sleeves would make it a lot easier, but let me tell you, it is the bizarrest sleeve construction I have ever seen! It's this odd zigzag of sleeve-to-underarm-to-bodice-side; I almost thought it was a mistake in the pattern at first. Anyway, after mulling it over and experimenting with pin-basting, I realized that it was not unlike sewing underarm gussets in technique, and proceeded wibble less, and sew more. And now that I've done it, I have to say it's one of the cleverest sleeve constructions I have ever seen as well! I may or may not try to duplicate this in the future if I'm feeling particularly ambitious...

The red line indicates the seam line...that's all one continuous stitch!

Also, in case you didn't notice, the fabric is printed all over with these little clocks! From far away, it kind of just looks like a drab, vaguely-floral, ugly prairie-dress print, but up close, well, you must agree with me when I say I thought it was perfect for a steampunk-y Edwardian blouse. I found it in the $1/yd bin at Fabric Planet (the same one Oona was recognized at!), so I'm not exactly sure what it is. It feels like a nice cotton lawn, though, so I figured it would work for a blouse. To bring out more of that ubiquitous steampunk-y brown color, I threw in some piping at all the relevant seams. After the brain-stress of the sleeves and the piping around corners, though, I didn't yet feel like tackling all those buttonholes, so instead I opted to just make my buttons decorative and have the front close with snaps instead.

Brass-colored filigree-ish buttons covering the hidden snaps underneath.
Also, they are attempting to distract you from noticing how rippled the bias strip got on the button band.

I'm really pleased with how nice all the seam binding looks inside!

Anti-climactic reveal of the blouse so far: pretty shapeless. Also, I didn't even try to match the print.

I know, it doesn't look like much yet. I promise it looks much better when it's tucked into a skirt and not just poofing out all over the place! So, the next step is adding the cuffs and collar. Unfortunately, the pattern doesn't come with a cuff pattern either, so it looks like I'll just be winging it with an appropriately-sized rectangle and lots of staring at the existing cuffed blouses in my wardrobe. As for the collar, it's supposed to detachable, but I really don't even know how that would work. Here are the pattern pieces...any ideas?

Both collar pieces are labelled "upper collar." You can also see the oddly shaped bodice/sleeve combo piece.

Tuesday, November 29, 2011

Tiny Steampunkish Top Hat How-To

Not totally steampunk, because it's missing about five million gears and cogs.

Remember the tiny gun that I made for my friend Elaine for the Tucson Zombie Walk? Well, it turns out that Elaine's psych lab group is really into steampunk (why aren't my lab mates ever like that?), so they're having a steampunk lab meeting! Everyone will sit around discussing brains and sleep while decked out in corsets and gears and things! So jealous. Anyway, she asked me to mail her the top hat from the walk so that she could be properly accessorized for this lab meeting; I decided, in a typical me fashion, that rather than finding a box big enough to mail the hat, I should just make her a tiny hat to go with her tiny gun. That way, she will always have a proper accessory should something like this come up again (which is actually not too unlikely).

Here's how I did it!

I began by raiding my kitchen to find a glass and a bowl of appropriate circumferences for what I envisioned as the base and top of the hat. I traced the circles out on a cereal box. I also sacrificed one of the yogurt containers that I use as tupperware (because I'm azn like that).
This is also the best yogurt ever. At least on this side of the Atlantic. There is nothing quite like yogurt in Europe.

I cut the base off of the yogurt container and cut a slit down the side. This yielded a nice template for the side of the hat, which I wanted to be slightly larger up top, just like the yogurt container. I traced this template onto the other side of the cereal box.
Ignore the cat head that wanted to investigate this madness.

The resulting cardboard piece. Cut it out, curl it up, and tape the sides together.

A raid of my fabric stash yielded the scraps leftover from my ren-faire bodice, fittingly enough. I cut out a circle a little larger than the top of the hat, then spread tacky glue all over the cardboard to attach the fabric circle. I folded the sides over to get it covered on the edges, too.

Just fold the extra edge bits over. I had to add a heavy textbook on top to get the edges to stay while it dried.
Repeat the steps above to cover the side piece (slightly larger fabric scrap, glue and fold over the edge).
I didn't bother adding glue all over the sides, just at the seam.
I then cut out a hole in the center of the base cardboard circle, trimmed a fabric scrap to match it (with enough extra on the sides to fold over again), then glued it all together. Note that I clipped the middle circle to get it to fold over.
The circle line is traced from the base of the side piece. I cut the hole a little smaller so there'd be a lip for it to stand on.

No need to be super exact on the cutting here!

All folded over. Looks kind of like a messy Star of David.

All nice and neat on the other side!
At this point I broke out the hot glue gun and proceeded to assemble all the pieces. This was done a little haphazardly by squirting a circle, then plopping the next piece on top. Unfortunately, it resulted in ugly glue seepage at all my edges.
It looked a lot worse in person.

To cover this up, I raided my trims for black braids, then glued those on to cover the glue. Ironic, isn't it. I used hot glue for the fat braid at the base, and tacky glue for more control on the thin braid at the crown. Finally, all that was left was decorating! I found a button to match Elaine's outfit, and hot glued that on along with some black tulle and a feather from one of Walnut's cat toys. I am nothing if not resourceful.

In order to secure this tiny hat to Elaine's head, I cut a circle of black felt to cover the bottom of the hat, added a strip of black felt through which a headband or hair clip could be inserted, and used that to cover the mess on the bottom of the hat.

I really, really, tried to get Walnut to wear the hat before sending it off to Elaine, but he was all like NOOOOO WAT IS THIS DESCENDING ON MAH HEAD DO NOT WANT. Sorry, no adorable picture of a cat in a hat. Have this t-shirt instead.

On the dress-making front, I have finished my Superman dress and it is pretty epic, if I do say so myself. I'm hoping to get some pictures later when the sun comes out.

Tuesday, October 25, 2011

Tucson Zombie Walk 2011: Steampunk Zombies!

Photo courtesy of Brittany Ann Barber, from the Tucson Zombie Walk Facebook page.
I am back from Tucson and pleased that it is not ninety-plus degrees during the day, although I could use balmy evenings. Elaine and I had tons of fun dressing up as steampunk zombies; it was a thrill to see all my costume components come together so nicely! Since the walk took place after dark, we got some shots before the walk began, at a convenient castle across the street from Elaine's apartment complex. Yes, I said castle. Apparently the guy across the street just wanted a castle, and so he built himself one. It made for a very atmospheric shoot.

I supplied Elaine's hat and guns. Everything else was hers.

Don't mess with me. I'm a zombie with guns. And a d20 to determine your fate.

You shall not pass! Also, I wasn't kidding about the castle. It has a front gate and everything.

We were so pleased with ourselves that it was hard to stop grinning. Even if it wasn't very zombie-like.
My very first zombie walk was over a year ago and I was just a kid grown woman in a paint-splattered, haphazardly torn t-shirt, marveling at the attention to detail exhibited by other zombies. I remember being floored by how awesome some costumes were and shyly asking if I could take pictures. Well, this time it was my turn to be approached for pictures, and gosh it was gratifying! Maybe I'm just a shallow, easily-flattered egoist, but honestly, that was my favorite part. There were definitely other awesome costumes there that night, including but not limited to a zombie Arthur Dent and bowl of petunias, a zombie Dr. Who group, and a steampunk zombie hunter with an impressive home-made light-up jetpack. My favorite part, though, was the families who went zombie together. There's nothing quite like tiny zombie Darth Vader or tiny zombie brides.

The costume components held up remarkably well, considering. My skirt was hemmed with flats in mind, so I was able to wear my comfortable flat boots. At the last minute, I added a purchased pocket watch necklace (can it still be called a pocket watch if it's not in my pocket?) from Forever 21 and my tiny gold D&D dice-in-a-vial necklace (attached to my belt...so it's a beltlace?).

The goggles I ended up balancing on my head, exactly how I tell my students they shouldn't wear their chem lab goggles. To attach the straps in the back, I ended up punching a couple of holes in the leather and inserting eyelets, then tying it all together with a scrap of ribbon that matched my skirt. Unfortunately, I realized the downside to loading up already-heavy goggles with a bunch of plumbing fixtures, gears, and brass -- by the end of the night I had a serious indentation right at my hairline from the weight of the goggles! Three days later, I still have a faint bruise, but nothing my hair won't hide. I think it's time to glue a strip of felt to the plastic...

To get the zombie look, we used a combination of gray cream make-up, zombie dirt, fake wounds, and congealed dirt from the Halloween store, and peacock-green eyeshadow and black powder eyeliner from Walgreens. This was a vast improvement on last year's fake-skin product, which had weird fibers in it and was a beast to mold. Also, it eventually started peeling. The fake latex fake wounds were like stickers that you peel off and stick to your (clean) skin; it sticks so well that getting it off afterward was like trying to detach a painfully stubborn band-aid. The congealed blood, which came in a tiny plastic lip-balm-looking container, worked much better than the "normal" fake liquid blood in a tube, both in that it didn't drip everywhere and in that it "clotted" on our fake wounds, making them look less obviously like stickers.

Look at how gloppy that blood is! Also, if you look carefully you can tell I'm checking my iPhone. Photo courtesy of Joel Smith, again, from the Facebook page.

Even though the walk itself was kind of long and through some fairly deserted lots in downtown Tucson, it was still extremely fun to be dressed up and shambling through the streets shocking passers-by. There were definitely a lot of people who knew what steampunk was, and a lot of people commented on the gun and goggles. The best compliment of the night, though, was definitely the kid who goggled at my goggles (sorry, couldn't resist) and said "You're like Mrs. Dr. Horrible!" I hope one day my kid is that awesome.

Photo courtesy of Joel Smith, from the Facebook page.