Tuesday, April 28, 2020

I'm Part of the #ADCapeCult Now!


I've loved American Duchess for a long time, from their gorgeous historical shoes to the very helpful blog chronicling the making of various items of historical clothing, the accessibility of their Simplicity patterns and their informative Fashion History podcast. Somehow it escaped my notice that they had a Patreon page, but then all these costumers I admire and follow on IG were posting about making this 1912 wrap cape from a free pattern by AD. So now, a week of naptime/post-bedtime sewing later, I have a cape and am a patron of American Duchess!


I actually had this cape pinned ever since participating in the VPLL 1912 Project years ago, so of course I had to make it. It seemed like most IG-ers were either making neutral gray/black/brown versions, and a few people made capes in their Hogwarts house colors. I knew I wanted to go vivid, and I had a red brocade tablecloth that I got at a thrift store several years ago that I actually meant to make into a cape...but I'm so not a Gryffindor. In fact, when I took a Sorting Hat quiz that tells you what percentage of each house you are, I think I got something along the lines of 67% Slytherin and 33% Ravenclaw, and zero percent Hufflepuff and Gryffindor. In other words, if you want someone to learn a lot of information and then use it for their own ambitious ends, while not caring about other people or the right thing to do, then apparently I'm your person. *insert laugh-crying emoji here* I think I had a genuine existential dilemma for five minutes about making a red cape when I'm so not a Gryff, but in the end I decided I wanted a red cape too much, and  since I was lining it in black satin, I could just call it a Fire Nation cape. Not that entire fictional countries must match up to Hogwarts houses, but I really do think the Fire Nation (as evidenced by its royals) is the most Slytherin nation in ATLA. Nerdy crossover fanning aside, though, I'm so glad I went with the saturated dark red, both because that's one of my favorite colors to wear, and because if you're going to make an impractical historical cape, you might as well go the whole way and make it an impractical color too?


The AD pattern is done on a tiny grid, like Janet Arnold's Patterns of Fashion books. When I was making JA patterns, I enlarged them by drawing on the back of wrapping paper that was printed with a 1-inch grid. I don't have any gridded paper anymore, so I scaled up the pattern by plotting it on medical paper (which is very thin and see-through) laid over my gridded self-healing cutting mat. It took a couple hours (with lots of interruption from kids, so YMMV), then another couple of hours to plan the layout on my tablecloth and cut the pieces. Somebody on IG pointed out that the shoulder seam notch on the cape piece didn't make sense grain-wise, and many people pointed out that the cape was two inches too short on the back piece when you walked the back-cape seam. Putting together these two pieces of information, I decided to rotate the cape piece back two inches: this makes the hem line up and also puts the grainline perpendicular to the floor when worn. Other than that, I didn't have any issues with making up the garment. The darts did take forever to mark and pin, and my polyester fabrics were tricky to press well without getting a weird shine (thank you, silk-organza press cloth and wooden half-dowel), especially on the collar. I also decided to make the cape theoretically reversible, so that meant changing up the collar fabrics and putting the contrast piece on both sides. Hemming the back piece at the end also took a couple of tries before I got the tablecloth and the satin lining to hang right together. To add some additional visual interest to the cape, I decided to add little chain tassels to the collar corners to mimic the buttons at the shoulders on the original cape. The cape is secured at the ends of the wrap pieces with hooks and eyes.

I seriously love this tablecloth. 

Annnnddd...flipped!

And worn flipped. 


The finished cape is just delightfully full and twirly and swooshy and good for dramatically storming about. If I were Snape (because a chemistry teacher is just a step away from potions professor, right?), I could flounce about most pleasingly! My only regret is not checking the shoulder fit before cutting and sewing: with my wide shoulders, the only way to get the shoulder seam to not sit obviously too far in toward my neck (and therefore make the cape hang funny) is to wear the wrap portion too loose. It's not the end of the world (that would be coronavirus), but I just wish I'd thought to check. It's been so long since I've sewn a new pattern that I forgot what issues I usually need to adjust for.


Why is red so hard to photograph in the only somewhat-still-lit corner of our backyard when we sneak out to quickly snap some photos while the kids have their half hour of screen time? Oh wait, I think I just answered my own question...


Summary:

Pattern: the American Duchess 1910s Wrap Cape pattern, free on their Patreon page

Fabric: a thrifted dark red poly-cotton brocade tablecloth, and black polyester satin from a friend's destash for the lining. I'm really pleased that I was able to make this suddenly-jumped-to-the-head-of-the-sewing-queue project entirely from stash materials.

Notions: three sets of hooks and eyes from a charity shop that I got on one of our anniversary trips to the UK, and two chain tassels that used to be earrings that I got at a clothing exchange.

Hours: Five for prepwork (scaling up the pattern, layout planning and cutting, pinning darts), then maybe another three for sewing and an additional hour for evening out the hem, sewing hooks and eyes, and adding tassels, for a total of nine hours.

How accurate is it? My fiber content is obviously anachronistic, but in terms of general look and "passing," I'd say pretty good!

Total cost: A whopping $5 for the tablecloth!

Final thoughts: How can you not love a cape? It's impractical, especially with young kids who see such a giant expanse of fabric as basically a giant napkin, and of course there's the fact that I made outerwear from non-breathable fabrics right as the weather is heating up, but I regret nothing. I'm so thankful that AD put out this pattern at this time, and I'm glad I can support their business even a little bit by being a patron.


Saturday, February 29, 2020

A Bed for Buddy Bear

SHB#2's favorite things right now are the colors pink and purple, flowers, butterflies, ladybugs, and taking care of her best friend, i.e. a stuffed bear almost as big as she is, named Buddy Bear. I'm not really sure how this happened, because I have most definitely not been pushing her toward (if anything, I've been pushing away from) stereotypically feminine colors or iconography or expectations for future childcare responsibilities. She does also enjoy large trucks and construction vehicles and Star Wars, but I'm trying to be a good feminist by not only not pushing her toward traditional feminism, but also not looking down on those interests if that's what she honestly enjoys. To that end, February's Kraft-tex project was for her.


When I got the February's Kraft-tex color of the month package, Orchid, SHB#2 immediately claimed it as her own: "Oh, eet's poh-poh! Eet's my favorite!" (i.e. it's purple: I love the way her toddler self pronounces things.) She's also been wanting a bed for Buddy Bear; ever since starting preschool she's been wanting to reenact her day with her bear: feeding it breakfast, doing circle time, teaching it songs, taking it to the potty, and putting it down for a nap. That last one is tricky since it's been established that the stuffed animal bed is a dog bed that's in SHB#1's room, but most of the time we need to leave the door to his room closed lest she destroy his Lego builds, so she could really use her own stuffed animal bed. I figured the size of a Kraft-tex sheet (18.5" x 28.5") was about the right size for a very shallow tray that would look more or less like the dog bed, since in SHB#2's mind, that is what stuffed animal beds look like.

With a little pillow because I had some scrap muslin and batting. 


Since I still haven't taken my machine in for servicing (hello, #onepersoncostumeshop season), I knew I wouldn't be able to do anything that involves joining two layers of Kraft-tex together without getting unsightly gaping or weird stitch tension issues, and ideally I wanted to be able to flatten the bed and potentially harvest the Kraftex after she gets over this stage of play, so I thought for a long time about how to make a tray that fit those parameters. I ended up lining the Kraft-tex with a piece of flannel (pink, with ponies and butterflies and flowers, per her choice from my stash) and then doing some experimental folding to get it vaguely tray-like. Once I figured out how I wanted to fold the corners, I creased all my fold lines with a hera marker, then used those lines as guides for stitching. I also made two channels along the long edges so that I could insert large cable ties (leftover from corset-making) to help keep it from being quite so floppy. Then it was a simple matter of using my awl to punch holes in the ends and then threading some ribbon through to tie it all together. I was originally going to insert grommets for sturdier and more photogenic ribbon holes, but TBH my customer did not care and has already claimed the bed for use, so maybe I'll go back and insert them later. But probably not.

So much pink and purple. I just folded over the edges of the flannel and zigzagged all the way around the edges. It's not the prettiest but it's functional and I think actual bias binding would have been too thick for all the folding. 


Here's a diagram showing how I did my folds and stitches and holes. The corner squares are 4" x 4", and all the lines inside the rectangle represent stitch lines where I sewed the flannel and Kraftex layers together. In addition to stitching, the dashed lines represent valley folds and the dotted lines represent mountain folds; the dash-dot lines that were NOT folded are my additional lines of stitching for the cable tie channels. Lastly, the circles mark where I put my ribbon holes. I punched these with my awl through all three layers at once when the entire thing was folded up (with WonderClips to hold the edges in place) so that I could be sure they would line up with each other properly. The final tray is just the right size for Buddy Bear, but still leaves a large flat portion of Kraft-tex in the middle that can be reclaimed and reused when SHB#2 no longer needs it as a bed. The ribbons also make it so the bed can be "taken apart" and flattened should it need to be stored away.
I feel like the SAT Math test, having to post a disclaimer that this diagram is not to scale. 

Perfect size for Buddy Bear (who, in case you want to know, is from Target's Cat and Jack kids' bedroom line).

All tucked in!

Of course, most people don't need very shallow tray beds to fit this very specific bear, but you could use this same principle to make a different sized tray depending on your needs, and maybe you'll actually take the time to put in nice grommets!


[Note: C&T Publishing provided the Kraft-tex for this project.]

Wednesday, February 12, 2020

A Brandy Cinderella Dress for a Small Human Being

Cinderella was my first favorite princess. My dad likes to remind me that when I was in preschool, he read the Disney Cinderella book to me every night at my request until he had memorized it. Cinderella was the reason why my parents started calling me Cindy (because my name is not actually Cation), and I watched the movie so many times that I have to think it must have had some effect on my eventually learning to sew, because I'm pretty sure it has the longest sewing sequence in a kids' movie. My parents were too frugal to ever buy dedicated costumes or dress-up clothes, but no doubt I would've worn a fancy Cinderella dress to rags (in a bizarre reversal of the movie's progression) had I owned one. I don't love Cinderella now (I much prefer my princesses to have more agency and badassery, like Mulan), but I will always have a soft spot in my heart for her. So when SHB#2's best friend, K, who loves Cinderella and dressing up, turned three last month, I knew I wanted to help make her princess dreams come true.

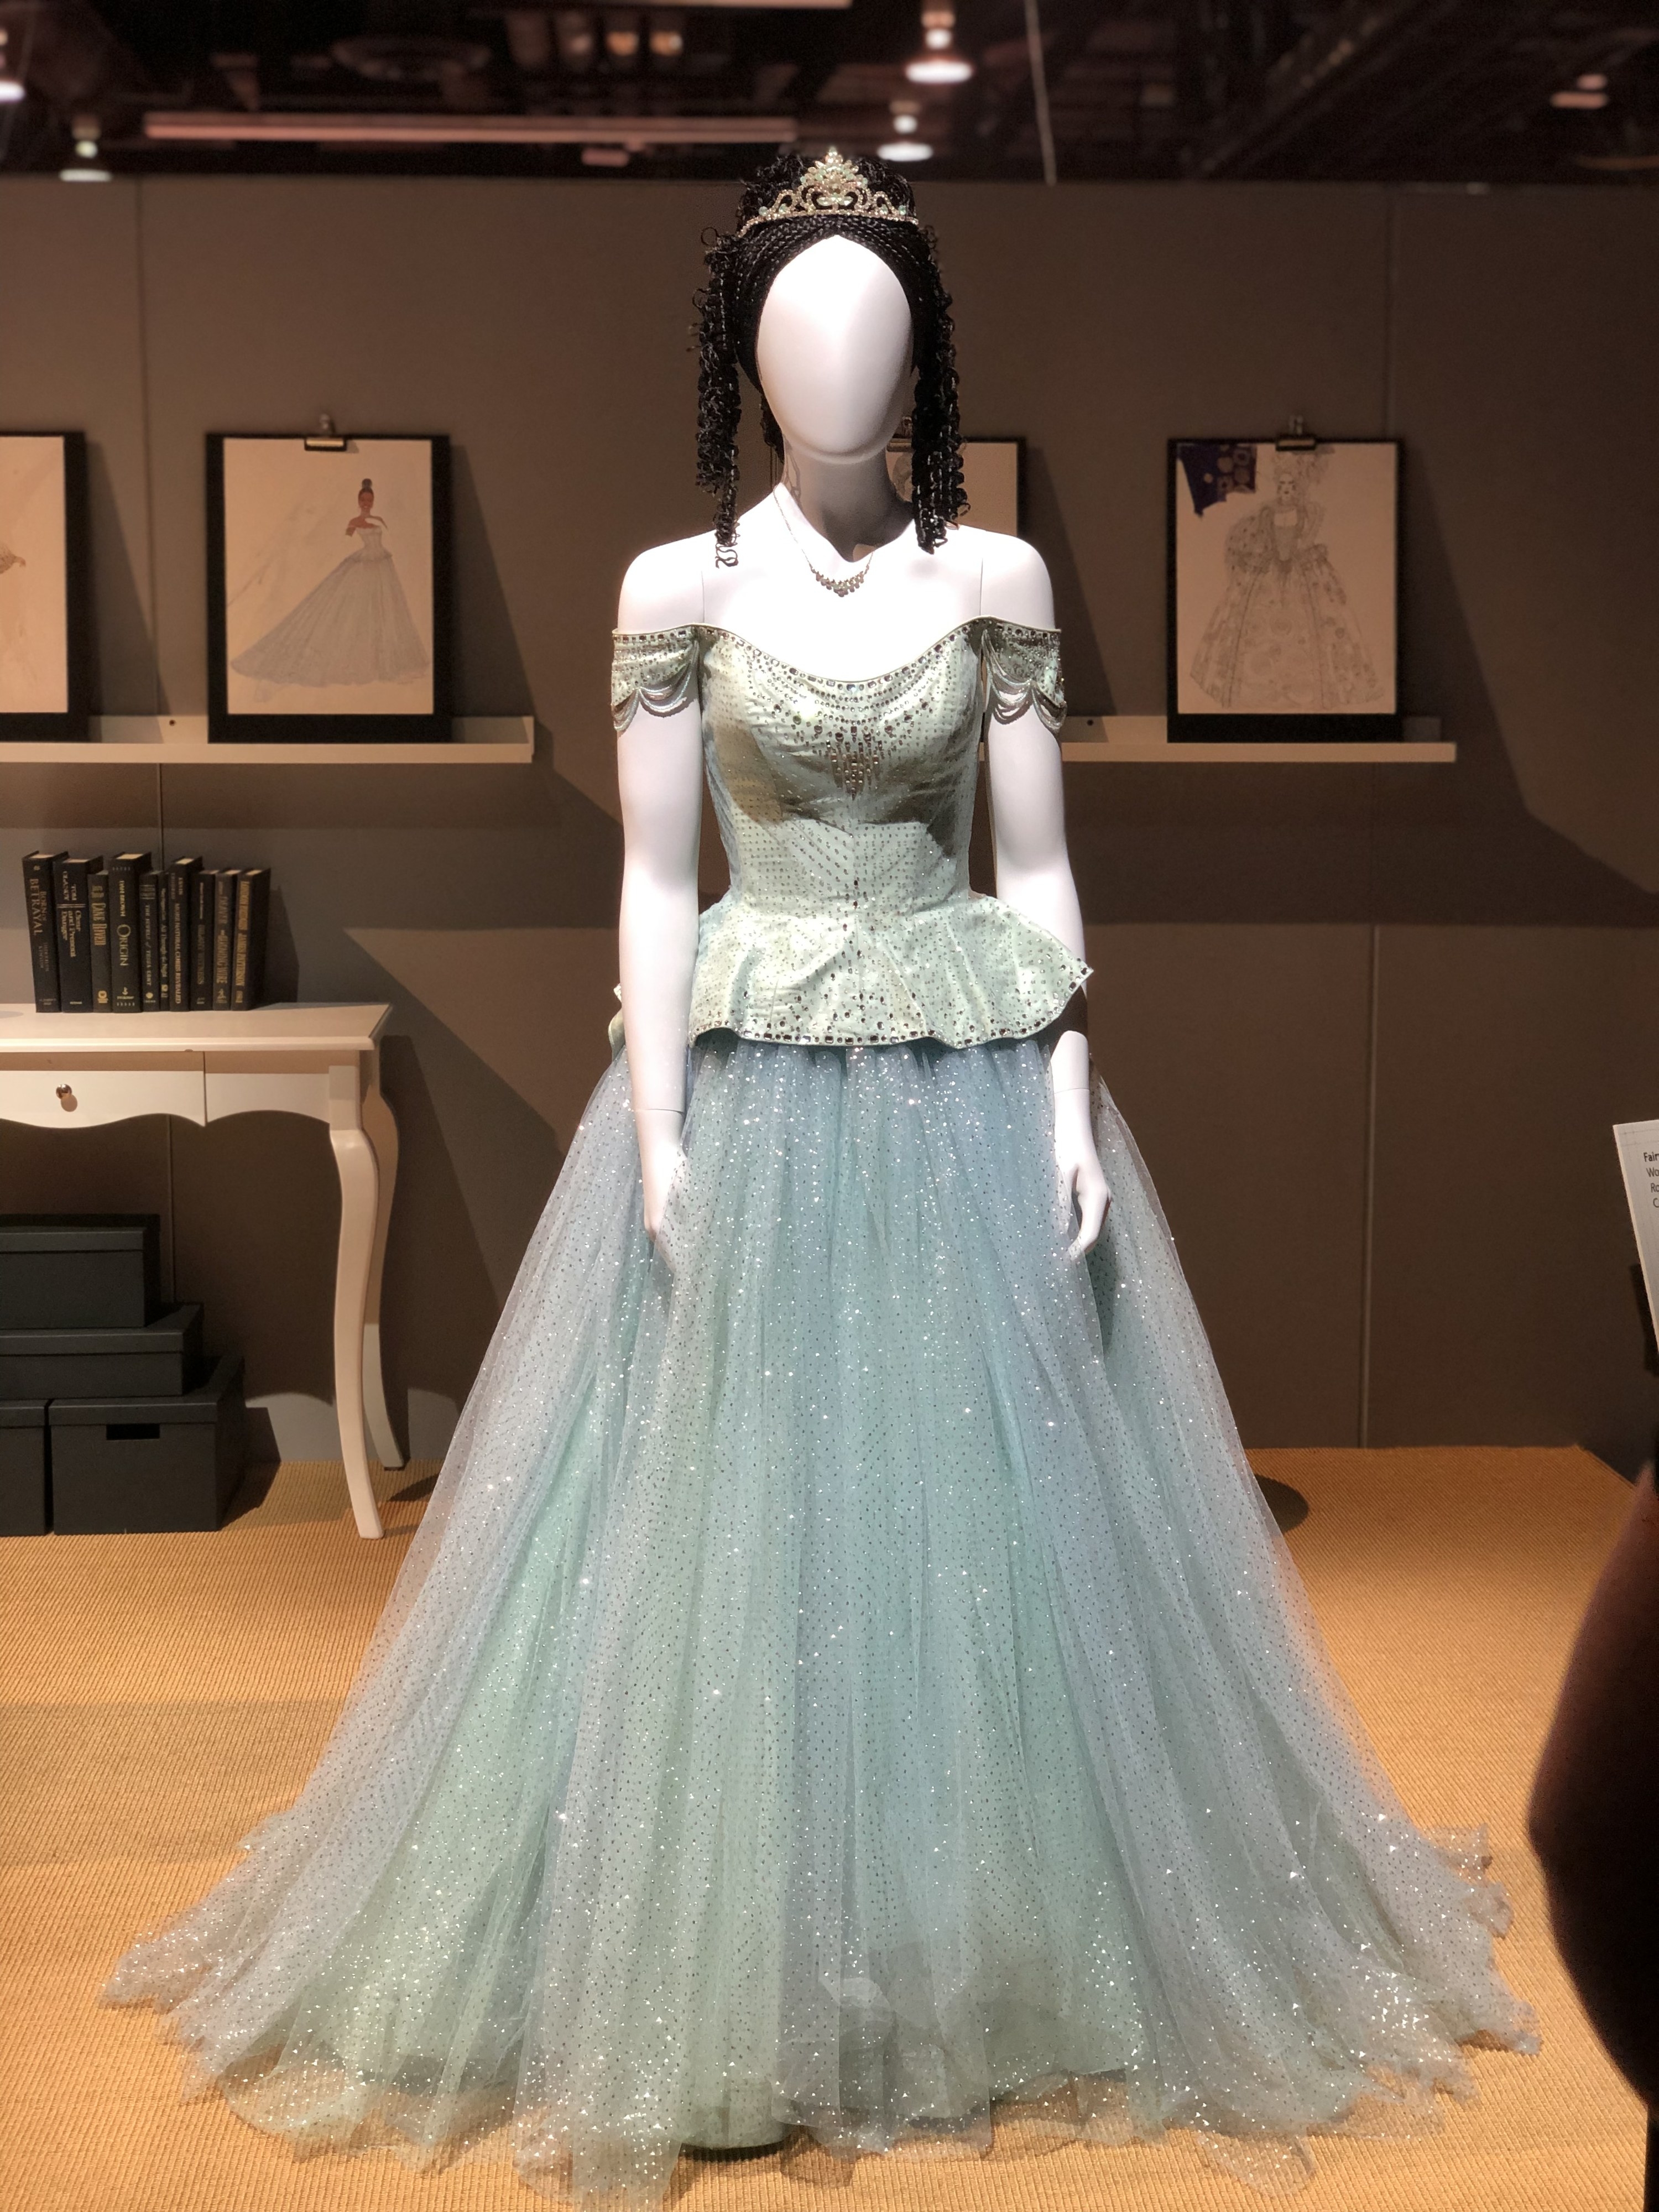
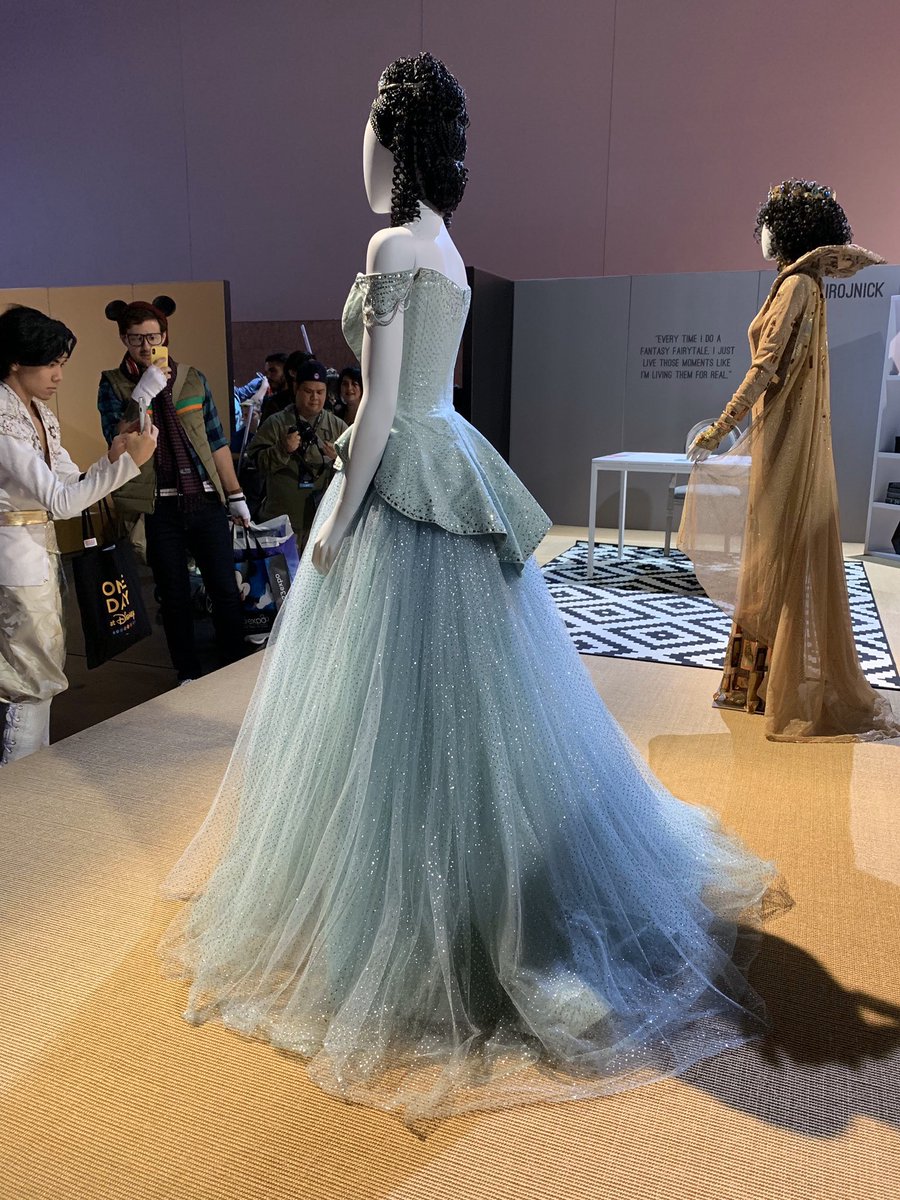
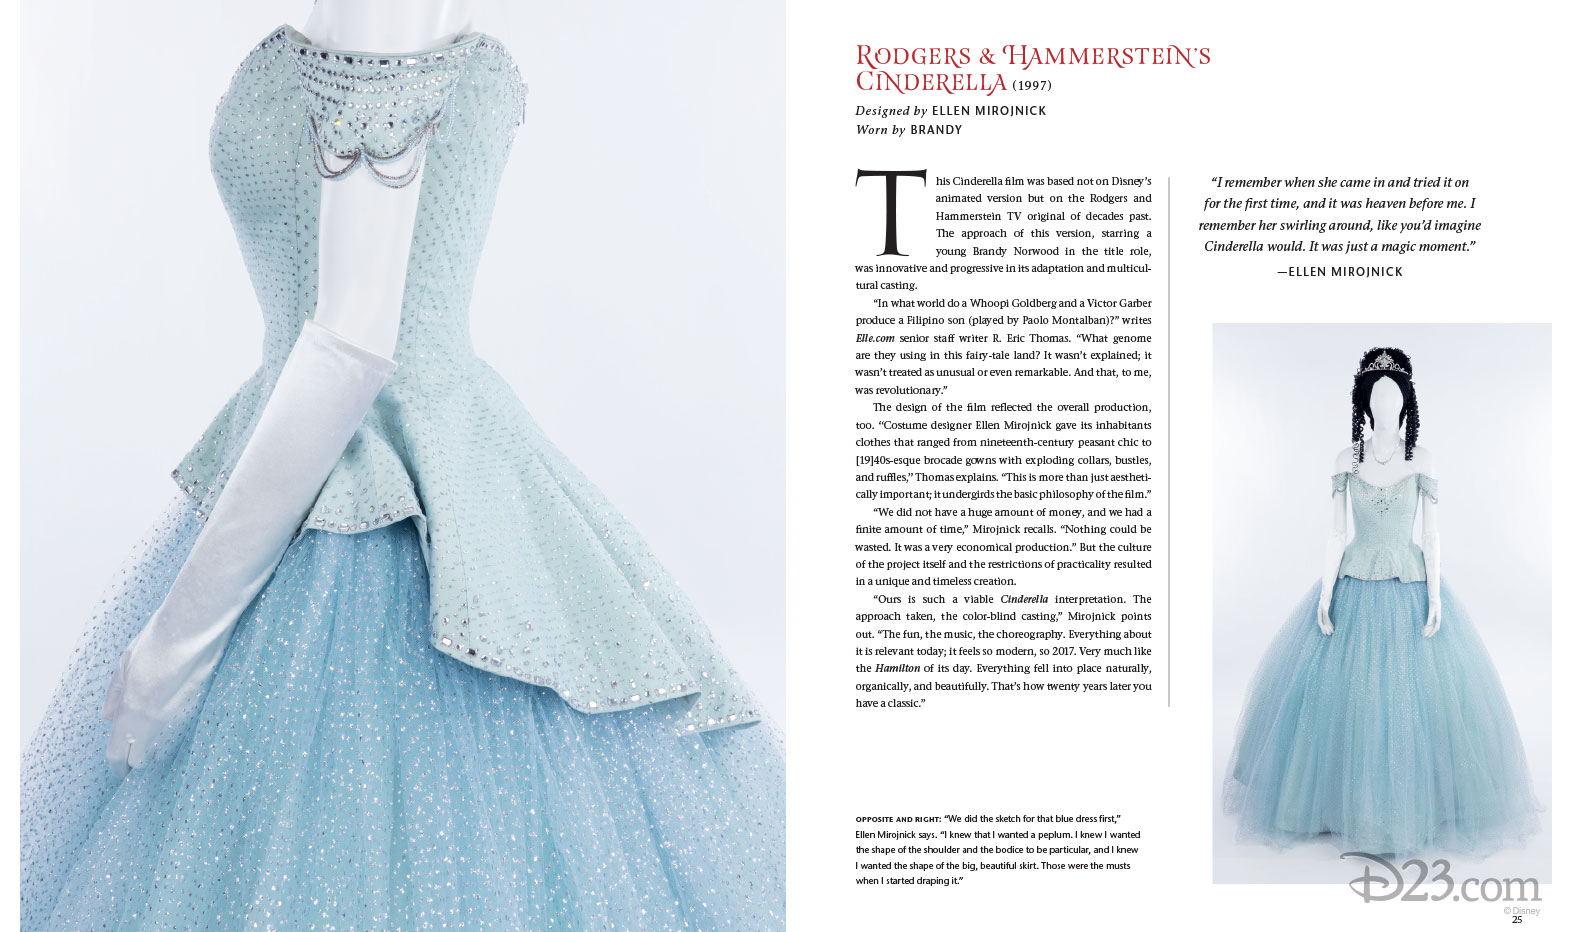
Here's the catch: K loves the 1997 Brandy version of Cinderella, and not the classic animated Disney one. There are tons of tutorials and patterns out there on teh interwebs for the classic Disney dress, but not much for Brandy's ball gown. Thankfully, at last year's D23 Heroes and Villains costume exhibit, the Brandy gown was on display so there were plenty of good reference pictures available even though the film came out awhile ago. I picked up a couple of different light blue sparkly fabrics from Joann's remnants selection (I make exceptions to my no new fabric buying rule for gifts, but even then I try to shop the remnants for small pieces that other people may not want) and started plotting about how to make this dress happen for a very small human being.


I love that  on the left you can see an Asian guy dressed as Paolo Montalban's prince taking a picture of the dress on display...I mean, how often does one get a canonically Asian, non-animatedprince?  


Having taken the evening gown construction class, I now know that a waist stay and boned bodice are essential for having a strapless dress stay up, but obvious I wasn't going to be putting such structure into a child's dress. Also, the fabric I found for the bodice was stretchy, because I wanted this to be a comfy, easy(ish) to put on fun costume. I decided that clear swimsuit elastic was the way to go, in the form of straps to hold up the top while the little droopy sleeve swags just hung decoratively. I knew that K and SHB#2 were more or less the same size, so I used one of her tops to draw up a vaguely raglan-sleeve-type pattern, where the sleeve had enough room to fall off the shoulder to look like Brandy's dress. I sewed some pintucks on the front and back to visually mimic the Vs made by the rhinestones on Brandy's dress, and added some pearls and silver beads from my stash to give the suggestion of a jeweled dress without covering the entire thing. Since the velvet is sparkly, I think the overall effect is sufficiently fancy. After semi-blinging out the top, I cut and attached a circular ruffle that was longer in the back to match the peplum on Brandy's dress.

Sorry, these are really not the best pictures because 1) glittery/sparkly throws off my phone camera, 2) our house does not get great light, and 3) SHB#2 was grabbing me while I was trying to quickly snap some pictures before wrapping it up to leave for the birthday party.

Tiny silver and pearl beads at the bodice neckline! Also, the tiara was one I bought for a costume party in high school, wore once, and forgot about until my mom was cleaning and found it and gave it back to me. I figured it should go to a little girl who could actually appreciate it. 
Back!


Brandy's skirt has layers and layers of fluffy tulle, but I couldn't find a good color match at Joann's. I did find half a yard of this nylon net with embroidered glittery flowers, though, which I deemed to be good enough. I layered it over some white dotted net (leftover from this top) and periwinkle blue knit fabric (leftover from making Mulan costumes) to get the blue-ish layered look, which worked pretty well, I think! The three layers were gathered into a white 2"-wide soft elastic waistband, then I hemmed the knit, innermost layer with some horsehair braid to help it stand out and away from tiny feet. The dotted net layer I left unhemmed, and the outermost embroidered flower layer has a whopping five inch hem. Since I didn't want a line of stitching going around the skirt, I just hand-tacked the flowers together where they overlapped. The nylon net is sheer enough (and there enough going on in the underlayers) that the overall effect is a mostly invisible hem, with the added bonus of the wide hem helping the overskirt to poof out more. With such a generous hem and the elastic waistband, there's plenty of room for growth (at least in the skirt, if not the top) for years to come.

Sparkles and glitter abound!


You can see the three layers of fabric here. 
Here's a close-up of how I folded over the outer layer. The flowers lined up very nicely, and the stiffness of the embroidered flowers at the bottom also help to keep it from collapsing in on itself. 


I think the finished outfit was received pretty well, considering K put it on right away and has been wearing it regularly ever since. I know the Selfish Seamstress (oh how I miss her presence in the sewing blogiverse!) says that sewing for kids is not to be done, but alas, motherhood has changed me and I am less selfish about sewing for others now. That said, I'm still only going to sew fun things, like costumes!

Blurry again, because have you ever tried to get a photo of a three year old in the evening, indoors?


The only problem is that throughout this process, I kept trying it all on SHB#2, such that by the end she thought it was for her. She was a little disappointed that it went to her bestie, so I think this means I need to make a floofy princess dress for her now...

Thursday, January 30, 2020

Back to My Roots

This past Christmas, I celebrated (okay, posted on IG stories) my sewing machine's tenth birthday. Mr. Cation got me the machine for Christmas in 2019, and the first thing I did was sew a whole slew of zippered pouches. I started out with unlined pouches, then added appliqued cats, then graduated to lined pouches and then even pouches with little "windows" that gave a hint as to the contents. It was good practice for sewing in straight lines, being precise, and thinking about how one would need to arrange right and wrong sides of outer and inner fabrics in order to get the correct sides showing and raw edges hidden, and the mass output was fine because you can always use more containers for things and they made for nice little hostess- or stocking-stuffer-type gifts. Then I discovered garment sewing and, with the exception of some forays into plushie- and quilt-making, I pretty much stopped sewing non-wearable things.

Now that I have small human beings, though, I need more zippered pouches to contain all the miscellaneous things that they "require." Requirement being a loosely applied term, though, because the other day SHB#2 "required" that I bring for her 1) a reusable ice cube, 2) two unopened packets of hot sauce, 3) a small pair of tongs, 4) a slap bracelet, and 5) an old hotel key card. Kids and their treasures of the day: you never know what piece of junk will be indispensable! At any rate, it's much easier to contain all these little things in a zippered pouch instead of in three tiny pockets or two tinier hands or one enormous diaper bag that also contains changes of clothes and washcloths and restaurant toys and water bottles and sunscreen and hats. So, more zippered pouches it was!


Coincidentally, at around the same time that I realized I was going to need more zippered pouches, C&T Publishing contacted me about trying out Kraft-Tex, a leather-like fabric that is made from mostly paper and a small amount of synthetic latex. I was intrigued, because I don't love using leather (when I do, I try to source it from thrifted items) OR pleather/vinyl (which is terrible for the environment), but there are some costume items that kind of require leather or leather-looking materials. I agreed to try out Kraft-Tex, thinking that if it worked out, I would be able to use it for the "leather" sections of the Pozu-knockoff Rey boots I'm theoretically trying to make. C&T Publishing has a color-of-the-month program for bloggers, where they send you a different color 18.5" x 28.5" sheet each month in exchange for a blog post about a project made with it. January's color is Crimson, which worked out because you know, Chinese New Year! Much red! So lucky! Very fortune! Wow!

Tiny toddler hand sneaking in to grab a pouch because this girl loves bags. She is forever running off with my make-up bag, my pattern weights bag, my pencil case, etc. 


I was able to get three zippered pouches out of my piece of red Kraft-Tex, and I learned a lot in the process. I've had some experience sewing with trickier materials, but this still felt like a pretty steep learning curve, mostly because, like leather, once the needle goes through the Kraft-Tex, the hole is permanent. The Kraft-Tex is very stiff, so while it is bendable, it's not easy, so manipulating around curves on a non-flat object was tricky. It's also quite thick, so my (admittedly cheap) machine didn't have enough power to get through multiple layers and I had to resort to using the hand wheel. Also, I still haven't been able to get the thread tension right (although that might also be because of my machine, not the material, since my machine is oh, two years overdue for a tune-up), so there's a pretty visible gap between the pieces when there's tension on the seam. All that said, I do really, really like the look and sturdiness of Kraft-Tex, and the fact that I don't need to interface it, so I want to try again after my machine's been serviced and see if I can't figure out a better way to sew with it. Anyway, here are the details!

It's hard to photograph this bright red material with an iPhone,
but hopefully you can see that it does have a nice leathery-looking texture.


Wonky hand-stitches on the bias binding, because by
that time I couldn't be bothered with keeping things
neat while sewing with pliers. 
The first pouch was Aneela Hoey's Zip-Up Tray Pouch, which I first heard about from SewBrooke. It's a tray that zips up into a nice little carrying case. I originally planned to give this to my son for putting Legos into so that he could bring them to different places to build, but since it doesn't close up all the way, tiny pieces can still fall out. I'm using it for my sewing stuff instead, since I really do like how it zips up somewhat compactly, but still allows for opening up to see all the contents without having to rummage to the bottom. In retrospect, this was a poor choice of first project for a new material, since there's a lot of tricky maneuvering to get around the corners, and the bulkiness and stiffness of the Kraft-Tex made for hideous stitching on my bias binding. It's kind of embarrassing to look at, but it's functional? I think I forgot that, just like with garment sewing, it's important to match the material to the pattern and not assume that you can force any material to work for a particular project. 


Fat and happy taco cats! And burger cats. 


I then made the Noodlehead Open Wide Zippered Pouch two times, thinking that less weird maneuvering would be better suited to the Kraft-Tex. Since my machine didn't like sewing through multiple layers of the material, I used a different coordinating fabric for the part that would actually be sewn to the zipper. My sister was planning to donate this sweatshirt with cute junk food cats all over it; the print is cute but the fabric is 100% polyester and feels pretty awful. I figured it would work for a non-garment application, so I fused a some light interfacing to the back to increase stability since it's a knit. I thought everything would be pretty easy since I wasn't manipulating strange shapes under the presser foot, but I realized when I flipped the pouch right-side out that my thread tension was all off, so the bottom looks pretty bad. It's still functional, but I wouldn't want to say, gift it to anyone. I made one more pouch with the same combination of fabrics but without the boxed corners on the bottom, thinking that that would reduce the obviousness of the thread tension issues, but it was only partially successful. The gaping is less noticeable, but still present, so I wouldn't quite call this a win. 

Top pouch, lined with a fruit-print quilting cotton from the stash, has been claimed by SHB#2 for holding her random treasures: a garbage truck, two magnetic pigs, pink and purple Duplo blocks, some Trader Joe's stickers, and her "phone," which is actually a random remote. The flat pouch, which I keep in my backpack, has extra utensils for if we go places that only give out disposable ones. The fold-out tray has all my essential sewing stuff for bringing to class: paper scissors, fabric scissors, pencil & eraser, fabric marker, tracing wheel, chalk, seam ripper, awl, tape (for flat pattern manipulation), hera marker, French curve, and extra bobbins. I should have a box of pins in there too, but I took it out to use. 


In the end, I do have three serviceable pouches that have already been corralled into holding things, and I love the look of the red with the cats (which vaguely remind me of the similar-colored Chinese lucky cats). It's very appropriate for a Chinese New Year set of projects, although cats are probably inappropriate for it being the Year of the Rat and all... Also, I'm feeling more motivated to actually take my machine in for its tune-up, which always seemed a little silly to me, seeing as how that costs as much as the machine itself originally did, but then I remember that I'm all for making things last as long as possible. 

Thursday, January 9, 2020

A Very Star Wars Halloween

Raising Small Human Beings is oftentimes an exercise in simultaneous frustration and amusement, and the selection of Halloween costumes is a prime example. When SHB#1 was three, he was obsessed with zebras, so he wanted to be a zebra for Halloween. That was fairly easy to make, and the fleece zebra suit I made for him got plenty of wear afterwards for pretend play. The next year, he was into construction vehicles and dinosaurs, so he alternated between wanting to be a pteranodon, a stegosaurus, or a "construction stegosaurus." I managed to convince him that a stegosaurus would have a hard time fitting a construction vest over the plates on its back, and together we settled on his being a "construction zebra" since the zebra suit still fit. I had to laugh when I saw his class picture: so many store-bought superheroes and princesses, and a lone zebra wearing a neon vest.

Here's a picture of the zebra costume, with a red cape so that he could be Superhero Zebra (4yos are nothing if not literal) for his third comic con. His stuffed zebra is also wearing a tiny red cape so that they can match! I was dressed as Dark!Rey. 

This past year, he was into the Octonauts for a good deal of it, so he went back and forth between wanting to be Tunip or Kwazii. I was despairing about finding teal or orange pants at the thrift store when he suddenly, in the last month before Halloween, got super into Star Wars, and decided he actually wanted to be Darth Vader. SHB#2 wants to do everything big brother does, so she immediately declared that she, too, would be Darth Vader (despite my best efforts to convince her that she would make an adorable Ewok). SHB#1 then decreed that we should be a Star Wars family, so I had to be Rey and Mr. Cation had to be Luke Skywalker. I can't lie; since Star Wars was one of my first fandoms I was super proud of the kids' geeky decision and secretly thrilled to have an excuse to make all these cool costumes!

Both kids already had black pants, and finding black turtlenecks at the thrift store was easy, so then it was just a matter of figuring out how to make Darth Vader's iconic chest plate, belt and cape. I thought about trying to applique all the pieces onto the turtlenecks, but that sounded like waaaaay too much work, plus I wanted them to be able wear the tops for regular, non-costume things. In the end, I decided to cut all the little buttons and "lights" out of tape and put them on black felt that I had leftover from a school costuming project. Gray duct tape worked for most of the details, and for the red and green bits I just used Sharpie to color over masking tape. After I showed the completed chest box to SHB#2, though, she immediately tried to take off all the "stickers," and I realized I would need to find a way to make them more durable to survive kid handling. I bought some iron-on vinyl and put that over the chest box and belt pieces and it worked perfectly; the tape seemed to really meld into the felt and it was easy to stitch it onto some scraps of black fabric and ribbon in order to allow it to all be tied on. The capes were just half circles cut from stash black jersey knit and sewn on with some elastic to gather the top and allow for easy slipping on over the kids' large heads.


Finished costume, a little worse for wear after being stuffed into a backpack, but still holding up fine! 


On Halloween, with their matching lightsabers. SHB#2 absolutely refused to wear a DV mask. 


Since SHB#1 hadn't specified which version of Luke he wanted Mr. Cation to be, I went with the easiest to put together, the ANH Tatooine Luke. I borrowed a gi top from a friend, and then it was just a matter of wearing his own khaki-colored linen pants and a dark brown leather belt with the buckle turned to the back. I also wrapped some strips of brown linen around his calves to mimic Luke's puttees.

Rey was the last costume to come together, even though I've been working on her the longest. I was originally planning on making her Resistance outfit to Rebel Legion standards, but stalled when I realized how difficult it was going to be to thrift the right fabrics. I'm committed to making my costuming greener where I can, and if that means not being screen accurate, then so be it. Costumes already get so few wears, I'd rather not add to their environmental burden by buying new fabrics for each one. Anyway, a year ago I thrifted some long brown pants; I cut off the bottoms and used those to make the kneepads. The shirt is made from a tea-dyed large white polo shirt, and the belt and wrist cuff were purchased from a seller in the Rey FB group. I found a very 80s grey wool herringbone coat at the thrift store for $10 that I initially thought might work for Rebel Legion approval, but upon closer examination, I realized that it was actually black and white herringbone, which together looked gray from far away. At this point I was too disappointed to continue work on Rey, so I stuffed everything into a garbage bag for a year.

From (a galaxy) far far away, it reads as gray, but up close it's pretty obviously black and white ;__;


A year in a naughty bag gave me time to get over the sting of disappointment, and when I pulled the coat back out, I felt okay about making the vest to complete our family costume. Thankfully, I still had the pattern pieces that I'd drafted and the mockup vest, so after what felt like miles of seam ripping to take apart the coat, I managed to get the pattern pieces to mostly fit.

From my Instastory. See the welt pocket I had to work around on those top pieces?

I ended up using a bunch of the scraps to practice the closed blanket stitch that's used on the edges of Rey's vest.
Why I chose to put in the time for that tedious that detail for a non-RL-approvable vest is beyond me. 


I did have to fudge a little by sewing some buttonholes closed, but it worked out in the end. I lined the inside of the vest with gray cotton flannel, which, with the interfacing that was already fused to the wool, made the vest stiff and heavy enough. I did reinforce the center front edges of the collar with some ironed and stretched horsehair braid, a technique I learned from my evening gown class with Lynda Maynard. After that, it was just a matter of adding the hand-sewn closed blanket stitch to all the edges. That took forever, and I only finished it just before we had to leave for trick or treating!

See that buttonhole I had to sew up right next to the side seam? Also I probably should've done something about the bulk at the shoulder from all the layers of wool+flannel+batting+turned seam allowances, but at that point I no longer cared. 

Look at all that time I spent carefully doing all that ladder-stitching by hand!
Gray flannel lining and wool held together by closed blanket stitches, and also all the whipstitched edges on the shirt.
So. Much. Hand. Sewing.

And here we all are! 


During trick or treating, it was so fun to hear people react to SHB#1's costume -- "Aww, a tiny Darth Vader!" -- and then to hear the even more excited reaction when they saw SHB#2 come up to the doorway right afterward -- "OMG AN EVEN TINIER DARTH VADER!!!" -- because obviously the smaller something is, the cuter, right? Only a couple people realized I was Rey, and not just somebody with somewhat odd clothing choices, but Halloween is really about the kid costumes. I would like to finish making my knock-off Po-Zu Rey boots at some point in the future, but in the meantime I'm just glad I finished this vest so that I could remove at least one UFO from my costume list and make my son happy at the same time.

Then again, maybe his happy face is due to the fact that he just ate a piece of his trick or treating loot. 

Tuesday, December 31, 2019

The Most Extra Lab Garment Ever

Apparently, when you take a non-elective class with the fashion department at Canada College, you are usually required to sew a "lab garment," aka something quick and easy to meet the requirements for lab hours and total number of garments sewn. This was the first time that I've had to do this, because somehow all my previous classes have been electives. The syllabus for my tailoring class said our lab garment should be something that goes with our coat, to make it into a complete outfit, but our professor said it could be anything. Most people made simple tops, some people made dresses from nice, well-behaved cottons, still others made easy gathered skirts from rectangles of fabric. I decided to be extra and make a 1920s-inspired evening gown to go with my coat. Also I was going to draft it myself. And I was going to use velvet. And I was going to add five yards of beaded trim that could only be sewn on by hand. And just to make things extra interesting, I wasn't going to bother making a mock-up; I was just going to just assume my draft was fine and try it on the week it was due, after all the work was finished and everything was pretty much irreversible. Maybe it's just as well my actual tailored coat was so simple.


In my quest to only sew my stash or secondhand fabrics, I already knew I was going to use this wine-colored stretch velvet leftover from costuming An Actor's Nightmare. I also had this lovely dark brown beaded and sequinned trim that I got seven years ago at the FIDM scholarship store, back when I still lived in The City of Culver City. I'd been saving it for a suitably glamorous project, and there was definitely no way I was going to do my own beading for a 1920s-esque evening gown, so it was the perfect time to use it.


I've used the armscye shapes from this dress before for my Anna May Wong dress. 

For my pattern, I started by looking at the shapes of pattern pieces from period publications, as well as the ones from Janet Arnold's Patterns of Fashion 2, and then sketching out similar shapes in my size as best as I could based on my measurements. Then I just made a V-neck in front and cut the back piece down the middle and folded some of it back to make the very low-cut V. For the skirt, I was pretty limited by what I could fit onto the remaining yardage, so they were just four vaguely A-line pieces, with more fullness on the back pieces. Because of the shapes of my remnants, I had to cut it with the nap going up instead of down, but I actually like how it looks richer and more luxurious that way.


You can see how tricky it was to fit my pattern pieces onto my remnants. I originally planned to have the deeper V on the front and the back to be cut on the fold with a scoop neck, but I couldn't fit that onto my fabric. I actually like my final arrangement better, since it allowed for fun back details. Also, laying out shifty fabric with both a cat and a toddler around is an exercise in patience.  


After attaching the pieces at the center front and shoulders, I cut facing pieces out of the stretchy black net remnants from my Ursula skirt, then proceeded to brace myself for many, many hours of hand-sewing on the beaded trim and tacking down the facings. Thankfully, Disney+ had just come out so I went through The Princess and the Frog, Cinderella, Sleeping Beauty, The Little Mermaid, and Mulan while sewing. I sewed the trim on the top first, then attached the skirt and added the waist trim and and skirt front trim. The hem is left raw, since with my limited fabric I didn't want to lose any length (that also gave me the excuse to not have to figure out how to hem the velvet without sacrificing its slinky movement...pretty sure I would've had to do more hand stitching to avoid a visible hem line).

Blurry nighttime shot of my facings pinned into place. 

Because the deep V of the back meant that the straps would try to fall off my shoulders, I wanted to add a T-shaped decorative something to help hold everything in place, like in this vintage dress. Fortunately, I was able to find these brownish necklaces at Joann's that were a perfect match for the beaded trim, so I rigged up two of them to make the back detail. Of course, the cut of the back and slit in the center front of the skirt meant that I had to wear this over a slip. I had grand plans to try making a bias-cut slip from some cotton sateen, but of course didn't have time. Instead, while thrifting for my school's drama production, I found a brown slip that matched nicely and was a good length. I do need to adjust the strap placement a bit, but otherwise it was a perfectly fortuitous find.

Oops, the tag on the slip is showing and it looks like it may have gotten twisted around a little bit, but you get the picture. 
A closer look at the beaded necklace detail on the back, and you can see where my invisible hand-picked facing isn't really that invisible around the armscye...


Summary:
Pattern: Loosely based on vintage garment shapes, but drafted for my measurements
Fabric: Weirdly shaped remnants of wine-colored 4-way stretch velvet that was originally 58" wide and 5 yards long, but had large sections cut out of it for a 1930s-ish evening gown; bits of black stretch net for the facings
Notions: 5 yards of 1.5" wide brown beaded and sequined trim
Total cost: Since the fabrics were all purchased for other projects, I'm counting them as essentially free. The trim was $1/yard, the necklaces were $15, and the slip was $8, so the whole fancy outfit was less than $30!
Would you make this again? Well, I do have a lot of beaded trim in champagne that I bought at the same time...but I think I would probably make a different look. As it is, I've realized that the shoulder straps are, sadly, a little bit too long for me. It's fine and wearable now, but it would be perfect if I could just pinch out half an inch at the shoulder seams. *cue tears* because of course all my trim is already sewn down. I doubt I'll ever bother with fixing it on this dress, but at least now I know if I ever want to use this draft again as a basis for another 1920s dress.
First worn: Again, just to class for pictures, but I'm hoping that now that we're entering the Roaring Twenties again, my life will suddenly, miraculously be filled with Gatsby-themed events to which I can wear this. *insert laugh-crying emoji here*
Final thoughts: I really seem to have a thing for making fancy dresses that I have nowhere to wear to, don't I? It's hard when I really like making pretty things but my life is really more about milk spills and cleaning up poop and putting away chemicals. But if I'm ever invited to a 1920s weekend extravaganza that requires multiple fancy dresses, I'll be all set!


Although when I think about it, I started making my fancy gentleman pirate outfit three years before I had an event to wear it to, or my Galadriel gown four years before reworking the sleeves for the LOTR symphony, so maybe in 2024 I'll wear this to the Costume College Gala or something...